All those bleed screws down there

BX Tech talk
Post Reply
User avatar
TB2
BXpert
Posts: 320
Joined: Sat Apr 28, 2007 3:31 pm
Location: Switzerland
x 1

All those bleed screws down there

Post by TB2 »

Hello,

So I fail again...

I bought all the neccessary parts and already changed one roller, the diesel filter and the HP belt. Now I actually wanted to change the water pump, but I can't figure out how to drain the cooling system. And the handbook seems to be for a different engine. It says that "the radiator acts as a reservoir" and on the picture below you can see the filler cap (14) in the lower left segment of the diagram:

Image

But I do have a big brownish reservoir and no filler cap on the radiator as seen on the following picture:

Image

The bleed screws are supposed to be "on the cylinder block" and "below the radiator". Well I found some sort of plastic switch with a little hole on the bottom right side of the radiator (standing in front of the vehicle), but it can only be turned 90° and nothing happens. A similar switch can be found on top of the radiator, but even turning both doesn't show any effect.

Image

Image

Then there's this white plug on the bottom side of the gearbox (I think),...

Image

...two identical screws directly on the engine block....

Image

... and this little cap somewhere under the radiator:

Image

I guess the two screws on the engine block are the ones to drain the engine oil and I think the those two hoses with the little cap are part of the air conditioning. The white plug, is it used to drain the gearbox fluid?

Talking about the cylinder block, the handbook points to this thing, which I don't know about what it does:

Image

Apparently I should unscrew the screws (2) and (3) on the diagram but I can't really find them, or at most I can find one (the one nearest to the intercooler).

Could anyone point me out to what all those screws and plugs are doing or how I could drain the cooling system properly?

Thanks a lot!
Carl

1989 TRD "Entreprise" Turbo Diesel
1989 16 Valve
---
Parts needed:
- One black leather headrest.
- FDV overhaul kit (95.669.034)
Please contact me through PN if you have any of this.
User avatar
AndersDK
BXpert
Posts: 537
Joined: Sat Jul 23, 2005 4:41 pm
Location: Denmark West
x 1

Post by AndersDK »

Well yes - quite confusing if you dont know the secrets :lol:

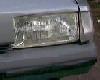
First off : the handbook diagram shows a standard (non-turbo) diesel. This is quite different from your turbo diesel engine with the intercooler laying flat upon the engine top.
In principle - yes these 2 engine types are similar, but realities are lots & lots of largr and minr differences.
Hence the mis-leading handbook description.

This is however very common to any car handbook you get hold of - unless it stricltly coversr the precise model & engine variant you have.
Add to this the on-going modfiicatons on the factory to the car - after the handbook is printed.

A) you found your coolant expansion bottle allright where you top up the coolant if necessary

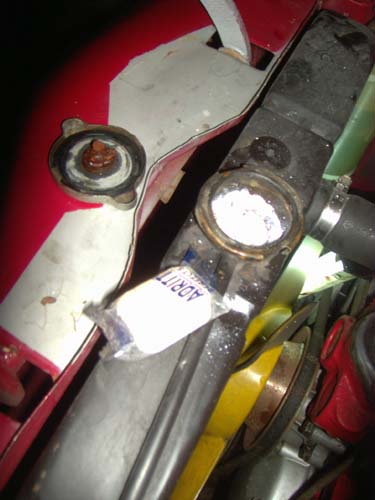
B) the 2 pictures from the radiator with "bleed" screws - they are in fact bleed screws. They twist out readily with handforce only, but might of course bind a bit from longterm closing. They only need 1-1.5 turn to come out and they have a simple rubber O-ring for sealing.

C) the white plug on bottom of the gearbox is simply a blind (welsh) plug sealing off a non used hole for the clutch atuator rod.
It may actually be a protector cap for the end of the rod if fitted.
Ths is because the same gearbox comes with 2 dofferent types of clutch actuator arm depending on factory production runs.
Meaning : dont touch this plug as it will not drain any fluid.

D) 2 identical plugs on engine block ? Hmm. Cant recognise these from my own turbo diesel. I may never have noticed them, but they are certainly not intended for use in any regular service work. Likely they are blinded off drilling ways from production. Either for coolant or oil ways.

E) "and ths little cap under the radiator" - is a NO-NO-NO :shock:
Dont touch.
This is the aircon system filler plug.

F) "Talking about the cylinder block, the handbook points to this thing, which I don't know about what it does: "
If you mean the light alloy thingie with a few rubber coolant hoses conected - then it is the thermostat housing.
Exactly in center of the picture - right above the stud where the small elbw connects - there is Hex-insex screw with an ever so small copper washer under it. This is the coolant air bleeder for the highest pont on the engine.
Be very patient wih this screw as it may snap the moment you apply forces to it :cry:
Use a small hammer and tap the screwhead several times trying to dislodge it from any corrosion. The use a hexkey to unwind it. Lube the threads with copper or alu non-stick paste.

To drain the cooling system "properly" you remove the plastic bleeders from the radiator, the cap from the expansion bottle and the screw mentioned above.
You may have a similar hex-screw behind the cylinder head, accessible when you unclip the frame with rubber from the intercooler.
This frame is just a pressfit down onto the intercooler.

There is no other "roper" way f draining- except it wil be advantageous to unclip the large top & botto hoses hoses from the rad.
This makes it very easy flushing both engine and rad- both reverse and forward flushing - using a garden hose.
If you want a cleaner cooling system - then use one of the prooven coolant cleaners available from car-shops.
Or purchase a large botte of 2.5L vinegar and pour into the cooling system - top up with clean tap water - and run for 3-5 weeks.
Cheap, safe and a very good smelling indicator of any leaks :lol:
C U / Anders - '90red16riBreak - '91GrisDolment16meteor - Project'88red19trsBreak
dead cars : '89white 16RS - '89antrasitTRDturboEst - '90white19triBreak
User avatar
TB2
BXpert
Posts: 320
Joined: Sat Apr 28, 2007 3:31 pm
Location: Switzerland
x 1

Post by TB2 »

Thanks Anders!

The handbook isn't worth much anyways. Only handdrawn pictures and a really old-school layout. It doesn't have an index and I've never seen so many typos in a released book. Not that typos matter in any way. This handbook is specifically for the BX TD from 87-92. Well, doesn't matter...

I hope I will manage to drain the system on sunday.

So those two identical screws are not the ones used when draining the engine oil? I'm used to that from other engines, at least they usually have 1 screw down there for that.

I've once seen someone pour dishwashing tabs into his cooling system:

Image
Carl

1989 TRD "Entreprise" Turbo Diesel
1989 16 Valve
---
Parts needed:
- One black leather headrest.
- FDV overhaul kit (95.669.034)
Please contact me through PN if you have any of this.
User avatar
mat_fenwick
Moderator
Posts: 7326
Joined: Tue Sep 20, 2005 4:08 pm
Location: North Wales
x 19

Post by mat_fenwick »

[quote="TB2"]So those two identical screws are not the ones used when draining the engine oil?[quote]

I think that they are actually on the sump, not the block (I know that English isn't your first language so I'm not being critical). Are they on the very bottom of the engine where the oil drains to?
I have a BX with A/C, with an aluminium sump, and I had 2 screws that looked identical to that. The higher one of the 2 I replaced with an oil temperature sensor, and the lower one I use to drain the engine oil.
I have a diagram of the cooling system for a turbo diesel, but unfortunately no working scanner. I will try and photograph the diagram, and post it here if it is any good. It may differ slightly, but will be closer than the non turbo diagram!
Image

1993 1.9 TZD Turbo Estate
1996 3.9 V8 Discovery
1993 VW LT35 campervan
1985 Hyundai Stellar V8
2016 Hyundai iLoad
User avatar
TB2
BXpert
Posts: 320
Joined: Sat Apr 28, 2007 3:31 pm
Location: Switzerland
x 1

Post by TB2 »

Hello Mat,

Thanks for your understanding regarding my English skills ;)

*looks up "sump" in a dictionary - So what people refer to as the cylinder "block" is only the upper part then.

Yes, both screws are on the very bottom of the engine. I suspect they can be used to drain the oil.

Thanks for your offer to post the diagram you have. I will try if I manage to drain the system tomorrow. I guess I', also going to disconnect the hoses on the radiator.
Carl

1989 TRD "Entreprise" Turbo Diesel
1989 16 Valve
---
Parts needed:
- One black leather headrest.
- FDV overhaul kit (95.669.034)
Please contact me through PN if you have any of this.
User avatar
mat_fenwick
Moderator
Posts: 7326
Joined: Tue Sep 20, 2005 4:08 pm
Location: North Wales
x 19

Post by mat_fenwick »

The lower screw is the drain plug, the other is a blanking plug for the oil temperature sensor fitted to the 16v (and GTi?). I guess it was a cost saving to drill all the aluminium sumps the same way and just blank the hole off if not required (i.e. on your turbodiesel).

Anyway, here is the diagram. Sorry for the poor quality, I have left the image at its full resolution to try and make it as clear as possible.
Image
Image

1993 1.9 TZD Turbo Estate
1996 3.9 V8 Discovery
1993 VW LT35 campervan
1985 Hyundai Stellar V8
2016 Hyundai iLoad
User avatar
TB2
BXpert
Posts: 320
Joined: Sat Apr 28, 2007 3:31 pm
Location: Switzerland
x 1

Post by TB2 »

Thanks Mat.

So, after all this time, I finally finished most of the job. :) I changed the cambelt, HP belt, water pump, idler and tensioner, diesel filter and coolant liquid.
And the engine is still running! What a relief, because I didn't fix the crankshaft in place. I just didn't manage to find that ambigous hole in the flywheel, so I just drew a line with tip-ex on the other flywheel and the surroundings. But the scrankshaft never moved, it held itself in place.

The tensioner is a real pain to change in that narrow place with the plunger constantly falling down.

So the only thing left is changing the oil and oil filter in this run. I wanted to do it right away but apparently citroen decided to use these 4 sided screws which I don't have a tool for. I guess I'll need to get one because nothing would fit really...
Carl

1989 TRD "Entreprise" Turbo Diesel
1989 16 Valve
---
Parts needed:
- One black leather headrest.
- FDV overhaul kit (95.669.034)
Please contact me through PN if you have any of this.
User avatar
mat_fenwick
Moderator
Posts: 7326
Joined: Tue Sep 20, 2005 4:08 pm
Location: North Wales
x 19

Post by mat_fenwick »

Well done! =D> It's a great feeling of satisfaction, knowing that you've done the job well yourself (and saved money!)
Oil and filter change should be a piece of cake now. If you are struggling to get the tool to undo the drain plug have you thought about grinding the end of an allen key until it's square and fits well? Or, can you use the square ned of a ratchet drive? I have on other cars but not on a BX so can't be sure whether it would fit.
Image

1993 1.9 TZD Turbo Estate
1996 3.9 V8 Discovery
1993 VW LT35 campervan
1985 Hyundai Stellar V8
2016 Hyundai iLoad
User avatar
mat_fenwick
Moderator
Posts: 7326
Joined: Tue Sep 20, 2005 4:08 pm
Location: North Wales
x 19

Post by mat_fenwick »

That should read "square end" not "square ned". :oops: Now where is the edit facility when you need it?
Image

1993 1.9 TZD Turbo Estate
1996 3.9 V8 Discovery
1993 VW LT35 campervan
1985 Hyundai Stellar V8
2016 Hyundai iLoad
User avatar
AndersDK
BXpert
Posts: 537
Joined: Sat Jul 23, 2005 4:41 pm
Location: Denmark West
x 1

Post by AndersDK »

mat_fenwick wrote:That should read "square end" not "square ned". :oops: Now where is the edit facility when you need it?
Seems that admin has turned off the EDIT facitlity in general on this forum.
Even moderators cant edit anymore :P

- so now we are caught in the act :lol:
C U / Anders - '90red16riBreak - '91GrisDolment16meteor - Project'88red19trsBreak
dead cars : '89white 16RS - '89antrasitTRDturboEst - '90white19triBreak
User avatar
TB2
BXpert
Posts: 320
Joined: Sat Apr 28, 2007 3:31 pm
Location: Switzerland
x 1

Post by TB2 »

Actually, we have dozens of door knobs lying around and they have these square shafts in between. I mean the part connecting the two knobs of eighter side of a door. Anyways, those fit exactly in the hole on that screw down there. I'm thinking about cutting one knob off and use that as a tool in the future, but that would be kind of a waste. Well, I'll see to it next sunday...
Thanks again for your support.
Carl

1989 TRD "Entreprise" Turbo Diesel
1989 16 Valve
---
Parts needed:
- One black leather headrest.
- FDV overhaul kit (95.669.034)
Please contact me through PN if you have any of this.
User avatar
TB2
BXpert
Posts: 320
Joined: Sat Apr 28, 2007 3:31 pm
Location: Switzerland
x 1

Post by TB2 »

No, can't get it open :?

Failed attempt #1:

Image

Failed attempt #2:

Image

Failed attempt #3:

Image

Failed attempt #4:

Image

The 4 sided shaft from the door handle fits the screw pretty well, but I just can't get it to open... :|

That bolt down there IS the correct one, right? I'm not so sure anymore because it looks like it has never been moved, there's not even the slightest visible gap between the screw and the housing. Here's a picture again:

Image

And with some more context:

Image

How do you ever get these bolts off? I mean an oil change is most likely the most basic job right after changing wheels.... :oops:

Regards,
Carl
Carl

1989 TRD "Entreprise" Turbo Diesel
1989 16 Valve
---
Parts needed:
- One black leather headrest.
- FDV overhaul kit (95.669.034)
Please contact me through PN if you have any of this.
jeremy
Over 2k
Posts: 2112
Joined: Fri Jul 01, 2005 2:58 am
Location: Hampshire UK

Post by jeremy »

In fact you'll find that hexagonal headed drain plugs are available in accessories shops for very little. I bought one with both the hex and socket heads on it - complete with a copper washer.

Often the hex plug is considerably cheaper than the socket type.

The correct key (sorry - don't know its size off hand) can be bought as well. Sets are also available.

http://www.machinemart.co.uk/shop/produ ... ug-key-set

Curiously the ZX 1.9D has a hex plug on the opposite end of the sump from a BX.
User avatar
MULLEY
Over 2k
Posts: 8406
Joined: Thu Jun 22, 2006 11:10 pm
Location: Derbyshire
My Cars: 1999 Xsara LX 2.0HDI (90) Hatch - Fern
2002 C5 2.0 HDI (110) Estate - Jasmine - SORN
2011 Mini Cooper D Clubman - SOLD
2016 Mercedes A180D Sport - Auto refinement
1992 TZD Turbo - Bluebell - SORN
1992 TZD Turbo Estate - SORN
1991 Gti 16V - Blaze - crash damaged, will get repaired - SORN
1990 Gti 8Valve SOLD - looks like it's been scrapped
2002 Mini Cooper S - SOLD - i miss this car
1992 TXD - Scrapped in March 2014
1988 CX 25 GTI Turbo2 - SORN
1996 - AX Memphis 1.5D - Dream - SORN
x 8

Post by MULLEY »

Carl, that picture where the drain plug should be looks a bit odd to me, my cars only have 1 plug & its placement on the sump is different as well. Perhaps the more learned can share some light why there are 2 plugs??

Once you have the correct drain plug key it/they should come off without too much bother. It may have been tightened up very tight so might prove quite hard to get off, try the usual spraying with wd40 & letting it soak in. I use a ratchet drive with the key to get mine off, that should give you the necessary leverage to get it off.

If all the above fails, try shocking the drain plug with a hammer, dont hit it mega hard as that might damage the sump. Then get the key in attached to the ratchet drive, & use the hammer to hit the end of the ratchet drive arm to give it that initial shock to get it moving.

Dont forget to replace the copper washer with a new one, as i guarantee the old one will be flat as a pancake, it will look like a normal washer rather than how a new one looks, they are fatter & rounded in shape.

Good luck, if i can do it, so can you :)
2002 C5 2.0 HDI Estate - Jasmine - Now SORN
2011 Mini Cooper D Clubman - SOLD
2016 Mercedes A180D Sport - Auto refinement
1992 TZD Turbo - Bluebell - My daily
1991 Gti 16V - Blaze - crash damaged, will get repaired.
1990 Gti 8Valve SOLD - looks like it's been scrapped
2002 Mini Cooper S - SOLD - i miss this car
1992 TXD - Scrapped in March 2014
1988 CX 25 GTI Turbo2 - SORN
1996 - AX Memphis 1.5D - Dream - SORN

I'm not just a username, i'm also called Matthew.
User avatar
mat_fenwick
Moderator
Posts: 7326
Joined: Tue Sep 20, 2005 4:08 pm
Location: North Wales
x 19

Post by mat_fenwick »

mat_fenwick wrote:The lower screw is the drain plug, the other is a blanking plug for the oil temperature sensor fitted to the 16v (and GTi?). I guess it was a cost saving to drill all the aluminium sumps the same way and just blank the hole off if not required (i.e. on your turbodiesel).
The aluminium sumps (for A/C cars) have the plugs on the rear for some reason - I noticed from one of Carl's pictures that he had the A/C compressor. The non A/C 16v (and GTI I think) have the higher of the 2 holes for the oil temperature sensor on their steel sumps, with the drain plug in the usual location underneath.

I'm not wanting to be critical or pedantic here, but it might be kinder not to use a ratchet for the initial undoing of very tight bolts, as it doesn't too the pawls within much good. (I have learnt the hard way and had one fail sending my knuckles into the side of a gearbox!)

But yes, if you can use a hammer to shock it undone that will help.
Image

1993 1.9 TZD Turbo Estate
1996 3.9 V8 Discovery
1993 VW LT35 campervan
1985 Hyundai Stellar V8
2016 Hyundai iLoad
Post Reply