How To Guide: Rear Wiper Timer on a Hatch
- BX Bandit
- Backslash Bandit
- Posts: 2588
- Joined: Thu Aug 31, 2006 7:46 am
- Location: Home
- My Cars: Cars
- x 3
How To Guide: Rear Wiper Timer on a Hatch
Switch not needed, but I do need the connector block that err connects on the switch with a good 6" of the wires if not more.
Last edited by BX Bandit on Thu Mar 07, 2013 10:06 am, edited 1 time in total.
1990 BX 16V Platinum Grey
1990 BX TGD White
1960 Morris Minor Clarondon Grey
1971 Triumph 2000 Auto Valencia Blue
1990 BX TGD White
1960 Morris Minor Clarondon Grey
1971 Triumph 2000 Auto Valencia Blue
- Vanny
- Merseyside resident
- Posts: 3586
- Joined: Tue May 17, 2005 11:48 pm
- Location: BXProject
- My Cars: BX 16v Ph2 - Jazz
BX 16v Ph2 - XPO - x 85
- Contact:
Re: Wanted: Estate Rear Wiper Switch Connector block
I thought the connector bit was the same for both estate and none, but has pins in different places? In which case you can use the pins (and a bit of wire) from many other connectors as they are common across much of the car. Might be worth a look?
-
KevR
- 1K Away
- Posts: 1767
- Joined: Mon Apr 12, 2010 8:46 pm
- Location: Normandy
- My Cars: It's all in my signature
- x 4
Re: Wanted: Estate Rear Wiper Switch Connector block
I believe the wiring/switches/connectors may be different between earlier Mk2s and later. When I converted my 1987 TRS to TD using bits from a 1990 model, the wiring was very different and I seem to remember the switches weren't compatible.
<Edit> Although having said that, the TRS was an estate and the TD was a hatch so maybe that's why I got confused, Ignore me.
<Edit> Although having said that, the TRS was an estate and the TD was a hatch so maybe that's why I got confused, Ignore me.
1990 BX TZD Estate ('the grey one', 1991 BX TZD Estate ('the white one'), 1982 2CV6 Charleston (in bits), 1972 AZU Serie B (2CV van), 1974 HY72 Camper, 1990 Land Rover 110 diesel LWB, 1957 Mobylette AV76, 1992 Ducati 400SS, 1966 VW Beetle, 1990 Mazda MX-5, 1996 Peugeot 106D, 1974 JCB 2D MkII, 1997 BMW R1100RS, 1987 Suzuki GSX-R1100, 1978 Honda CX500A, 1965 Motobecane Cady, 1988 Honda Bros/Africa Twin, 1963 Massey Ferguson 825, and a lot of bicycles!
- BX Bandit
- Backslash Bandit
- Posts: 2588
- Joined: Thu Aug 31, 2006 7:46 am
- Location: Home
- My Cars: Cars
- x 3
Re: Wanted: Estate Rear Wiper Switch Connector block
/\ That's basically my point in a way Kev. I want to convert my hatch rear wiper to an estate version, for which you deffo need a different switch and I think connector block although Vanny could have a point that the connector block physically fits but I need to play about with the pins/wiring to get it to behave as an estate one.
1990 BX 16V Platinum Grey
1990 BX TGD White
1960 Morris Minor Clarondon Grey
1971 Triumph 2000 Auto Valencia Blue
1990 BX TGD White
1960 Morris Minor Clarondon Grey
1971 Triumph 2000 Auto Valencia Blue
- BX Bandit
- Backslash Bandit
- Posts: 2588
- Joined: Thu Aug 31, 2006 7:46 am
- Location: Home
- My Cars: Cars
- x 3
Re: Wanted: Estate Rear Wiper Switch Connector block

The switch on the left is the hatch one (7 connections), the one on the right is for an estate (5 connections).
Looks like Vanny is right, and just a few spade terminals need to swapped about.
Why is there 7 on a hatch though and 5 on an estate?
1990 BX 16V Platinum Grey
1990 BX TGD White
1960 Morris Minor Clarondon Grey
1971 Triumph 2000 Auto Valencia Blue
1990 BX TGD White
1960 Morris Minor Clarondon Grey
1971 Triumph 2000 Auto Valencia Blue
- Vanny
- Merseyside resident
- Posts: 3586
- Joined: Tue May 17, 2005 11:48 pm
- Location: BXProject
- My Cars: BX 16v Ph2 - Jazz
BX 16v Ph2 - XPO - x 85
- Contact:
Re: Wanted: Estate Rear Wiper Switch Connector block
I've never managed to figure it out as there are no available ESTATE wiring diagrams showing the different pin outs for the estate switch. I have a brand new (latching) switch but no inclination to reverse engineer a wiring diagram and fit it as yet.
Will be interesting to see how you get on!
Will be interesting to see how you get on!
- BX Bandit
- Backslash Bandit
- Posts: 2588
- Joined: Thu Aug 31, 2006 7:46 am
- Location: Home
- My Cars: Cars
- x 3
Re: Wanted: Estate Rear Wiper Switch Connector block
Pretty sure there is one in those big red Citroen folders I have borrowed from Jay. I just need to scan and post it
1990 BX 16V Platinum Grey
1990 BX TGD White
1960 Morris Minor Clarondon Grey
1971 Triumph 2000 Auto Valencia Blue
1990 BX TGD White
1960 Morris Minor Clarondon Grey
1971 Triumph 2000 Auto Valencia Blue
- Vanny
- Merseyside resident
- Posts: 3586
- Joined: Tue May 17, 2005 11:48 pm
- Location: BXProject
- My Cars: BX 16v Ph2 - Jazz
BX 16v Ph2 - XPO - x 85
- Contact:
Re: Wanted: Estate Rear Wiper Switch Connector block
really? Must have missed it, i've got 9 of them here and never noticed an estate one, hmmm should probably look again at some point.
- BX Bandit
- Backslash Bandit
- Posts: 2588
- Joined: Thu Aug 31, 2006 7:46 am
- Location: Home
- My Cars: Cars
- x 3
Re: Wanted: Estate Rear Wiper Switch Connector block
Right here goes. Most of the wiring diagrams were Mk 1, which IIRC, had a timer for the rear screen as standard for the hatch?
Well anyway, I found a wiring diagram for a Mk 2 with a rear screen wipe timer. Be it estate or hatch I don't know, but it has what we're looking for (I think)
551 is the switch
766 is the timer
681 is the rear wash motor
601 is the rear wiper motor

BX Rear Wash Wipe Intermittent Timer by Neil Pye, on Flickr
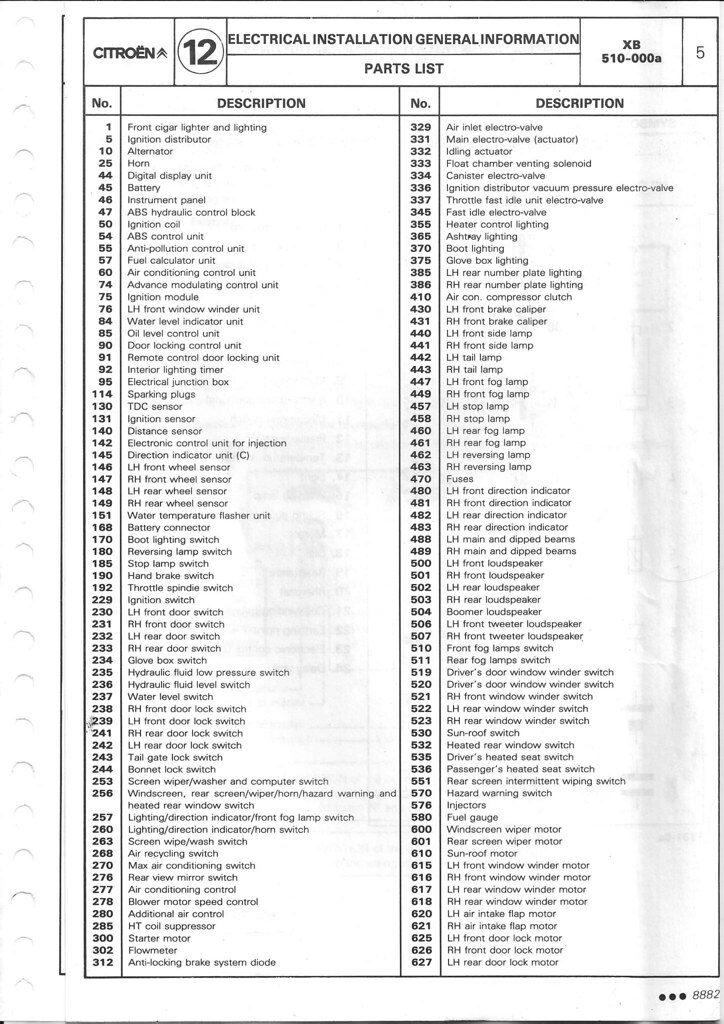
BX Electrical Wiring Diagram Legend page 1 by Neil Pye, on Flickr
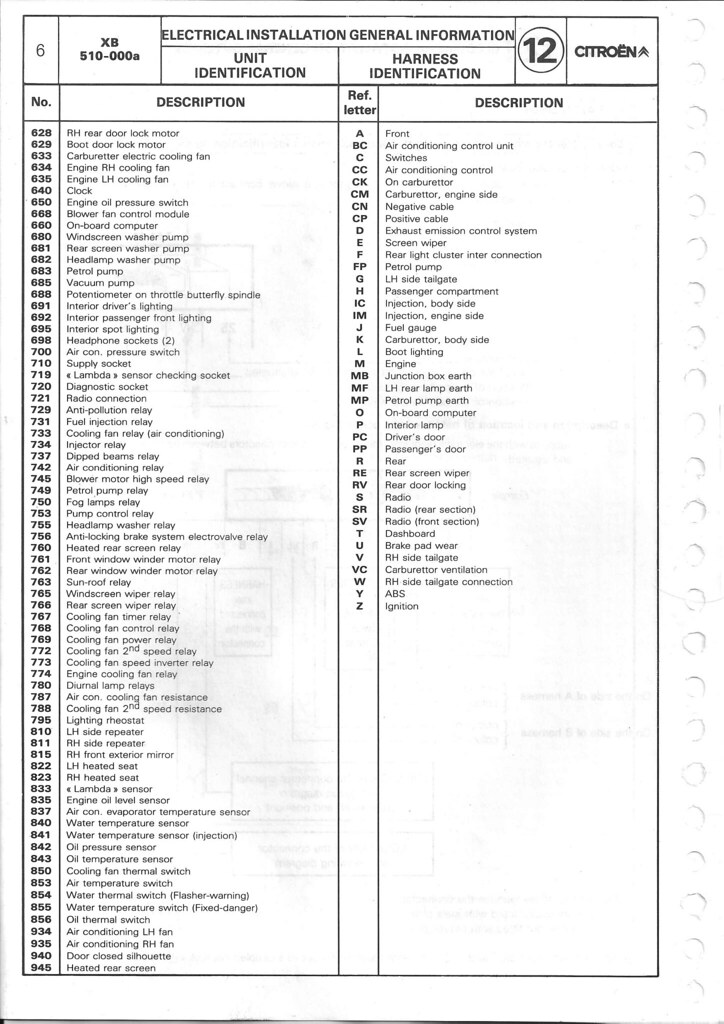
BX Electrical Wiring Diagram Legend page 2 by Neil Pye, on Flickr
Annoyingly I can't find the wiring diagram for our hatchbacks (unless the HBOL has it - will check)
Well anyway, I found a wiring diagram for a Mk 2 with a rear screen wipe timer. Be it estate or hatch I don't know, but it has what we're looking for (I think)
551 is the switch
766 is the timer
681 is the rear wash motor
601 is the rear wiper motor

BX Rear Wash Wipe Intermittent Timer by Neil Pye, on Flickr

BX Electrical Wiring Diagram Legend page 1 by Neil Pye, on Flickr

BX Electrical Wiring Diagram Legend page 2 by Neil Pye, on Flickr
Annoyingly I can't find the wiring diagram for our hatchbacks (unless the HBOL has it - will check)
1990 BX 16V Platinum Grey
1990 BX TGD White
1960 Morris Minor Clarondon Grey
1971 Triumph 2000 Auto Valencia Blue
1990 BX TGD White
1960 Morris Minor Clarondon Grey
1971 Triumph 2000 Auto Valencia Blue
- BX Bandit
- Backslash Bandit
- Posts: 2588
- Joined: Thu Aug 31, 2006 7:46 am
- Location: Home
- My Cars: Cars
- x 3
Re: Wanted: Estate Rear Wiper Switch Connector block
Here is one from Haynes. It actually lists this as a 1.4 model. I suspect Cit deleted the intermittent option to save the £££ or rather the FrFrFr.
Also, even though there are 7 pins on the Hatch switch, 2 are common, so there are only 6 wires.
Facing the connector block as it actually is in the car (i.e. wires going away from you) then the pin numbers are arranged like this:
Grey with Red 1 2 Grey with White
Green with Purple 3 7 Green
Brown 8 4 Grey
No Terminal 5 6 Terminal Not Used
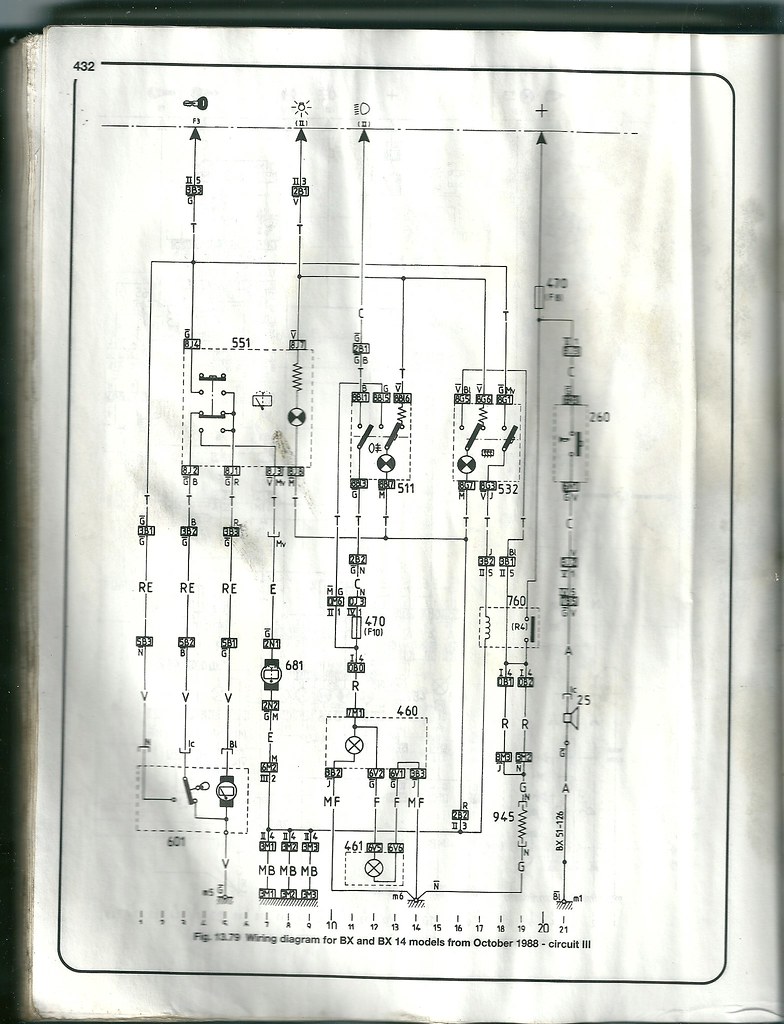
BX Hatch Rear Wash Wipe Non Intermittent by Neil Pye, on Flickr
Also, even though there are 7 pins on the Hatch switch, 2 are common, so there are only 6 wires.
Facing the connector block as it actually is in the car (i.e. wires going away from you) then the pin numbers are arranged like this:
Grey with Red 1 2 Grey with White
Green with Purple 3 7 Green
Brown 8 4 Grey
No Terminal 5 6 Terminal Not Used

BX Hatch Rear Wash Wipe Non Intermittent by Neil Pye, on Flickr
1990 BX 16V Platinum Grey
1990 BX TGD White
1960 Morris Minor Clarondon Grey
1971 Triumph 2000 Auto Valencia Blue
1990 BX TGD White
1960 Morris Minor Clarondon Grey
1971 Triumph 2000 Auto Valencia Blue
- BX Bandit
- Backslash Bandit
- Posts: 2588
- Joined: Thu Aug 31, 2006 7:46 am
- Location: Home
- My Cars: Cars
- x 3
Re: Wanted: Estate Rear Wiper Switch Connector block
So this is how you can do it.
Access to dash pod to remove rear wiper switch
Access to rear wiper motor - requires removing one plastic panel
Recommend using a Xantia rear wiper intermittent relay complete with it's mini wiring loom to hold relay and poka-yoke connections.
You'll need a 20mm (i think) socket, 13mm spanner/socket, a 10mm spanner/socket, a 6mm spanner/socket, a crimping tool, wire cutters, wire strippers, various crimp connectors (or solder them and heat shrink), a soldering iron + associated parafanlia, a BX Estate rear wiper switch (different from hatch switch)
Begin by extracting the rear wiper switch from your console and separate the switch from the connector block.
The hatch and estate switches have different connection profiles, so, working on the loom, you need to move the connectors to different positions within the connector block.
Gently open the sides of the connector block
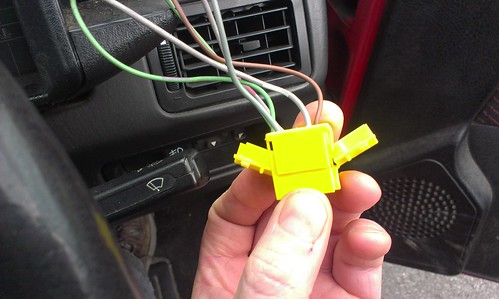
IMAG0224 by Neil Pye, on Flickr
Insert a watchmakers screw driver gently between the 'thicker folded' part of the contact and the plastic. The connectors can be removed quite easily, don't pull hard.

IMAG0225 by Neil Pye, on Flickr
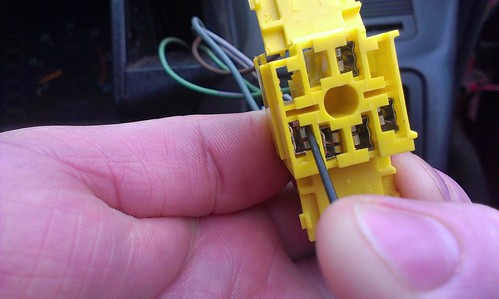
IMAG0001 by Neil Pye, on Flickr
The following is the transfer of pin positions within the hatchback connector block. Pin position numbers are marked on the plastic of the connector block
Pin 1 (Grey with Red) moves to Position 5. This is now the Intermittent Relay ON feed.
Pin 2 Splice into wire of pin 3 and move to Position 7.
Pin 3 (Green with Purple) moves to Position 7 and is both the rear Wash and a 'intermittent by-pass' to keep wiping whilst washing
Pin 4 (Grey) moves to Position 1. This is the ignition switched +12v supply
Pin 5 -
Pin 6 -
Pin 7 (Green) moves to Position 8. This is the Wash/Wipe switch illumination for head lights on/night driving
Pin 8 (Brown) moves to Position 4. This is an Earth for the switch illumination.
Do the pin swapping in the following order though, then you'll only have one wire out at a time:
Pin 1 - Pos 5
Pin 4 - Pos 1
Pin 8 - Pos 4
Pin 7 - Pos 8
Pin 2 - (Splice with Pin 3) and move to Pos 7
Pin 3 - Pos 7 (spliced with above)
Once you've done the switch work, you need the intermittent timer realy. Mine came off my Xantia and was fitted on the rear wiper mechanism itself. So for time being, we'll assume that's the best place to put it.
So, the Intermittent Relay or IR for short, (item 766 on the electrical drawing) has 6 connections.
Pin 1 on the IR is the Intermittent Relay On. The feed to pin 1 comes from the Blue connector (listed as Bl on the diagram). (Position 5, bottom left hand corner on the diagram.) (Also shown as 5B1 but that connector is not local to the rear wiper motor.) Separate the connector and feed the 'car side' terminal (the one that disappears into the hatch lid/car) into Pin 1 on IR.
Connect Pin 2 of the IR onto the 'wiper motor side' of the corresponding Blue/Bl connector (the one that feeds into the wiper motor itself). This is the pulsed output to the wiper motor.
Connect Pin 4 of the IR to an earth. There is one on the motor.
Separate the Transparent/Ic (position 3, bottom left hand corner on the diagram).connector to the rear wiper motor (this looked white to me). Feed the 'car side' to Pin 6 of the IR. Pin 6 on the IR is the wash trigger, to maintain continuous wiping while washing. (This is the wire you spliced earlier.)
Connect Pin 5 of the IR to the corresponding Transparent/Ic connector (wiper motor side).
Finally, the Black (N) (Position 1, bottom left hand corner on the diagram) connector needs to be spliced to feed both pin 8 on the IR and the motor itself. This is the 'wiper park' signalling.
The combination & size of male/female connectors on the wiper motor feed makes direct connection to the IR (or mine at least) all but impossible. i.e. not a plug and play setup. Plus, you need to make up some connectors to go from the IR to the motor.
The donor IR from my Xantia was mounted on the rear wiper assembly, on to it's own connector block, with two pairs of housed male spade connectors. I decided to use these connecting blocks, as it makes connecting both the IR and the unit itself simpler. It involves a bit of de-soldering and soldering but it's worth it.
Here is the original wiring to the BX motor. Note the Transparent (white?), Blue and Black connectors in the top right, those connect to the loom in the hatch lid.
White is the motor feed
Black is earth
Grey & Blue are 'wiper park'

IMAG0226 by Neil Pye, on Flickr
I de-soldered the BX wires (keep them as you'll need them in a bit) and then soldered on the Xantia wires. Same colour wires except the blue is now a red.
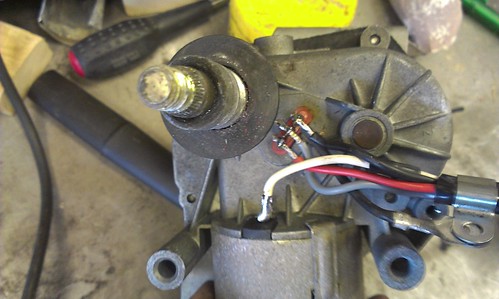
IMAG0001 by Neil Pye, on Flickr
The Xantia 'mini' loom consisted of the two pairs of housed male spade connectors - Yellow and Red blocks.
I managed to find two mating connector blocks in my heap of spares - the yellow and brown connector blocks
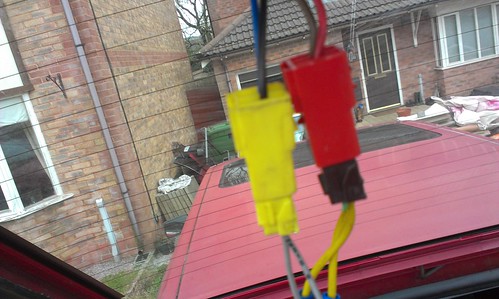
IMAG0228 by Neil Pye, on Flickr
and the IR holder
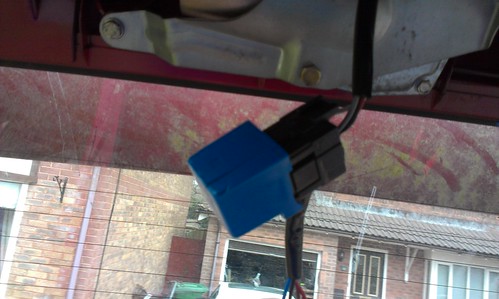
IMAG0227 by Neil Pye, on Flickr
I then crimped the corresponding wires into the original wires de-soldered from the BX wiper motor.7
Note the earth ring to the left of the crimps.
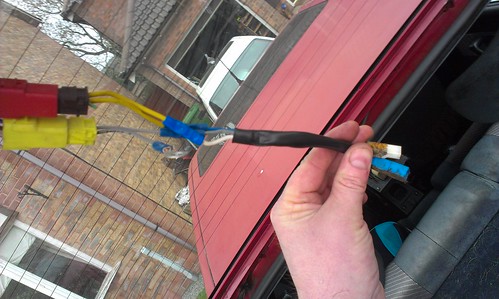
IMAG0229 by Neil Pye, on Flickr
And there it is all connected. It needs tidying up a bit with cable ties and securing properly.
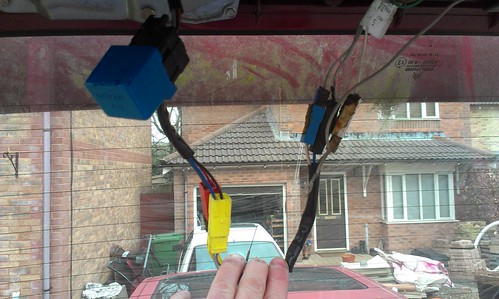
IMAG0230 by Neil Pye, on Flickr
Hey presto! I'm also going to wire up an 'auto-rear-wipe-when-reverse-is-selected-if-front-wipers-are-on' which shouldn't be difficult but I've not thought about it yet!
Any suggestions/comments welcome
Access to dash pod to remove rear wiper switch
Access to rear wiper motor - requires removing one plastic panel
Recommend using a Xantia rear wiper intermittent relay complete with it's mini wiring loom to hold relay and poka-yoke connections.
You'll need a 20mm (i think) socket, 13mm spanner/socket, a 10mm spanner/socket, a 6mm spanner/socket, a crimping tool, wire cutters, wire strippers, various crimp connectors (or solder them and heat shrink), a soldering iron + associated parafanlia, a BX Estate rear wiper switch (different from hatch switch)
Begin by extracting the rear wiper switch from your console and separate the switch from the connector block.
The hatch and estate switches have different connection profiles, so, working on the loom, you need to move the connectors to different positions within the connector block.
Gently open the sides of the connector block

IMAG0224 by Neil Pye, on Flickr
Insert a watchmakers screw driver gently between the 'thicker folded' part of the contact and the plastic. The connectors can be removed quite easily, don't pull hard.

IMAG0225 by Neil Pye, on Flickr

IMAG0001 by Neil Pye, on Flickr
The following is the transfer of pin positions within the hatchback connector block. Pin position numbers are marked on the plastic of the connector block
Pin 1 (Grey with Red) moves to Position 5. This is now the Intermittent Relay ON feed.
Pin 2 Splice into wire of pin 3 and move to Position 7.
Pin 3 (Green with Purple) moves to Position 7 and is both the rear Wash and a 'intermittent by-pass' to keep wiping whilst washing
Pin 4 (Grey) moves to Position 1. This is the ignition switched +12v supply
Pin 5 -
Pin 6 -
Pin 7 (Green) moves to Position 8. This is the Wash/Wipe switch illumination for head lights on/night driving
Pin 8 (Brown) moves to Position 4. This is an Earth for the switch illumination.
Do the pin swapping in the following order though, then you'll only have one wire out at a time:
Pin 1 - Pos 5
Pin 4 - Pos 1
Pin 8 - Pos 4
Pin 7 - Pos 8
Pin 2 - (Splice with Pin 3) and move to Pos 7
Pin 3 - Pos 7 (spliced with above)
Once you've done the switch work, you need the intermittent timer realy. Mine came off my Xantia and was fitted on the rear wiper mechanism itself. So for time being, we'll assume that's the best place to put it.
So, the Intermittent Relay or IR for short, (item 766 on the electrical drawing) has 6 connections.
Pin 1 on the IR is the Intermittent Relay On. The feed to pin 1 comes from the Blue connector (listed as Bl on the diagram). (Position 5, bottom left hand corner on the diagram.) (Also shown as 5B1 but that connector is not local to the rear wiper motor.) Separate the connector and feed the 'car side' terminal (the one that disappears into the hatch lid/car) into Pin 1 on IR.
Connect Pin 2 of the IR onto the 'wiper motor side' of the corresponding Blue/Bl connector (the one that feeds into the wiper motor itself). This is the pulsed output to the wiper motor.
Connect Pin 4 of the IR to an earth. There is one on the motor.
Separate the Transparent/Ic (position 3, bottom left hand corner on the diagram).connector to the rear wiper motor (this looked white to me). Feed the 'car side' to Pin 6 of the IR. Pin 6 on the IR is the wash trigger, to maintain continuous wiping while washing. (This is the wire you spliced earlier.)
Connect Pin 5 of the IR to the corresponding Transparent/Ic connector (wiper motor side).
Finally, the Black (N) (Position 1, bottom left hand corner on the diagram) connector needs to be spliced to feed both pin 8 on the IR and the motor itself. This is the 'wiper park' signalling.
The combination & size of male/female connectors on the wiper motor feed makes direct connection to the IR (or mine at least) all but impossible. i.e. not a plug and play setup. Plus, you need to make up some connectors to go from the IR to the motor.
The donor IR from my Xantia was mounted on the rear wiper assembly, on to it's own connector block, with two pairs of housed male spade connectors. I decided to use these connecting blocks, as it makes connecting both the IR and the unit itself simpler. It involves a bit of de-soldering and soldering but it's worth it.
Here is the original wiring to the BX motor. Note the Transparent (white?), Blue and Black connectors in the top right, those connect to the loom in the hatch lid.
White is the motor feed
Black is earth
Grey & Blue are 'wiper park'

IMAG0226 by Neil Pye, on Flickr
I de-soldered the BX wires (keep them as you'll need them in a bit) and then soldered on the Xantia wires. Same colour wires except the blue is now a red.

IMAG0001 by Neil Pye, on Flickr
The Xantia 'mini' loom consisted of the two pairs of housed male spade connectors - Yellow and Red blocks.
I managed to find two mating connector blocks in my heap of spares - the yellow and brown connector blocks

IMAG0228 by Neil Pye, on Flickr
and the IR holder

IMAG0227 by Neil Pye, on Flickr
I then crimped the corresponding wires into the original wires de-soldered from the BX wiper motor.7
Note the earth ring to the left of the crimps.

IMAG0229 by Neil Pye, on Flickr
And there it is all connected. It needs tidying up a bit with cable ties and securing properly.

IMAG0230 by Neil Pye, on Flickr
Hey presto! I'm also going to wire up an 'auto-rear-wipe-when-reverse-is-selected-if-front-wipers-are-on' which shouldn't be difficult but I've not thought about it yet!
Any suggestions/comments welcome
Last edited by BX Bandit on Fri Mar 01, 2013 6:08 pm, edited 3 times in total.
1990 BX 16V Platinum Grey
1990 BX TGD White
1960 Morris Minor Clarondon Grey
1971 Triumph 2000 Auto Valencia Blue
1990 BX TGD White
1960 Morris Minor Clarondon Grey
1971 Triumph 2000 Auto Valencia Blue
- BX Bandit
- Backslash Bandit
- Posts: 2588
- Joined: Thu Aug 31, 2006 7:46 am
- Location: Home
- My Cars: Cars
- x 3
Re: Wanted: Estate Rear Wiper Switch Connector block
Yay it works! I'll do a write up with photos later. Me pleased
1990 BX 16V Platinum Grey
1990 BX TGD White
1960 Morris Minor Clarondon Grey
1971 Triumph 2000 Auto Valencia Blue
1990 BX TGD White
1960 Morris Minor Clarondon Grey
1971 Triumph 2000 Auto Valencia Blue
- mat_fenwick
- Moderator
- Posts: 7327
- Joined: Tue Sep 20, 2005 4:08 pm
- Location: North Wales
- x 20
Re: Wanted: Estate Rear Wiper Switch Connector block
Excellent! I'll move it to the FAQ and modifications section later, as it's something often discussed.
- Vanny
- Merseyside resident
- Posts: 3586
- Joined: Tue May 17, 2005 11:48 pm
- Location: BXProject
- My Cars: BX 16v Ph2 - Jazz
BX 16v Ph2 - XPO - x 85
- Contact:
Re: Wanted: Estate Rear Wiper Switch Connector block
You pleased? I'm bloody ecstatic that i don't have to figure it out myself! Just need to find a n intermittent timer unit now!BX Bandit wrote:Me pleased
- BX Bandit
- Backslash Bandit
- Posts: 2588
- Joined: Thu Aug 31, 2006 7:46 am
- Location: Home
- My Cars: Cars
- x 3
Re: Wanted: Estate Rear Wiper Switch Connector block
/\ An additional front intermittent relay might do? Not checked, but perhaps easily obtainable within BX circles?
1990 BX 16V Platinum Grey
1990 BX TGD White
1960 Morris Minor Clarondon Grey
1971 Triumph 2000 Auto Valencia Blue
1990 BX TGD White
1960 Morris Minor Clarondon Grey
1971 Triumph 2000 Auto Valencia Blue

