C'est Bleriot - 1987 17RD Hatchback
- vulgalour
- BXpert
- Posts: 553
- Joined: Mon Feb 04, 2013 11:30 am
- Location: Kent
- My Cars: 1980 Austin Princess 1.7 HL
1987 Citroen BX 17RD - x 105
Re: C'est Bleriot - 1987 17RD Hatchback
Let's go over to the unit and sort these brakes out on the Princess and... oh, the speedo has stopped working. FINE, let's play this game again.
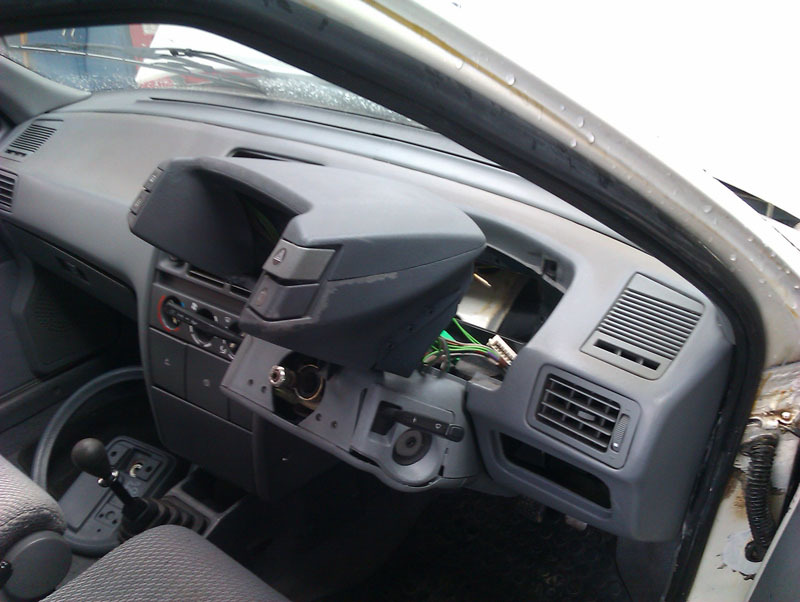
The cable had tape around it, I noticed this when I had it apart and chose to ignore it hoping that if I let it be it wouldn't be a problem. WRONG!
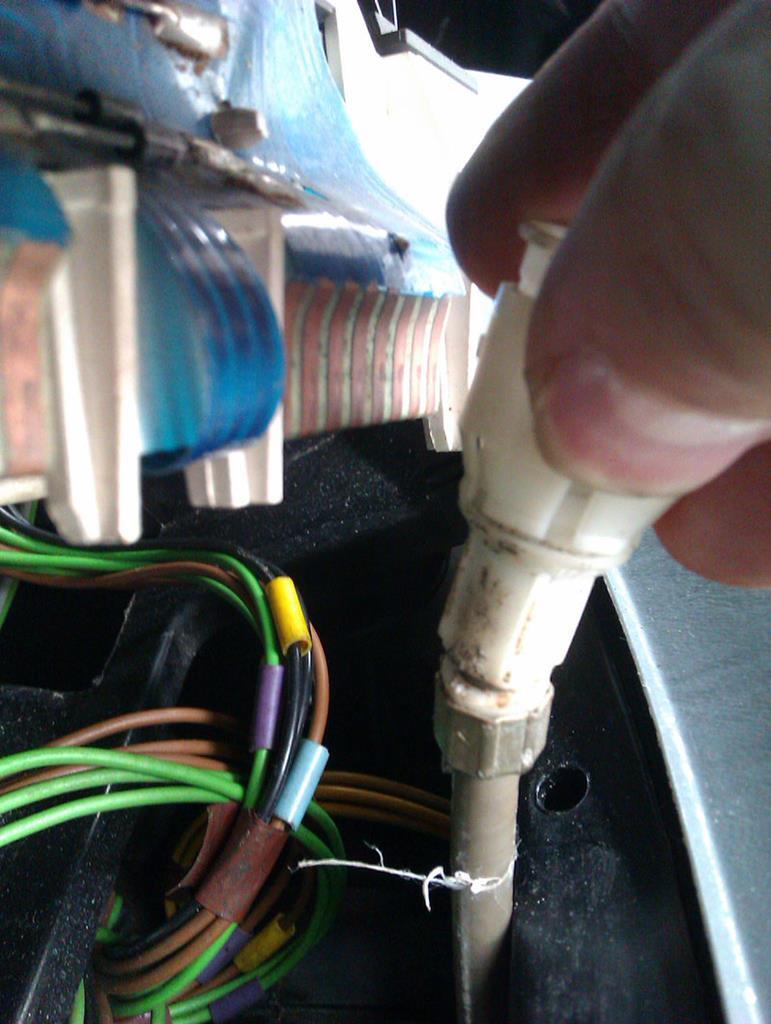
I unwrapped the tape, relocated the cable properly, and then re-wrapped the broken bit first with foil tape and then with duct tape, a repair that's usually good enough for this sort of application. Happily, reassembly of the dashboard proved it was an effective repair. The only supplier for the upper cable (two-part cable on the BX) I've found is Chevronics and the asking price is just a little bit too much for me at the moment with other things I need to spend on. Slightly annoying that the break is just the plastic bit that holds the cable to the back of the binnacle, and a really easy part to break if you're unfamiliar with what's behind the instrument cluster. Normal service resumed I then made several attempts to get the steering wheel back on straight because I didn't straighten the wheel before removing it or mark the centre point, which was silly of me.
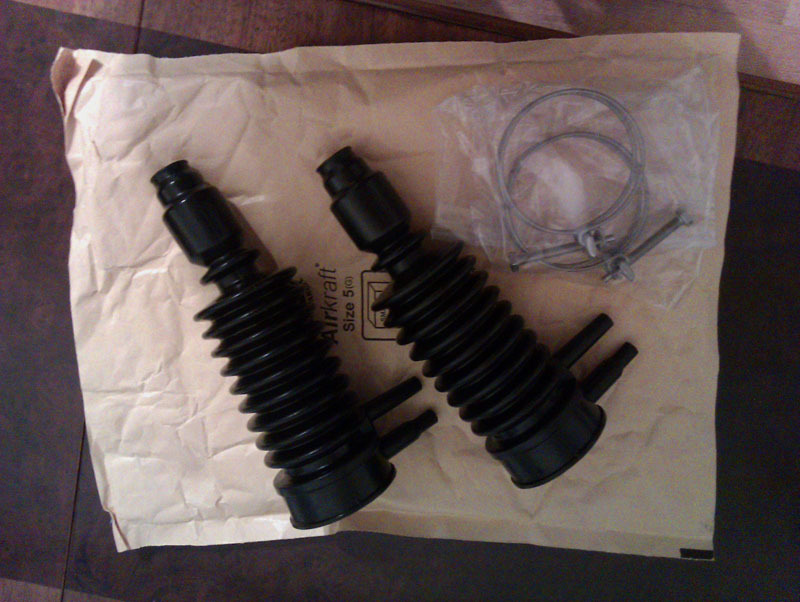
I've ordered replacement rear gaiters and wire clips to cure that LHM leak at the back, having to find Chevronics (again, the only supplier of this part I can find) on eBay since their website didn't want to accept my card for some reason. The Princess brakes job, predictably, did not go smoothly so it's just as well I could fix the BX since I couldn't drive the Princess home today.

The cable had tape around it, I noticed this when I had it apart and chose to ignore it hoping that if I let it be it wouldn't be a problem. WRONG!

I unwrapped the tape, relocated the cable properly, and then re-wrapped the broken bit first with foil tape and then with duct tape, a repair that's usually good enough for this sort of application. Happily, reassembly of the dashboard proved it was an effective repair. The only supplier for the upper cable (two-part cable on the BX) I've found is Chevronics and the asking price is just a little bit too much for me at the moment with other things I need to spend on. Slightly annoying that the break is just the plastic bit that holds the cable to the back of the binnacle, and a really easy part to break if you're unfamiliar with what's behind the instrument cluster. Normal service resumed I then made several attempts to get the steering wheel back on straight because I didn't straighten the wheel before removing it or mark the centre point, which was silly of me.
I've ordered replacement rear gaiters and wire clips to cure that LHM leak at the back, having to find Chevronics (again, the only supplier of this part I can find) on eBay since their website didn't want to accept my card for some reason. The Princess brakes job, predictably, did not go smoothly so it's just as well I could fix the BX since I couldn't drive the Princess home today.
- vulgalour
- BXpert
- Posts: 553
- Joined: Mon Feb 04, 2013 11:30 am
- Location: Kent
- My Cars: 1980 Austin Princess 1.7 HL
1987 Citroen BX 17RD - x 105
Re: C'est Bleriot - 1987 17RD Hatchback
I shan't bore you with the details of getting the dashboard out, nor the fact I had to re-tape the speedo cable (because no adhesive heatshrink and plenty of impatience... a job for another day when I buy a replacement cable probably) but I can tell you that all 25 of the dash binnacle bulbs have now been replaced. The problem with the ones that weren't working was poor fit more than it was blown bulbs, the replacements are a slightly different design that actually works better. All the telltales work that should and a first look is promising.
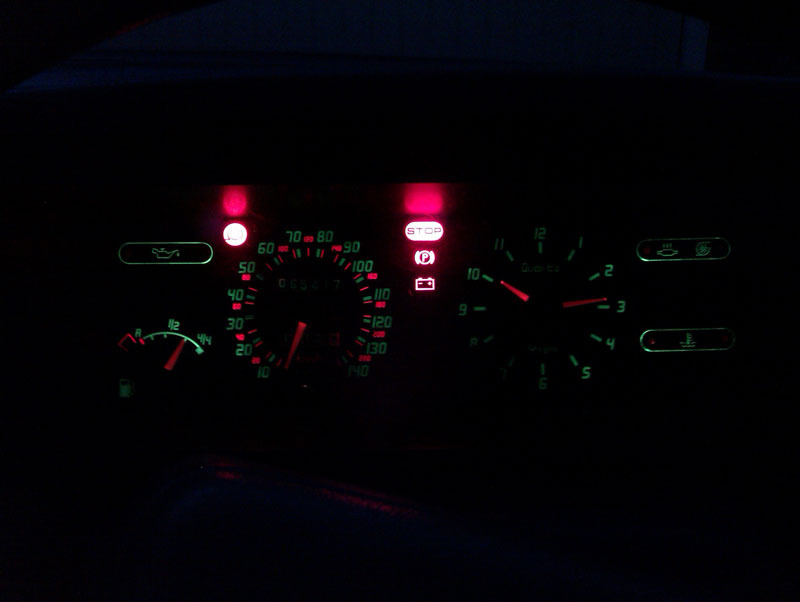
I was going to go the LED route until it was pointed out that they're not compatible with the rheostat and you have to be aware of the polarity. Then there was the added issue of actually finding LED versions of these bulbs that looked like they were from a reputable supplier and the cost difference was such that I was as well going with incandescent types, so that's what I did. I don't often use the rheostat, it's just nice to have what few options the car has to actually work, so here's the dimmest and brightest settings for the light bulb geeks out there that might like this sort of thing.
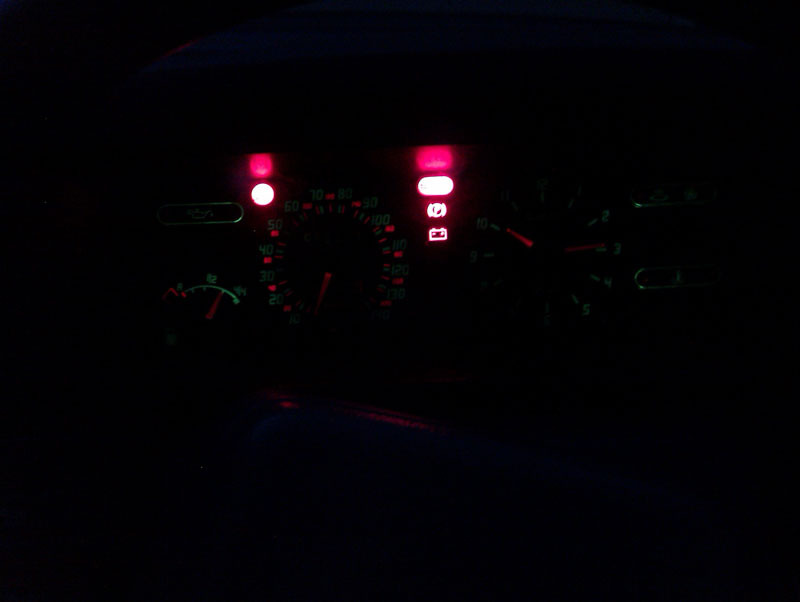
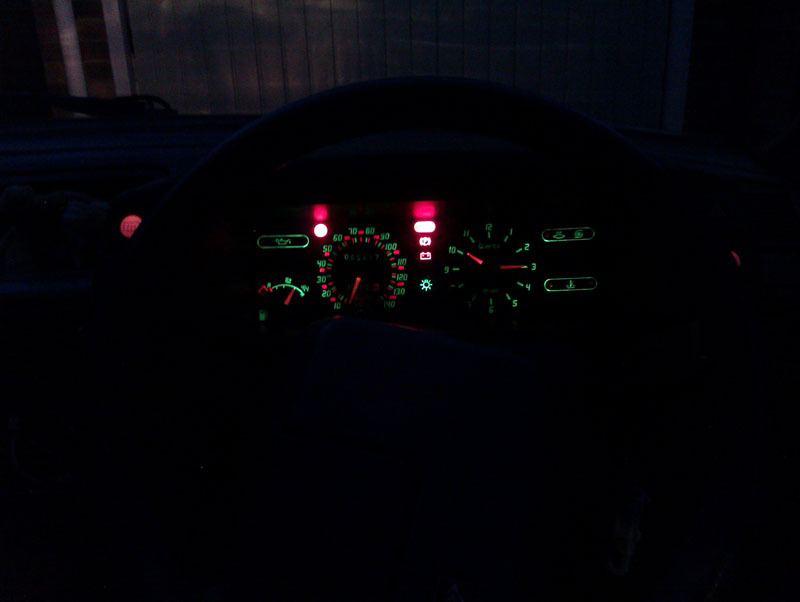
Much better! I suspect the centre console will require the same treatment, I haven't actually checked to see if what should illuminate there actually does since I never really look for the controls in the dark, they're chunky enough to find by feel. The other important thing to arrive today was the new rear suspension gaiters and clamps so once the Princess is sorted I'll get those replaced.

I was going to go the LED route until it was pointed out that they're not compatible with the rheostat and you have to be aware of the polarity. Then there was the added issue of actually finding LED versions of these bulbs that looked like they were from a reputable supplier and the cost difference was such that I was as well going with incandescent types, so that's what I did. I don't often use the rheostat, it's just nice to have what few options the car has to actually work, so here's the dimmest and brightest settings for the light bulb geeks out there that might like this sort of thing.


Much better! I suspect the centre console will require the same treatment, I haven't actually checked to see if what should illuminate there actually does since I never really look for the controls in the dark, they're chunky enough to find by feel. The other important thing to arrive today was the new rear suspension gaiters and clamps so once the Princess is sorted I'll get those replaced.

- saintjamesy89
- Over 2k
- Posts: 2002
- Joined: Tue May 04, 2010 8:01 pm
- Location: Somerset
- My Cars: 1985 Citroen BX19 GT
198x Citroen BX16 TRS auto
1988 Volvo 740 2.0 GL Hearse
1991 Saab 900 16v convertible
2007 Lexus RX 400h SE - x 129
Re: C'est Bleriot - 1987 17RD Hatchback
I've got to have the instrument cluster out of my GT to do some of the bulbs - I think i'll replace the lot also. The dash will be out fo the a/c ocnversion anyway, so I can do it then. It makes a nice difference to have fully functional dash bulbs doesn't it!
I'm not a Saint, or a James, but a Tom Saint-James!
Mes voitures:
1985 Citroen BX19 GT
1988 Volvo 740 2.0 GL Hearse
2006 Lexus RX 400h SE hybrid
Mes voitures:
1985 Citroen BX19 GT
1988 Volvo 740 2.0 GL Hearse
2006 Lexus RX 400h SE hybrid
- vulgalour
- BXpert
- Posts: 553
- Joined: Mon Feb 04, 2013 11:30 am
- Location: Kent
- My Cars: 1980 Austin Princess 1.7 HL
1987 Citroen BX 17RD - x 105
Re: C'est Bleriot - 1987 17RD Hatchback
It really does! It's not that expensive to do all the bulbs and given the faff of removing the pod and the risk of damaging old plastic every time you do, you're as well just replacing the lot with new in one go. Be interesting to see just how much you end up having to change when you do the a/c installation and how much forward planning Citroen did for any loom changes you might need to make.
- saintjamesy89
- Over 2k
- Posts: 2002
- Joined: Tue May 04, 2010 8:01 pm
- Location: Somerset
- My Cars: 1985 Citroen BX19 GT
198x Citroen BX16 TRS auto
1988 Volvo 740 2.0 GL Hearse
1991 Saab 900 16v convertible
2007 Lexus RX 400h SE - x 129
Re: C'est Bleriot - 1987 17RD Hatchback
I'm translating "interesting to see..." into "dreading with all my being"!
Theoretically it'll be a lot easier as I will have a whole car to rob from with all the original stuff already in it - i'm sure there will be some refurb/reconditioning needed of some of the parts though. I am genuinly excited to get t he french BX, being export spec I wonder if it will come with any other interesting bits or accessories?
Theoretically it'll be a lot easier as I will have a whole car to rob from with all the original stuff already in it - i'm sure there will be some refurb/reconditioning needed of some of the parts though. I am genuinly excited to get t he french BX, being export spec I wonder if it will come with any other interesting bits or accessories?
I'm not a Saint, or a James, but a Tom Saint-James!
Mes voitures:
1985 Citroen BX19 GT
1988 Volvo 740 2.0 GL Hearse
2006 Lexus RX 400h SE hybrid
Mes voitures:
1985 Citroen BX19 GT
1988 Volvo 740 2.0 GL Hearse
2006 Lexus RX 400h SE hybrid
-
rutter123
- Over 2k
- Posts: 2695
- Joined: Sun Sep 02, 2012 9:54 pm
- Location: South Lincs
- My Cars: 90 Bx Tzd turbo ven red 295k
74 D Super 5 black
05 Volvo V50 2.0d 180k
65 Peugeot Boxer work van 280k - x 137
Re: C'est Bleriot - 1987 17RD Hatchback
Maybe a Gitanes dispenser?
90 BX Tzd turbo 294k SORN undergoing major surgery
90 BX Tzd turbo estate 46k awaiting surgery
65 Peugeot Boxer Van the new workhorse
52 Toyota Rav4 180k Bulletproof Jap reliability
90 BX Tzd turbo estate 46k awaiting surgery
65 Peugeot Boxer Van the new workhorse
52 Toyota Rav4 180k Bulletproof Jap reliability
- vulgalour
- BXpert
- Posts: 553
- Joined: Mon Feb 04, 2013 11:30 am
- Location: Kent
- My Cars: 1980 Austin Princess 1.7 HL
1987 Citroen BX 17RD - x 105
Re: C'est Bleriot - 1987 17RD Hatchback
...garlic hook, wine holder, baguette locker, fromage fridge...
I jest. I'd be surprised if there's that many differences really, aside from perhaps colour and fabric choices.
I jest. I'd be surprised if there's that many differences really, aside from perhaps colour and fabric choices.
- vulgalour
- BXpert
- Posts: 553
- Joined: Mon Feb 04, 2013 11:30 am
- Location: Kent
- My Cars: 1980 Austin Princess 1.7 HL
1987 Citroen BX 17RD - x 105
Re: C'est Bleriot - 1987 17RD Hatchback
As previously mentioned, I've been trying to source the missing accessories for this BX, so I've been keeping an eye out for three things; headlight protectors, door handle scratch protectors, and a tailblazer panel. I missed out on a fairly good tailblazer recently that needed one section regluing, I wasn't really prepared to pay £130 for a broken bit of plastic tat. Amazingly, another one turned up and I got it for a mere £40 and it wasn't really any more broken than the first offering. However, it needed a fair bit more cosmetic work before it could go on the car.
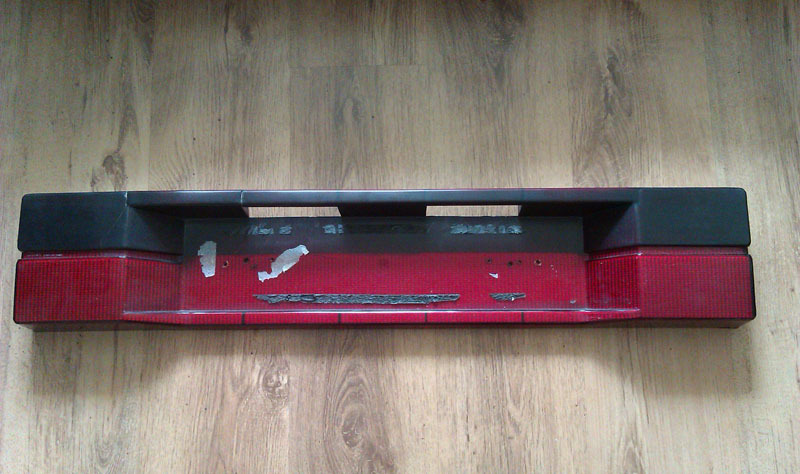
Looks dreadful, doesn't it? It's had the top half sprayed with tint spray very heavily to match the later facelift rear lights, has a crack in the left hand side and two splits on the top edge. The tint spray hides most of the damage in photographs, and none of it in person.
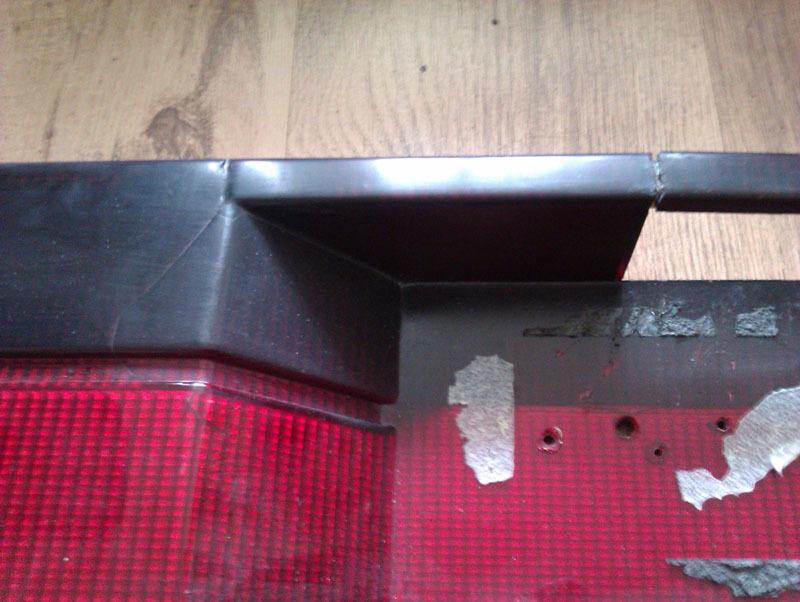
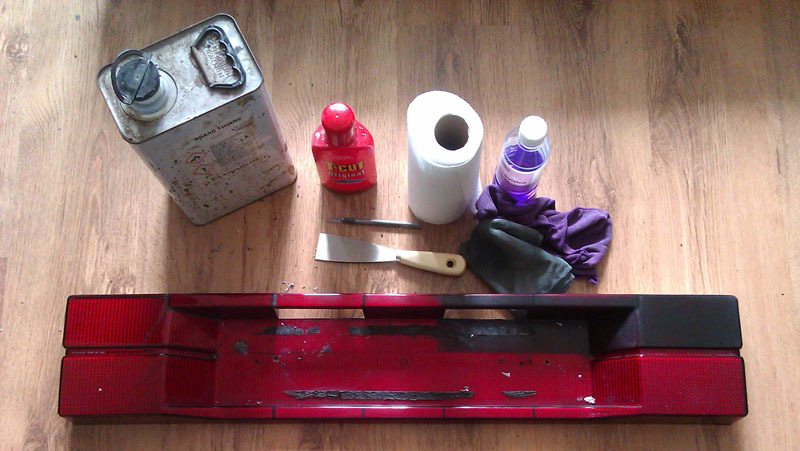
Someone also appears to have used a machine gun to put number plate holes in rather than just going with the two holes that are cast into the part. Time to get the potions out. After a bit of trial and error I found that purple methylated spirits would slowly shift the spray tint, rather too slowly really, so I risked cellulose thinners on a hidden portion and found that worked much better. The thinners worked best when put onto a square of folded paper towel (same way you put a cloth over the top of a T-cut bottle and tip the bottle up to blob a bit on the cloth to use) and worked quickly over a small area at a time. I didn't get any fogging issues or problems with the plastic under the spray tint and a bit of clean water and T-cut after the thinners brought the plastic up nice and fresh. I'd recommend this method on very hard plastics like this, with the caveat to be cautious.
The damage is more visible with the paint removed and in some lights the crack is more visible than others and is quite visible, especially since there's a bit of polish in the crack here.
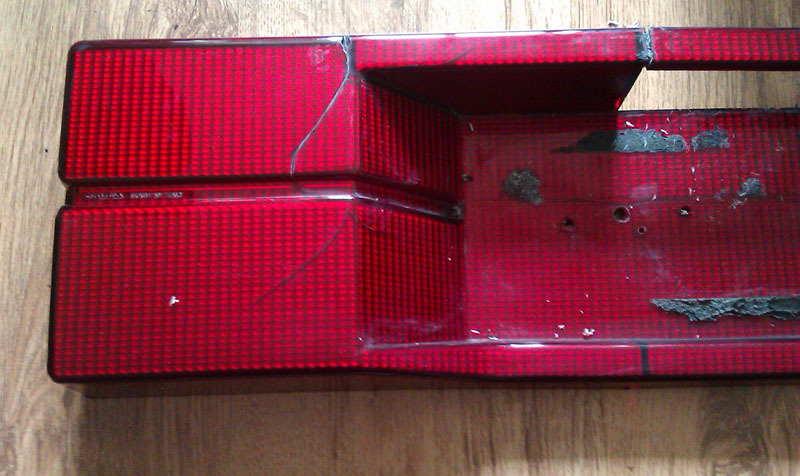
For the sticker residue I tried out WD40, as suggested elsewhere, and that worked surprising well. Spray on quite liberally, leave for a little bit, and then scrape off with a scraper. I had to carefully use a metal scraper because I'd misplaced my plastic ones, I'd recommend using plastic ones instead, there's no risk of damaging the plastic panel then. With all that cleaned up I could clean off the old glue as much as possible and tack the joints with a tiny bit of superglue and later I'll go over the cracks on the reverse of the panel with some epoxy resin glue to give it some strength back. For the front of the cracks where there's some small bits of plastic missing I'll fill with epoxy resin for strength and a better finish since it can be sanded and polished. With all that done, I'll repaint any of the filled areas that are showing clear with some clear red paint (Citadel or Tamiya, most likely) on the back before a fresh coat of bright silver. This should eliminate the visible damage almost entirely. There will still be a crack visible, there's not really anything you can do about that, but it won't be that noticable most of the time. Time spent so far is only about an hour.
As an aside, part of the packaging the tailblazer was wrapped in had a familiar name on it: Tim Leech. I guess the BX world is a small one.

Looks dreadful, doesn't it? It's had the top half sprayed with tint spray very heavily to match the later facelift rear lights, has a crack in the left hand side and two splits on the top edge. The tint spray hides most of the damage in photographs, and none of it in person.


Someone also appears to have used a machine gun to put number plate holes in rather than just going with the two holes that are cast into the part. Time to get the potions out. After a bit of trial and error I found that purple methylated spirits would slowly shift the spray tint, rather too slowly really, so I risked cellulose thinners on a hidden portion and found that worked much better. The thinners worked best when put onto a square of folded paper towel (same way you put a cloth over the top of a T-cut bottle and tip the bottle up to blob a bit on the cloth to use) and worked quickly over a small area at a time. I didn't get any fogging issues or problems with the plastic under the spray tint and a bit of clean water and T-cut after the thinners brought the plastic up nice and fresh. I'd recommend this method on very hard plastics like this, with the caveat to be cautious.

The damage is more visible with the paint removed and in some lights the crack is more visible than others and is quite visible, especially since there's a bit of polish in the crack here.

For the sticker residue I tried out WD40, as suggested elsewhere, and that worked surprising well. Spray on quite liberally, leave for a little bit, and then scrape off with a scraper. I had to carefully use a metal scraper because I'd misplaced my plastic ones, I'd recommend using plastic ones instead, there's no risk of damaging the plastic panel then. With all that cleaned up I could clean off the old glue as much as possible and tack the joints with a tiny bit of superglue and later I'll go over the cracks on the reverse of the panel with some epoxy resin glue to give it some strength back. For the front of the cracks where there's some small bits of plastic missing I'll fill with epoxy resin for strength and a better finish since it can be sanded and polished. With all that done, I'll repaint any of the filled areas that are showing clear with some clear red paint (Citadel or Tamiya, most likely) on the back before a fresh coat of bright silver. This should eliminate the visible damage almost entirely. There will still be a crack visible, there's not really anything you can do about that, but it won't be that noticable most of the time. Time spent so far is only about an hour.

As an aside, part of the packaging the tailblazer was wrapped in had a familiar name on it: Tim Leech. I guess the BX world is a small one.
- vulgalour
- BXpert
- Posts: 553
- Joined: Mon Feb 04, 2013 11:30 am
- Location: Kent
- My Cars: 1980 Austin Princess 1.7 HL
1987 Citroen BX 17RD - x 105
Re: C'est Bleriot - 1987 17RD Hatchback
Last night, I put the epoxy required on the outside of the panel with masking tape dams to prevent the epoxy running where I didn't want to. Once the epoxy was touch dry, but before it was fully hardened, I peeled the masking tape off so it didn't get trapped.
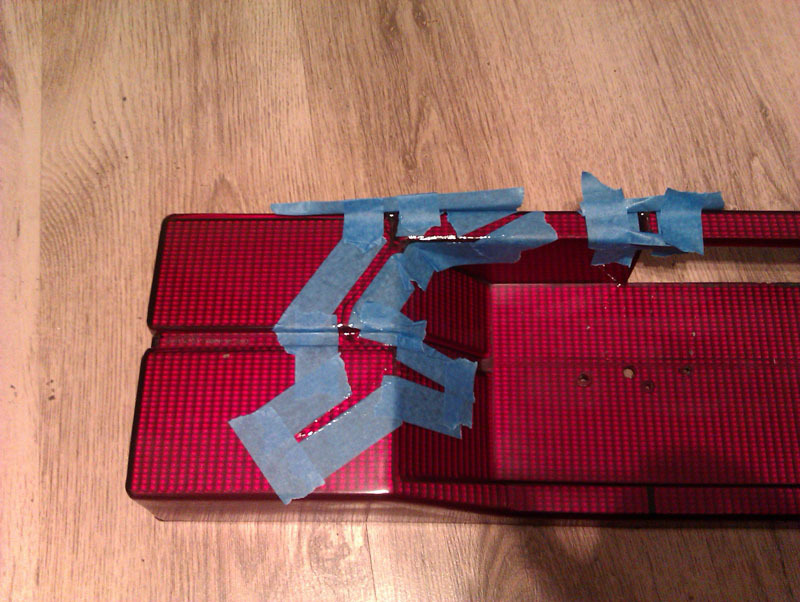
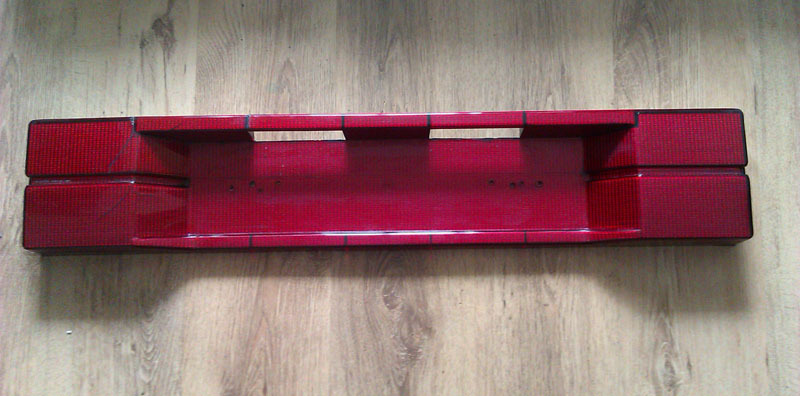
Today, with the epoxy fully hardened, I set to with small files first to take down the bulk of the material and then very fine wet and dry sand paper to remove any file marks and smooth out the joins as much as possible. Rather like body filler, you do seem to end up taking off about 90% of what you applied. The end result should be a strong and visually diminished repair, if not an invisible one. To remove the really fine scratches in the plastic I went over the whole thing with T-cut which also helped remove fine historic scratches and improve the general appearance of the piece.
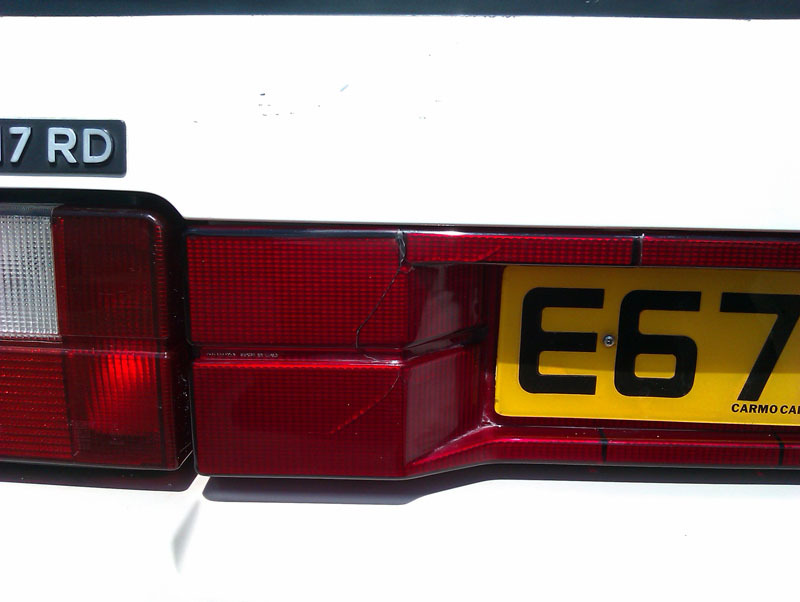
After T-cut I blobbed some Citadel clear red paint on anywhere on the back of the panel light shone through, and then a splash of Halfords' wheel silver paint which is just about a perfect match for the silver paint on the back of the panel. Once dry, it was a case of finding out which holes lined up before fitting to the car. 2 holes on the tailblazer lined up with those on my number plate and none of them lined up with the four holes drilled into the tailgate so I had to drill two more in the tailgate to screw this all together. The little aluminium France badge and the Autoshite sticker didn't have to be removed as they didn't stop the tailblazer from fitting. Overall, I'd say this job was a reasonable success. Don't worry, that's not a B****t P***y sticker on the back window... well it is, but not in support of it. Trollolololol.
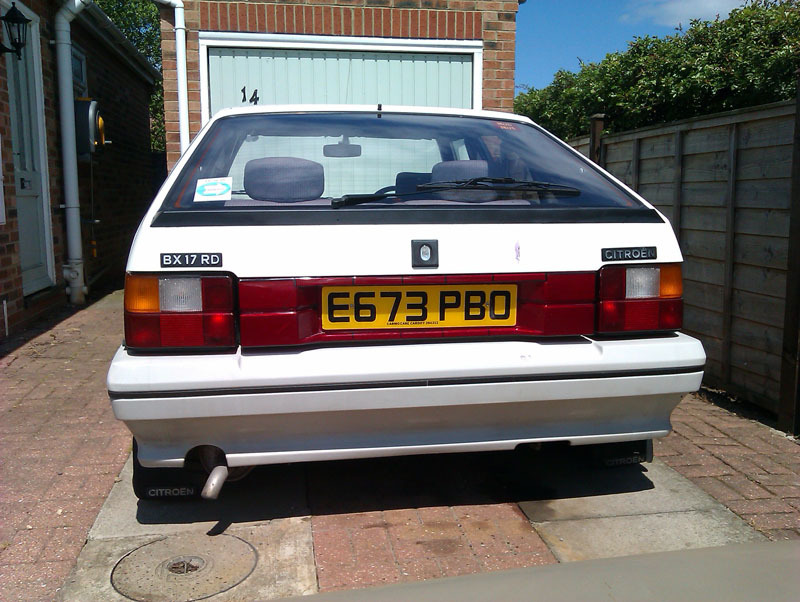
How right does that number plate look now too? Fantastic.

Today, with the epoxy fully hardened, I set to with small files first to take down the bulk of the material and then very fine wet and dry sand paper to remove any file marks and smooth out the joins as much as possible. Rather like body filler, you do seem to end up taking off about 90% of what you applied. The end result should be a strong and visually diminished repair, if not an invisible one. To remove the really fine scratches in the plastic I went over the whole thing with T-cut which also helped remove fine historic scratches and improve the general appearance of the piece.

After T-cut I blobbed some Citadel clear red paint on anywhere on the back of the panel light shone through, and then a splash of Halfords' wheel silver paint which is just about a perfect match for the silver paint on the back of the panel. Once dry, it was a case of finding out which holes lined up before fitting to the car. 2 holes on the tailblazer lined up with those on my number plate and none of them lined up with the four holes drilled into the tailgate so I had to drill two more in the tailgate to screw this all together. The little aluminium France badge and the Autoshite sticker didn't have to be removed as they didn't stop the tailblazer from fitting. Overall, I'd say this job was a reasonable success. Don't worry, that's not a B****t P***y sticker on the back window... well it is, but not in support of it. Trollolololol.

How right does that number plate look now too? Fantastic.
- panky
- BXpert
- Posts: 453
- Joined: Mon Jan 22, 2018 4:44 pm
- Location: Widnes
- My Cars: 1985 BX 19 GT (DKK), 1971 Morris Minor Traveller, 1971 Commer Auto-Sleeper, 1969 Commer Jennings Roadranger.
'88 BX GTi (a long time ago) - x 110
Re: C'est Bleriot - 1987 17RD Hatchback
That looks great. I've used Lamp Doctor paste on plastic in the past (and and on rust streaks on the Commer's windscreen) and it works very well, seems slightly more abrasive than T cut but doesn't leave any scratches.


- saintjamesy89
- Over 2k
- Posts: 2002
- Joined: Tue May 04, 2010 8:01 pm
- Location: Somerset
- My Cars: 1985 Citroen BX19 GT
198x Citroen BX16 TRS auto
1988 Volvo 740 2.0 GL Hearse
1991 Saab 900 16v convertible
2007 Lexus RX 400h SE - x 129
Re: C'est Bleriot - 1987 17RD Hatchback
That looks cracking! Sorry about the pun... The only thing letting the rear of that down now, to my pedants eye is the exhaust tail pipe. Even the bumpers look brilliant, something the BX suffers with I think.
I'm not a Saint, or a James, but a Tom Saint-James!
Mes voitures:
1985 Citroen BX19 GT
1988 Volvo 740 2.0 GL Hearse
2006 Lexus RX 400h SE hybrid
Mes voitures:
1985 Citroen BX19 GT
1988 Volvo 740 2.0 GL Hearse
2006 Lexus RX 400h SE hybrid
- Tim Leech
- Over 2k
- Posts: 15598
- Joined: Tue Apr 15, 2008 11:12 am
- Location: Derbyshire
- My Cars: Various
- x 159
Re: C'est Bleriot - 1987 17RD Hatchback
I’m glad to see it arrived in one piece! I struggled to find a courier to send it at a fair price that would insure it, in the end tnt took it for £15.
Yes I was the seller. The holes in it were already there as was the cracks etc, I took it off my car as it was a little untidy
Yes I was the seller. The holes in it were already there as was the cracks etc, I took it off my car as it was a little untidy
Lots of Motors, mostly semi broken....
- Tim Leech
- Over 2k
- Posts: 15598
- Joined: Tue Apr 15, 2008 11:12 am
- Location: Derbyshire
- My Cars: Various
- x 159
Re: C'est Bleriot - 1987 17RD Hatchback
One think to note is that the car should have have a plain black tailgate button push which would operate with the central locking.
Lots of Motors, mostly semi broken....
- vulgalour
- BXpert
- Posts: 553
- Joined: Mon Feb 04, 2013 11:30 am
- Location: Kent
- My Cars: 1980 Austin Princess 1.7 HL
1987 Citroen BX 17RD - x 105
Re: C'est Bleriot - 1987 17RD Hatchback
I had no idea I was actually buying from yourself! That'll explain why the whole process was so utterly painless. The painting was a fairly proper job, I'm used to that sort of spray tint coming off with much less effort. I don't actually mind the tailgate being on a separate key, it is fairly practical, though it would look better if it were the proper plain black button. There is something amiss with the central locking, which isn't that unusual for a French car, the passenger door lock will unlock and lock everything as normal but the driver's door lock won't unlock and lock the passenger door. Also, if you pull the lock up manually on the passenger front door, it prevents the rest of the doors locking and unlocking unless you stick the key in the passenger door. I'm guessing it's the solenoid in the passenger door at fault so it's only engaging and disengaging mechanically on the key rather than electronically. I imagine a similar failure is why it's on a key on the tailgate rather than the central locking.