The rubber end cap 3 can also be replaced.
Having seen the price of a new doseur, I decided to try Anders' method. It took me a while to understand how worn joints could cause a leakage return, but finally this is how I think it happens :

So, off to Citroën to get the bits :

The man at the counter seemed a bit worried : " We never open those things, mate " . Aye, right, it's a lot more interesting to sell new ones ! Good news, though, joints number 12 and 13 are still available and reasonably cheap. The end-cap 3 is also available. Joint 11 however is no longer available, so if your doseur is leaking from there, you'll need to find another source.
And so to work. Here's the doseur, access not too bad in an N/A diesel :

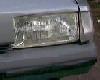
Haynes says to put the front of the car on axle stands. At least on this car and the 14s, this is pointless as the whole job can be done from the top. First, put the car in low position and release the pressure. Then unscrew and pull out the top three hydraulic pipes (this is the more recent 3-piston doseur). The bottom one is a bit of a pig, so disconnect the speedo cable in the engine compartment (red arrow in the photo of the engine bay), and undo the two 11mm nuts behind the brake pedal first to give you a bit of leeway :

Then you can pull the doseur, tilt it and get at the bottom pipes. Start dismantling it at the pedal end. Lever off the ring, pull off the end-cap, then there's a circlip to take out and here are the bits which sould come out :

At the other end, it's easier to shove the metal plug back a bit to get the circlip out. :

Then out comes this lot, with a bit of poking from the other side :

The teflon and O-rings (one on top of the other) have to be pried out with a little hook :

Don't bother touching the end seal O-ring unless you have a replacement for it.
All in all, you've now got this :

The photo shows the bung plug still in place, you can take it out for washing no problem, as there is no adjustment. So, wash everything in petrol, dry with compressed air, then start putting in the new joints, O-ring first, then the teflon one on top in the same groove. Take care, as it looks fragile and apt to kinking. To get it in, you need to form a " heart " shape, according to the Citroen document here : http://www.rwbsmith.plus.com/citroen2/Brakes/doseur.pdf . The best I managed was this, it worked :

After that, it's proverbial « reverse-order » time, with a lick of LHM on the moving parts .
Here's a close up of the " right way round " for the middle piston in case you have any doubts :

To get the doseur back on the car, put on the bottom pipe and return first, then fix it with the nuts at the brake pedal before putting on the remaining pipes and return (can anybody explain why there are two separate returns which come from the same bore ???). Screw the speedo cable back on again, pressurise the system, start the motor and check for the dreaded external leaks, particularly at the motor-end where the old joint had to be re-used.
VERY IMPORTANT : carefully purge all four brakes before driving. If you have an old two-piston doseur, you have to purge it as well.
After all this I did a quick brake test back and forth, A-OK, before whipping off the brake return at the reservoir. SH!T ! No difference, it was dribbling out exactly as before. Fluorescent green despair !
However, two minutes later I had another look : nothing ! Not even a drop ! RESULT ! It would seem that just after braking there remains some pressure in the return which makes it dribble for a minute or so.
Next morning, the car was still up, in fact the front end was marginally lower than the back.
Conclusion : if you plan on keeping your BX for some time, and feel up to this ( fairly easy ) job even some time in the distant future, buy those joints now. The rubber end-cap is less of an issue, the one on my 300000km doseur still looked new. Joint number 11, which was apparently available in March, can no longer be obtained. It stands to reason that this is going to happen to the other bits sooner rather than later. It's only a couple of quid for the pair of joints, and I am certainly going to get another pair " just in case ". Of course, none of this will work if the pistons themselves are worn, but if the LHM has been kept clean through the life of the car, that's unlikely before very very high mileages.
Hope this can help keep a few more