BX Electric Driver's Mirror
-
mat_fenwick
- Moderator
- Posts: 7330
- Joined: Tue Sep 20, 2005 4:08 pm
- Location: North Wales
- x 22
Right, I've taken a photo of my switch internals. It looks very similar to the photo in Khan's link, here:
linky thing
Mine is like this:
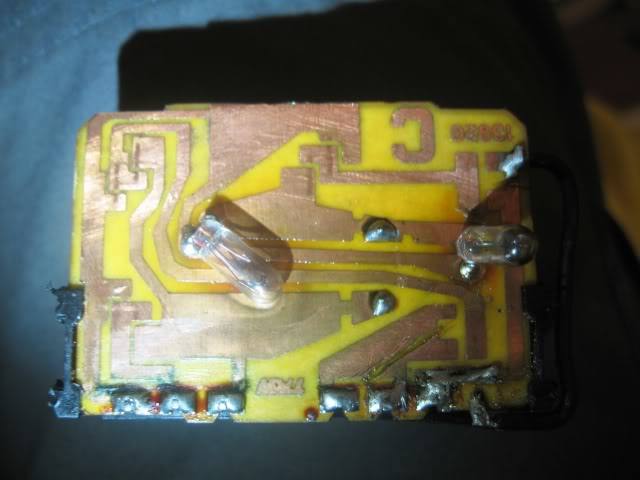
Where the black lines are on the first photo is where to cut the tracks; where the red marking is, this indicates a link. On mine you can just about make out the black link wire I have run outside the switch casing. (Above the link wire on mine, in the bottom RH corner you can see where I accidentally cut the wrong track and had to patch it back together again ) Hopefully on my photo you can see where I have cut.
I can't understand all the French link, but I think the relay is for when you are using the XM switch (as I had initially thought looks identical) which reverses the up and down motion of the mirror.
Does this all make some kind of sense?!
linky thing
Mine is like this:

Where the black lines are on the first photo is where to cut the tracks; where the red marking is, this indicates a link. On mine you can just about make out the black link wire I have run outside the switch casing. (Above the link wire on mine, in the bottom RH corner you can see where I accidentally cut the wrong track and had to patch it back together again
I can't understand all the French link, but I think the relay is for when you are using the XM switch (as I had initially thought looks identical) which reverses the up and down motion of the mirror.
Does this all make some kind of sense?!

1993 1.9 TZD Turbo Estate
1996 3.9 V8 Discovery
1993 VW LT35 campervan
1985 Hyundai Stellar V8
2016 Hyundai iLoad
-
prm
- BXpert
- Posts: 192
- Joined: Tue May 01, 2007 7:54 pm
- Location: Surrey
-
scrappydoo
- Confirmed BX'er
- Posts: 47
- Joined: Fri Oct 23, 2009 5:21 pm
-
scrappydoo
- Confirmed BX'er
- Posts: 47
- Joined: Fri Oct 23, 2009 5:21 pm
-
mat_fenwick
- Moderator
- Posts: 7330
- Joined: Tue Sep 20, 2005 4:08 pm
- Location: North Wales
- x 22
To elaborate on that a bit - the 2 wires already connected to your switch split into 4 wires behind the glovebox and go off to each mirror. You need to establish which wires go to the drivers mirror, and then take those wires to the redundant terminals on your modified switch. I took the carpet up, traced them back and pulled them through.I already wrote:you'll need to delve around under/behind the glovebox where the wiring from both mirrors joins together. Cut the wires for the drivers mirror and run them to the switch.
1993 1.9 TZD Turbo Estate
1996 3.9 V8 Discovery
1993 VW LT35 campervan
1985 Hyundai Stellar V8
2016 Hyundai iLoad
-
scrappydoo
- Confirmed BX'er
- Posts: 47
- Joined: Fri Oct 23, 2009 5:21 pm