C'est Bleriot - 1987 17RD Hatchback

Tell us about life with your BX, or indeed life in general!
Post Reply
User avatar
vulgalour
BXpert
Posts: 553
Joined: Mon Feb 04, 2013 11:30 am
Location: Kent
My Cars: 1980 Austin Princess 1.7 HL
1987 Citroen BX 17RD
x 105

Re: C'est Bleriot - 1987 17RD Hatchback

Post by vulgalour »

Earlier today I was hunting out some stuff in the garage and found some H4 yellow headlight caps that I'd bought for my old Renault 6. I had thought I'd moved these caps on, they didn't fit the headlight bulbs in the Renault, and I didn't have another car to fit them to, turns out I hoarded them instead. They literally just clip on to a H4 bulb and that's it.
Image

They have the added advantage of making it impossible to touch the bulb glass once fitted. I had to wait until I'd finished work before I could see the result and while my camera overcompensates with blue, making the photos it takes look like an early Star Trek set, I've got photo editing software and I'm not afraid to correct the balance. In person, the yellow it puts out looks just like it should, not a dirty old-bulb sort of colour, nor a harsh brilliant yellow, just this very mellow glow reminiscent of news footage of France in the 80s.
Image

Image

Time will tell if they're actually horrible to drive with at night and whether or not they actually keep their yellow colour.
User avatar
vulgalour
BXpert
Posts: 553
Joined: Mon Feb 04, 2013 11:30 am
Location: Kent
My Cars: 1980 Austin Princess 1.7 HL
1987 Citroen BX 17RD
x 105

Re: C'est Bleriot - 1987 17RD Hatchback

Post by vulgalour »

BX needed to be moved today since I was doing a spot of garden maintenance. It started up with a bit of reluctance and after I'd parked it elsewhere I went back and found this big puddle of diesel under it.
Image

That's a lot of diesel. Before opening the bonnet I had a look underneath to see if I could find it and all I could really see was a lot of diesel had leaked from somewhere higher up in line with the injector pump.
Image

Hmm... let's pop the bonnet and see what's what. Ran over the various fuel connection points and saw that the top of the injector pump was greasy with diesel. With the engine not running it wasn't readily apparent where it was coming from aside from a slight dampness on the outlet/return on top of the pump.
Image

I had inspected these hoses recently and had seen nothing untoward. Indeed yesterday they weren't causing any diesel to come out and the pump didn't have a greasy sheen of diesel on it like it does here. Better start it up and see what's what. Car was a bit reluctant to start up. These shots were taken after I'd removed the hose clamp for the bigger non-braided hose when I'd had chance to clean my hands so I could use the camera. With the car running it soon became very clear where the leak was.
Image

A bit of throttle and it was REALLY clear.
Image

That's a surprise, to be quite honest. Easily rectified at least... but wait, what's that I see in the camera that I didn't see in person? *tickatickaticka* Enhance.
Image

*tickatickaticka* Enhance.
Image

You have got to be kidding me! Another failed hose, and another fairly new one at that. I bet that's sucking air in and cocking things up isn't it? I haven't got enough hose in stock to replace this with and the hose itself isn't long enough for me to trim the end off so I'll have to order a new length and replace the whole thing. These cracks are not visible in person, I only saw them because of the camera showing them up. The digital camera, the tool we all forget we've got when it comes to spanner time.

Oh well, I trimmed the leaking portion off the braided hose and refitted it. I will be buying enough hose to replace all the leak-off pipes as a precaution when I buy the other hose to replace that big cracked one. Maybe that will fix the issue. When the braided hose was removed it was almost impossible to see the crack that was causing the leak, it's no wonder I couldn't find it until it properly failed.
Image

Image

Hooked it all back up and the car, unsurprisingly, started much more willingly than before and didn't leak any more diesel out. Gave it some throttle and it was fine, no leaking out of diesel. However, on pulling back onto the drive it did that trick of the idle dropping until it stalled. It did fire up again quite willingly so it's slightly improved which ties in with the slight improvement I made by trimming down that bad hose so perhaps when I replace all the other fuel hoses it will be okay and this problem will go away.
Image

I also learned quite by accident how the driver's side mudflap got broken at some point in the past and why you shouldn't park too close to the curb.
Image
User avatar
vulgalour
BXpert
Posts: 553
Joined: Mon Feb 04, 2013 11:30 am
Location: Kent
My Cars: 1980 Austin Princess 1.7 HL
1987 Citroen BX 17RD
x 105

Re: C'est Bleriot - 1987 17RD Hatchback

Post by vulgalour »

Right then.
Image

Getting the old return fuel hose off wasn't too bad. It helped having someone wiggle it at the engine bay end so I could see which hose it was underneath the car and then it was a case of wiggling it out of the metal clip on the inner wing and the two plastic clips that hold it to the other fuel hose. It's just a push fit onto the metal pipes at each end, there's no additional clips. The rubber hose had welded itself to the hard line under the car and had to be sliced off with a Stanley knife, it was otherwise fairly plain sailing. Checked it against the length of hose I'd ordered and fortunately the hose I ordered was exactly the same length, so no cutting required. That's also when I found this large crack in the old fuel hose that had been hidden by the metal clip on the inner wing.
Image

Fitting the new hose wasn't too bad, the fit was a little looser than the old hose so I added a hose clip just to be certain it wouldn't leak or fall off, it does measure the same size as the hose I took off so the difference must be very tiny.
Image

I then finegled the hose down through the rats nest of other stuff to get it under the car so I could connect it to the hard line. It was easier to pop the hard line out of a couple of its clips to line the two halves up. I then secured it at this end with a hose clip too, just in case. It's worth noting that the interference fit on the hard line underneath the car was much better and a clamp probably wasn't needed.
Image

Image

I then moved on to the leak-off hoses. The new hose measured the same as the end I'd disconnected from the pipe on top of the injector pump, and it turns out this is too big for the injectors, so now I have to order some smaller hose so that I can sort those out. Interestingly, when I popped off the leak-off hose furthest away from the pump (passenger side), it was very dry, especially when compared to the others. I don't know if this is normal, or if it hints at a problem with this injector.
Image

I reconnected the hose and started the car up. Whatever had been leaking diesel - and honestly, I couldn't find anything underneath the car or down the back of the engine that looked like it even had diesel going in or out of it anywhere remotely near where the diesel leak had been - now wasn't so perhaps it was some diesel trapped in a nook from the previous leak, or perhaps it was that return hose I've just replaced leaking in a way that wasn't obvious. Either way, the car did start much better on restarts and while it did stall once on doing the three-point turn to come back on the drive, it was otherwise vastly improved. If you give it a lot of throttle and then let it idle, it will do so without the wandering idle for much longer now, and is far less inclined to stall. I hope that means replacing that one hose got rid of a large air leak, causing the improvements, and that the remaining issue can be solved by the injector cleaner I'm waiting on being delivered, and replacing all the leak-off hoses when the correct size I order arrives.
User avatar
jamescarruthers
BXpert
Posts: 571
Joined: Wed Nov 07, 2012 2:11 pm
Location: Cambridge
x 23

Re: C'est Bleriot - 1987 17RD Hatchback

Post by jamescarruthers »

What about sending the injectors away for a good clean, with before and after testing? I have had good results from Injector Tune who do injector cleaning by post and send a report back. The idle of my car improved after it was done, and the willingness to pick up. At idle, the minute differences between cylinders (that increases as they pick up muck at different rates over time) is much more apparent.
1987 Volvo 480 ES
2006 Citroen C6 Exclusive 3.0 petrol/LPG

Previous BX's:
A966 XRL -- BX 16 TRS
H767 BEG -- BX 14 TGE
B316 AMP -- BX 14 E
User avatar
vulgalour
BXpert
Posts: 553
Joined: Mon Feb 04, 2013 11:30 am
Location: Kent
My Cars: 1980 Austin Princess 1.7 HL
1987 Citroen BX 17RD
x 105

Re: C'est Bleriot - 1987 17RD Hatchback

Post by vulgalour »

I'm hoping the injector cleaner sorts it first. If it doesn't then yes, health check on the injectors a definite, replacement if needed. I'd like to avoid pulling the injectors while the Princess is also waiting for bits to get it back to running again so at least I have one working car to use... or I could just buy another car... NO! Bad thoughts. BAD THOUGHTS.
Kitch
Over 2k
Posts: 6417
Joined: Sun Jul 03, 2005 9:36 pm
Location: Fareham, Hants
My Cars: Too many to list
x 88
Contact:

Re: C'est Bleriot - 1987 17RD Hatchback

Post by Kitch »

That fuel hose looks suspiciously like the dodgy stuff that fails. It doesn't have R9 on it, does it?
One third of a three-spoke BX columnist team for the Citroenian magazine.

CCC BX registrar: The national BX register - click to submit a car!

1983(A) 16TRS (Rouge Valleunga)
1990(H) 16Valve (Rouge Furio)
User avatar
vulgalour
BXpert
Posts: 553
Joined: Mon Feb 04, 2013 11:30 am
Location: Kent
My Cars: 1980 Austin Princess 1.7 HL
1987 Citroen BX 17RD
x 105

Re: C'est Bleriot - 1987 17RD Hatchback

Post by vulgalour »

I'll have to check now you've said that.
User avatar
vulgalour
BXpert
Posts: 553
Joined: Mon Feb 04, 2013 11:30 am
Location: Kent
My Cars: 1980 Austin Princess 1.7 HL
1987 Citroen BX 17RD
x 105

Re: C'est Bleriot - 1987 17RD Hatchback

Post by vulgalour »

The new hose doesn't have R9 on it, so that's something. It doesn't have any markings at all in fact, I'm not going to think particularly hard about that right now.

The new leak off hose arrived for the BX so I thought it'd be a quick job just to pop out and fit that and then the air leak issue will be solved, right? RIGHT? Let's pull off the old ones.
Image

These didn't look particularly bad, a little stiff perhaps. Fitting the new ones was nice and easy.
Image

Once primed, and a fair bit of cranking, the car did fire up. It restarted willingly too. This was good. I left it to idle for a bit and then the car just slowed down and stalled. A restart was more difficult and when I primed the pump this time I could hear air squeaking from somewhere near the pump or the filter, just not quite where. Car was an absolute pig to get to start again and wouldn't idle for very long so I knew I had an air leak somewhere and it must have been a pretty bad one. Not sure where it would be exactly, I checked over all the connections I'd disturbed and noticed some chafe marks on the new hose going into the new fuel filter housing, so I repositioned those.
Image

While this was good for routing the pipes, they squashed right up against the bonnet and the pipe going to the injector pump was a bit too close to the mechanism for my liking. I readjusted everything again to fix that so now the pipes can't chafe or touch any moving parts. The shorter hose has a bit of a kink so I will probably have to replace that with a slightly longer piece and then I'll cable tie the hoses together so they don't flap about. I wish I could just get the proper kind of original filter top new, then I wouldn't have this routing issue. I did try fitting them to the opposite side of the filter housing and the LHM reservoir gets in the way.
Image

That done I tried to start the car and could see diesel bubbling, literally, out of the top of the fuel filter. I reckoned I'd found my air leak and, annoyingly, it was where the new parts were. Removing the fuel filter confirmed it. The top O ring has stretched massively and I don't know why, I was very careful installing it and didn't pinch the seal. I put the filter and top together off the car when I replaced them and then fitted it to the car, so nothing should have been unseated. Suffice to say, I've ordered replacement seals, perhaps that will cure the air leak issue. It is annoying when new parts fail, this filter and seals have done maybe four miles total.
Image
User avatar
Jaba
1K Away
Posts: 1893
Joined: Tue Jul 05, 2005 7:54 am
Location: Usually in the garage
My Cars: BX GTi, C3 Auto
x 80

Re: C'est Bleriot - 1987 17RD Hatchback

Post by Jaba »

What bad luck you are having. You fix one leak and then find that you have to move on to the next one. Patience is needed for BX ownership sometimes. But it is all the more rewarding when you finally get it back on the road.
Your problems make the few BX niggles that I am having to sort look like nothing at all PAH.
The Joy of BX with just one Citroën BX to my name now. Will I sing Bye Bye to my GTI or will it be Till death us do part.
User avatar
vulgalour
BXpert
Posts: 553
Joined: Mon Feb 04, 2013 11:30 am
Location: Kent
My Cars: 1980 Austin Princess 1.7 HL
1987 Citroen BX 17RD
x 105

Re: C'est Bleriot - 1987 17RD Hatchback

Post by vulgalour »

I hadn't really expected to have to replace almost every fuel hose under the bonnet, the fuel filter housing, and the fuel filter, to cure this issue and I'm still not entirely certain I will have cured it even when I fit the new seal once it arrives (lead time of a week delivery on that at the moment). Once I've replaced the filter I'll know if I've got to the bottom of this air leak, if not I'll be moving on to the other hoses and potentially dropping the fuel tank. It's a palaver, especially given that the rest of the car is in such decent shape, though I'm thankful it's happening now and not when I can actually get out and drive it a lot, it does make things a little less frustrating than they might be.

The other problem is now I don't actually have a working car, they're both disabled because of me trying to fix things. At least the other half has a working car so we'll be relying on his not-exactly-new van until I resolve the BX's issues.
rutter123
Over 2k
Posts: 2695
Joined: Sun Sep 02, 2012 9:54 pm
Location: South Lincs
My Cars: 90 Bx Tzd turbo ven red 295k
74 D Super 5 black
05 Volvo V50 2.0d 180k
65 Peugeot Boxer work van 280k
x 136

Re: C'est Bleriot - 1987 17RD Hatchback

Post by rutter123 »

If it helps I have several o/e fuel filter units of which none gave any problems, I would gladly send you one or two if you like for the cost of the postage, maybe worth a try being as your unit is giving you problems.
90 BX Tzd turbo 294k SORN undergoing major surgery
90 BX Tzd turbo estate 46k awaiting surgery
65 Peugeot Boxer Van the new workhorse
52 Toyota Rav4 180k Bulletproof Jap reliability
User avatar
vulgalour
BXpert
Posts: 553
Joined: Mon Feb 04, 2013 11:30 am
Location: Kent
My Cars: 1980 Austin Princess 1.7 HL
1987 Citroen BX 17RD
x 105

Re: C'est Bleriot - 1987 17RD Hatchback

Post by vulgalour »

If the new seal doesn't cure it I'll take you up on that. Actually, even if the new seal does cure it I'll take one off your hands just in case.
User avatar
vulgalour
BXpert
Posts: 553
Joined: Mon Feb 04, 2013 11:30 am
Location: Kent
My Cars: 1980 Austin Princess 1.7 HL
1987 Citroen BX 17RD
x 105

Re: C'est Bleriot - 1987 17RD Hatchback

Post by vulgalour »

I had bought a Volvo 240 high level brake light for the BX, something I was going to make brackets and whatnot for. Then while shopping for something unrelated I had the sort of high level brake light I actually wanted to fit pop up in my suggestions. The algorithm worked! So today, I'm going to show you how I fitted this without a soldering iron and with the help of a C clamp.
Image

The first task is the scary bit, I had to remove the inner C pillar trim to check the wiring route I wanted to take was viable. There is wiring that runs into the tailgate for the central locking, so that gave me access from the tailgate into the car so that's the route I chose to take since it should be the most straightforward. First job is to remove the two small screws holding the top of the C pillar trim in place and then gently prise each of the fir tree studs out of the holes to get the C pillar trim off. I did not enjoy this part of the job one bit. You also need to be aware there's a plastic hook on the point at the back of the car, you don't want to be snapping that off.
Image

Image

That done, it confirmed the wiring route I wanted to take could be taken quite easily, didn't even have to drop the headlining, just ease the very corner out so I could see when the wire had been fed through. Before committing to anything, I then took a look at what the book suggested was the wiring diagram so I could determine which was the wire I need to splice into...
Image

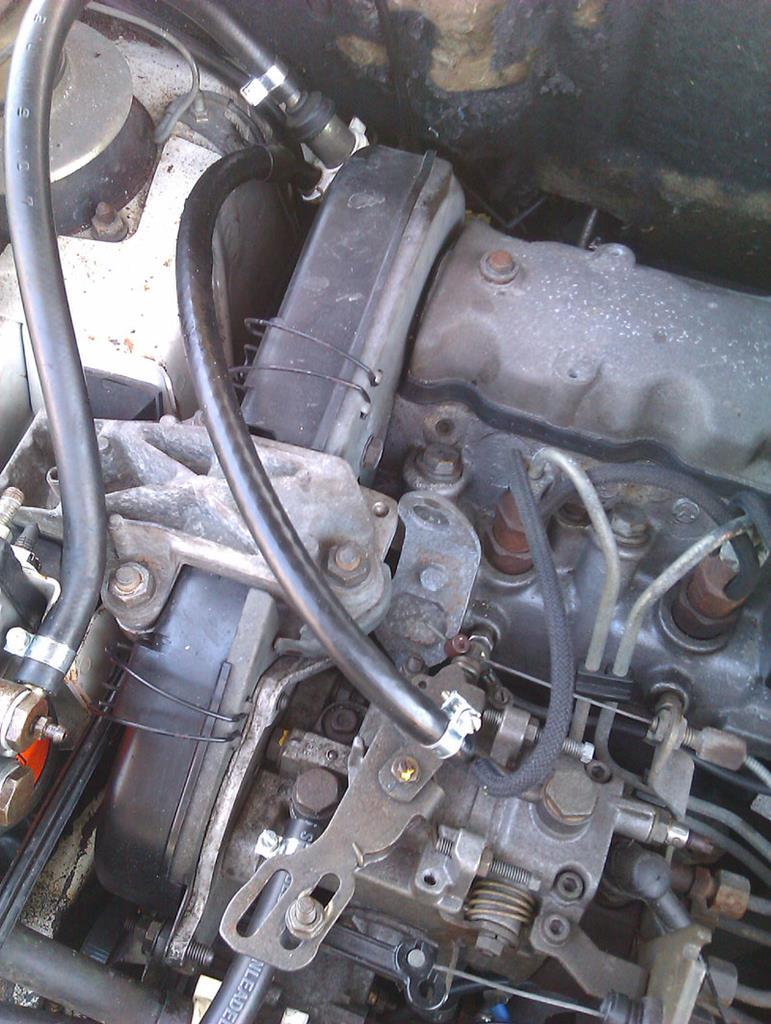
er... NOPE. I couldn't figure out how any of this, or any of the other wiring diagrams, related to what I saw on the car so instead I chose the practical approach. Built into the back of the light clusters is sort of a printed circuit board, only it's made out of a sheet of metal, that's held in place by melted bits of plastic. Looking at this I could understand which sections of it powered the brake and running lights and that it correlated to the brown plug on the back of the light cluster. The green plug is the piggy-back for the other light cluster, and the small yellow plug deals with the indicators. What I didn't know is which of the pins on the brown plug related to the brake light and I didn't know where my multimeter was (typically I found it when I was putting tools away after this job was done), so I went the practical approach. I stuck the wires from the new brake into the slots for the pins on the brown plug until I got a pair that lit the brake light up. I have no idea if this is good practice, but it seemed low risk as the worst I could theoretically do I assumed was to blow a bulb or a fuse. After a bit of trial and error, the only pins that operated the brakes were these.
Image

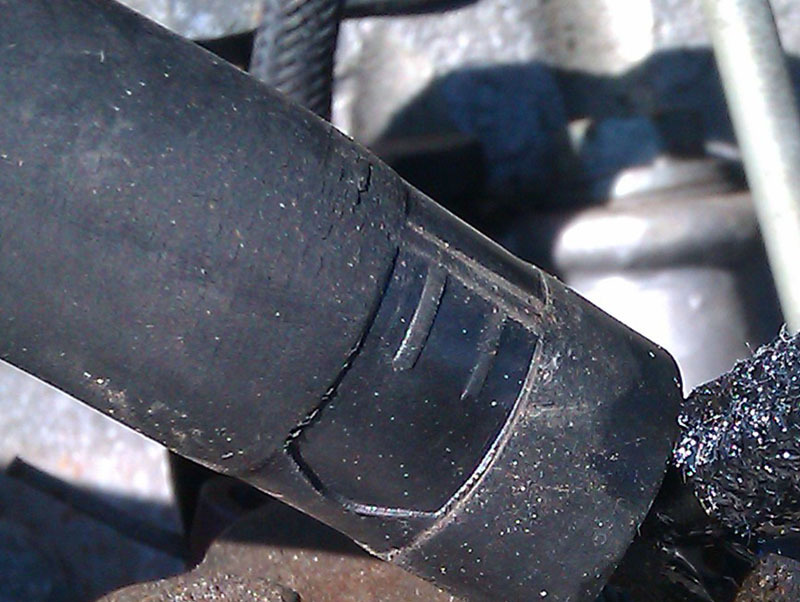
Then I had to figure out the best way to connect the new and old wiring. After a bit of jiggery pokery, I figured out that you can prise the black part of the plug out which gives you access to the back of the pins. The factory wiring just pushes into these pins to make a connection so, in theory, it made sense for me to do the same and stack the new wires on the old ones. A little nerve wracking prising the plug apart since I had nothing to replace it with, I found the best way was to prise it up with a screwdriver from each narrow side and then push the locking tabs in as you go, eventually it pops out. Then fiddle about with the new wire and test several times to make sure you had a good connection before putting the black insert back in. I did have to resort to a tool not commonly found in an electrician's kit which was a small C clamp so that I could press the black insert home, using pliers or similar got one side in and not the other, so this worked quite well. Image

More testing after that and the light was still working reliably. Good. Next was to tidy away the wiring. I didn't have the sort of clips I wanted for the one short bit of exposed wiring at the top of the tailgate, so I improvised with a clip I did have that was just bit enough. Eventually I'll replace this with some more suitable edge clips.
Image

The extra wire was tidied away and given a cable tie so it didn't end up hanging down outside the trim.
Image

I carefully reinstalled the trim I'd disturbed and the wire was mostly invisible, quite a satisfactory job. Further testing showed that the light was still working. There's no trim to hide the wire behind in the side pockets in the boot, what you see in there is literally the bodywork of the car. Fortunately there's a trim bracket you can hook the wire over to keep it close to the back of the light cluster so unless you go looking for it, you don't see the wire.
Image

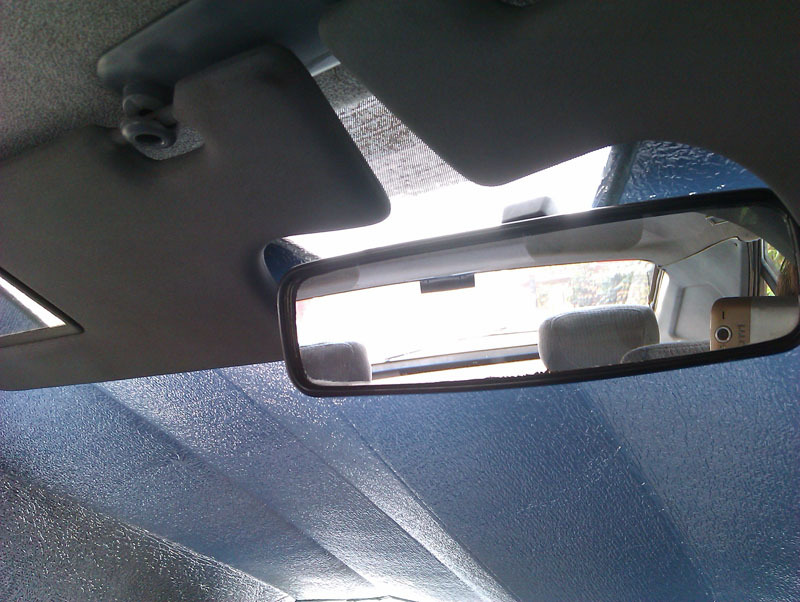
I'd already figured out any rear visibility issues, as in what it blocked from inside the car and where it was most visible from the outside of the car, which is why I settled on having it at the top of the screen instead of at the bottom. I did double-check this before instalation since there was enough wire to put the light at the bottom of the screen, it just didn't work as well there.
Image

Image

It's an unobtrusive bit of kit that gives me a little more peace of mind since I now have a brake light at eye level for other drivers. I like that it's not very obvious inside, or outside, of the car. Oh, and I suppose I should show it lit just to prove it does work. A little difficult to see in the daytime with the tailgate open, at night I'm sure it'll be much more obvious.
Image
User avatar
panky
BXpert
Posts: 408
Joined: Mon Jan 22, 2018 4:44 pm
Location: Widnes
My Cars: 1985 BX 19 GT (DKK), 1971 Morris Minor Traveller, 1971 Commer Auto-Sleeper, 1969 Commer Jennings Roadranger.
'88 BX GTi (a long time ago)
x 78

Re: C'est Bleriot - 1987 17RD Hatchback

Post by panky »

Nice satisfying little job nicely done
Image
User avatar
TizzyD
BXpert
Posts: 537
Joined: Fri Jun 01, 2012 10:36 pm
Location: Bedfordshire
x 10

Re: C'est Bleriot - 1987 17RD Hatchback

Post by TizzyD »

Hope you can get to the bottom of the idle/starting issue.

Yellow bulb covers I found made seeing road signs at night easier and never noticed any drop off in performance to standard bulbs (I usually use night breakers or Philips X-treme) I was also of the view that yellow headlights being uncommon makes you stand out a bit more at night so people are more likely to notice that you're there, also never had any issue with the fuzz with them either. Only reason I don't run them at the moment is I broke one and never got round to ordering another pair.
'02 Clio Dynamique 1.2 16v - 92K - Sold
'09 Yamaha YBR 125 - 1100 miles
'93 Bx 17 TZD Turbo - 240K - The Aubergine

Image
Post Reply