Well i got bored so started fitting aircon, well i started fitting the recirc air blowers and its turned into fitting the whole damn lot!
Good things i've discovered, fitting the blower fans, and the AC heating unit is prety easy! Infact fitting the wiring for the recirc doesnt seem too tasking (direct loom swap!), however the rest of the elcetrics look like they might become a little puzzling!
Note, perhaps mostly for Ian, Citroen do a full R134 gasket set, includes all the seals and magic green washers and only costs £14.84! Total rip off for a hand full of 20p seals and a magic washer, but the convenience of having a set of the right ones all together at the same time, priceless! Citroen Part Number; 6457 V1
Fitting of Aircon!
-
Vanny

- Merseyside resident
- Posts: 3608
- Joined: Tue May 17, 2005 11:48 pm
- Location: BXProject
- My Cars: BX 16v Ph2 - Jazz
BX 16v Ph2 - XPO - x 103

-
tom
- Citroen Sorceror
- Posts: 1283
- Joined: Fri May 20, 2005 8:51 pm
- Location: France
- My Cars: 2003- Passe-Partout 1.9 TGD estate
2005 Grolliffe Tizzydee turbo estate and sundry other BXs and Grace, a CX TRD.
2008 to 2023 - all sorts of stuff, some interesting
2024. TxD 1.9D estate. 'Wheelybin'. Much worse than expected. Scrapped.
2025 Grogan. 1.9 TD Evasion Image Break. LHD. - x 38
-
Vanny
- Merseyside resident
- Posts: 3608
- Joined: Tue May 17, 2005 11:48 pm
- Location: BXProject
- My Cars: BX 16v Ph2 - Jazz
BX 16v Ph2 - XPO - x 103
Tom, its looking terminal!
http://bxclub.co.uk/forum/viewtopic.php ... c&start=15
cant afford to do much about it right now, but ASDA do oil for £2.48 for 5 litres so the engine can eat that for now!
On the aircon front! Seals are ordered, looms have been hacked to death (i have looms from a 309 turbo which i am integrating into the BX loom to leave some magic features ), but i've lost my instructions!
I spent a good two hours on the phone to a guy who did DIY aircon solutions (think it might have been the AutoKool guy), and had a big long list of instructions on how to get this project rolling, but i lost them!
So questions for the learned! I'm going to convert the whole system to R134a, have sourced the seals as above, and i'm aware that the mineral oil in the system at the moment isn't suitable for use with the R134a, and it needs to be replaced with PAG oil, but how much and where?
From memory i need to put oil in some or all of the following;
Compressor
Pipework assembly
Condensor
Evaporator & TX valve
Any suggestions how much?
Also, does the pump need to be serviced in anyway before it goes onto the car? Do i need new ports to get the new gas into the system through the old ports, or can i just buy an adapter when i come to fill it? And finally, is there some sort of cut off valve between low and high side, and does it need replacing?[/url]
http://bxclub.co.uk/forum/viewtopic.php ... c&start=15
cant afford to do much about it right now, but ASDA do oil for £2.48 for 5 litres so the engine can eat that for now!
On the aircon front! Seals are ordered, looms have been hacked to death (i have looms from a 309 turbo which i am integrating into the BX loom to leave some magic features
I spent a good two hours on the phone to a guy who did DIY aircon solutions (think it might have been the AutoKool guy), and had a big long list of instructions on how to get this project rolling, but i lost them!
So questions for the learned! I'm going to convert the whole system to R134a, have sourced the seals as above, and i'm aware that the mineral oil in the system at the moment isn't suitable for use with the R134a, and it needs to be replaced with PAG oil, but how much and where?
From memory i need to put oil in some or all of the following;
Compressor
Pipework assembly
Condensor
Evaporator & TX valve
Any suggestions how much?
Also, does the pump need to be serviced in anyway before it goes onto the car? Do i need new ports to get the new gas into the system through the old ports, or can i just buy an adapter when i come to fill it? And finally, is there some sort of cut off valve between low and high side, and does it need replacing?[/url]
-
Jaba

- Over 2k
- Posts: 2025
- Joined: Tue Jul 05, 2005 7:54 am
- Location: Usually in the garage
- My Cars: BX GTi, C3 Auto
- x 113
Vanny,
there have been many postings recently on this subject. If you search you will have many happy hours of reading and research.
If you go to Sanden's site and download the service manual for your compressor (probably a SD709) you will find the info you need in there to get the system to run on 134a.
More specifically, to answer your questions you need 5 fl.ozs/140cc of PAG 10 oil. Autokool sell PAG46 which is the same stuff under a different name. You have to fit a R134a type adapter to each recharge valve on your hoses.
You will need to get a new drier receiver too. So many ££££s in prospect.
The Joy of BX with just one Citroën BX to my name now. Will I sing Bye Bye to my GTI or will it be Till death us do part.
-
tom
- Citroen Sorceror
- Posts: 1283
- Joined: Fri May 20, 2005 8:51 pm
- Location: France
- My Cars: 2003- Passe-Partout 1.9 TGD estate
2005 Grolliffe Tizzydee turbo estate and sundry other BXs and Grace, a CX TRD.
2008 to 2023 - all sorts of stuff, some interesting
2024. TxD 1.9D estate. 'Wheelybin'. Much worse than expected. Scrapped.
2025 Grogan. 1.9 TD Evasion Image Break. LHD. - x 38
Jaba has it right Vanny. You must have a drier with suitable dessicant and I confirm the quantity of PAG oil which is poured into the compressor, the valves of which do the high/low side isolation. All the other bits can be washed out with white spirit except the compressor, which just needst to be drained and refilled. Tape over all open pipes when you have finished working on a component; foreign matter is bad news.
Returning to your engine, I take it that this is the one you rebuilt? If so, was there a wear ridge at the top of the bore? Even .001" could give problems if you have replaced the rings with ordinary ones and not ridge dodgers (cracked rings). Failing that, you appear to hacve suffered a major lubrication failure somewhere. XU motors are oil tight for 300,000 miles and don't burn the stuff but you have low oil pressure and ring blow by. The two together sound like bad news although it may be that you have fitted a ring upside down.
Returning to your engine, I take it that this is the one you rebuilt? If so, was there a wear ridge at the top of the bore? Even .001" could give problems if you have replaced the rings with ordinary ones and not ridge dodgers (cracked rings). Failing that, you appear to hacve suffered a major lubrication failure somewhere. XU motors are oil tight for 300,000 miles and don't burn the stuff but you have low oil pressure and ring blow by. The two together sound like bad news although it may be that you have fitted a ring upside down.
-
Ian_Fearn

- Spender lotta cash on Citroens
- Posts: 2231
- Joined: Fri Jun 03, 2005 9:51 pm
- Location: Derbyshire
-
Vanny
- Merseyside resident
- Posts: 3608
- Joined: Tue May 17, 2005 11:48 pm
- Location: BXProject
- My Cars: BX 16v Ph2 - Jazz
BX 16v Ph2 - XPO - x 103
Sandens Website;
http://www.sanden.com/support/index.html
Have spent the day getting my head around the wiring, its a bloody mess! As tom has said before, the master Citroen diagram from the good book is just a little WRONG! Have managed to get my head round it though, have written up some wiring diagrams and will post once i've checked they work.
Biggest problem i've had today is getting the washer jets to work again, they went a little mad and stopped working! Shorted somehting out and they're working now! Seals will be in from Citroen tomorrow, they still stock on the code above.
Recirc flaps are way cool!
From other posts i find the following;
http://www.ariazone.co.uk/ Supplier of Mat Fenwicks condensor
Gas Weights
16v system takes 1kg of gas and the TZi system takes 800g for R134a
Vacuum
Reading from a post made by AlanS;
5) Remove compressor from car, upend it and let as much oil as possible drain out. Try not to do it in rainy weather or wet conditions. Use tha oil as Tom has said and refit to the car. If someone has a set of gauges, once it has been refitted and reconnected, then go to the local tip or recycling centre and see if you can buy an old but still operational sealed unit from a fridge or freezer, (Out here, they have thousands of the bloody things.) Wire it so it can run directly off a power lead. (Usually it is active to a terminal that connects to a wire leading into the cabinet that comes back via one marked "C" (control) and a neutral direct to a motor terminal. So N to motor, A to "C" an it should run.
Cut the discharge line (smaller pipe usually 3/16") and run through a small jar of oil so you can detect bubbles. Fit a 1/4" male flare fitting to the suction side by either getting union and cutting in half or by buying from your parts guys a 1/4" Schraeder connection they use for recharging refrigeration systems, and braze that onto the suction side which is usually 5/16"
That connected to your system for a fair amount of time, say an hour at a time, will evacuate most of the air from the sytstem and give you a vacuum. Going DIY, that should be good enough to rid the system of air and boil off the moisture. Often the fridge guys like to run their 2 stage pumps on them for a while just to be sure.
As a test for leaks, once the bubbles have stopped comiong through the pump, and it has run for a further few hours, take a reading on the gauge and then remove the gauge carefully trying t not allow any air to get back into the system as you remove them. Refit caps and use the car for a day or so and then carefully reconnect the gauges. The reading should be the same. If however, it has returned to zero, go looking for leaks. If it is just up fractionally, reconnect the pump and give it a few more hours as that can mean there's moisture in there and some of it has released.
When you're sure the vacuum is defintely holding, take it to whoever you have arranged and get it charged. Charging will take less than 15 minutes.
One word of advice on using a fridge compressor (sealed unit) as a vac pump; do not allow them to run for several hours without a rest as under nnormal operating conditions, the gas cycling through the system acts as a coolant on the internals and long stretches under vacuum can cause them to overheat.
Sounds like a cool toy to make (vacuum pump), but sounds like a long winded method for a quick recharge! Will a friendly AC man be able to suck it out and top it up? What should i expect to pay?
I gather from my readings that trying to charge a system that hasn't been vacuumed is rather pointless and result in a crap system?
Thermistor!
From Aussie Frogs;
sounds like i will eventually need a thermistor that is 4700 ohm at 25 degrees C that rises to 12000 ohms at 0 degress C, so i intend to fit a spare NOW rather than have to try get one in when it eventually fails!
http://www.maplin.co.uk/Search.aspx?cri ... &source=15
TX?
TX, meaning transmission, meaning the bit where the AC system puts out the cold air? And the TX valve is the bit that controls this output and is it's self controlled by the magic black box behind the 'doors open panel'
Finally
Probably the longest and best post i've read is the following;
http://www.frenchcarforum.co.uk/forum/v ... hp?t=11605
Apologies for making these things so bloody long winded, i'm hopefull that i can create a nice simple 'how to guide' for future use! Theres a lot of info hidden in these pages (didnt realise just how much info there is!) and hopefully i can give a nice helpfull guide to Mr Fearn! (just want to make some notes as i go!)
Last edited by Vanny on Wed Jul 26, 2006 12:56 am, edited 1 time in total.
-
Jaba
- Over 2k
- Posts: 2025
- Joined: Tue Jul 05, 2005 7:54 am
- Location: Usually in the garage
- My Cars: BX GTi, C3 Auto
- x 113
Vanny,
What have you found is incorrect with the wiring diagram ? For a diesel- - non ECU car this is the appropriate diagram and apart from the heater blower fans high speed circuit it is correct as far as I know. Well, the cable colour codes seldom tally as well.
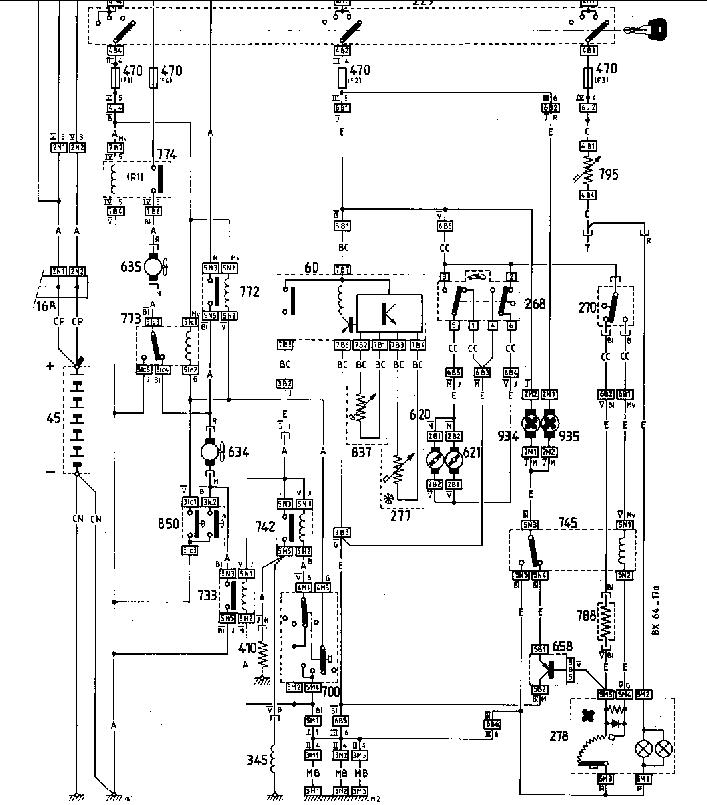
Out of interest do you plan to fit and wire in items 270, high speed relay on when temp control is turned to cold and 788 extra resistor ?
I am puzzled by what this resistor does. It is 1.2k and I have one car with it fitted and another without it. Both sets of blower fans work at the same speed, have the same power regulator and when I connect in the resistor to the circuit where it is missing it makes ZERO difference to the fan speed at any position. Hence I have not bothered to fit it.
Perhaps someone with electronics knowledge may be able to explain what this does.
Similarly I have not fitted the microswitch 270 either
A point about the Tx valve. It is known as the expansion valve here. It is a mechanical device which controls the rate of expansion, using a needle valve, of the refrigerant according to the evaporator temperature. It is not linked to the black box. This is simply an on/off switch and a switching relay for the compressor and radiator fans in aircon mode.
Broken frig - does that mean you will be making a vacuum pump ? If so can I be the first to test it ?
What have you found is incorrect with the wiring diagram ? For a diesel- - non ECU car this is the appropriate diagram and apart from the heater blower fans high speed circuit it is correct as far as I know. Well, the cable colour codes seldom tally as well.
Out of interest do you plan to fit and wire in items 270, high speed relay on when temp control is turned to cold and 788 extra resistor ?
I am puzzled by what this resistor does. It is 1.2k and I have one car with it fitted and another without it. Both sets of blower fans work at the same speed, have the same power regulator and when I connect in the resistor to the circuit where it is missing it makes ZERO difference to the fan speed at any position. Hence I have not bothered to fit it.
Perhaps someone with electronics knowledge may be able to explain what this does.
Similarly I have not fitted the microswitch 270 either
A point about the Tx valve. It is known as the expansion valve here. It is a mechanical device which controls the rate of expansion, using a needle valve, of the refrigerant according to the evaporator temperature. It is not linked to the black box. This is simply an on/off switch and a switching relay for the compressor and radiator fans in aircon mode.
Broken frig - does that mean you will be making a vacuum pump ? If so can I be the first to test it ?
The Joy of BX with just one Citroën BX to my name now. Will I sing Bye Bye to my GTI or will it be Till death us do part.
-
Vanny
- Merseyside resident
- Posts: 3608
- Joined: Tue May 17, 2005 11:48 pm
- Location: BXProject
- My Cars: BX 16v Ph2 - Jazz
BX 16v Ph2 - XPO - x 103
The way i have tackled the wiring is to approach it as two totally seperate systems, firstly the blower system including the AC Control Unit (60) and secondly the Engine fans system. Between the two systems there is only ONE wire linking the two together, this is the 'AC on' trigger from the control unit.
The first system went in totally un molested and does indeed include the cooling fan second speed resistor (788) and the Max AC switch (270). I do agree that the resistor does seem a little pointless, and has a good foot of extra cable on it so could be located just about anywhere, i had wondered if it was meant to go in the fan unit and its resistance change with ambient air temp, but this still serves no cause! The max AC switch does however have some effect on the current setup and with the blowers only just on, then the switch is depressed there is a deffinate increase in air output! THough at the moment i have no ducting so it is easy to see
The second system will be rather butchered to fit my car, and the wiring diagram i have does NOT match the actual wires! The major difference is in the AC relay (742), the fast idle electrovalve (345) runs from pin 3 of the AC relay, so the second AC is turned on, the idle revs increase, regardless of the pressure switch. the AC relay is also supplied the wrong way round! The +ve trigger supply comes from the fused supply and ONLY goes to pin 2, it doesnt branch off ti the cooling fan relay, or the pressure switch. There is also an extra 3 pin plug not on the diagram!
The actual wiring circuit is MUCH simpler than the one in the book, However my wiring circuit will be much simpler again!
Because i have Pug 309 Dturbo rad fans and wiring loom installed, it has a connector for running AC, its a simple plug in afair with four wires, +ve, -ve, high speed and low speed connection, thus i can dispence with relays 733, 772 and 773, at which stage the wiring diagram is simplified to a coupl of conectors and a single relay (742).
This should leave enough room in the scuttle for relays for the headlights and the starter motor
Shrunk diagram is as follows;

I have all diagrams and pretty pictures on site;
BX Project
The first system went in totally un molested and does indeed include the cooling fan second speed resistor (788) and the Max AC switch (270). I do agree that the resistor does seem a little pointless, and has a good foot of extra cable on it so could be located just about anywhere, i had wondered if it was meant to go in the fan unit and its resistance change with ambient air temp, but this still serves no cause! The max AC switch does however have some effect on the current setup and with the blowers only just on, then the switch is depressed there is a deffinate increase in air output! THough at the moment i have no ducting so it is easy to see
The second system will be rather butchered to fit my car, and the wiring diagram i have does NOT match the actual wires! The major difference is in the AC relay (742), the fast idle electrovalve (345) runs from pin 3 of the AC relay, so the second AC is turned on, the idle revs increase, regardless of the pressure switch. the AC relay is also supplied the wrong way round! The +ve trigger supply comes from the fused supply and ONLY goes to pin 2, it doesnt branch off ti the cooling fan relay, or the pressure switch. There is also an extra 3 pin plug not on the diagram!
The actual wiring circuit is MUCH simpler than the one in the book, However my wiring circuit will be much simpler again!
Because i have Pug 309 Dturbo rad fans and wiring loom installed, it has a connector for running AC, its a simple plug in afair with four wires, +ve, -ve, high speed and low speed connection, thus i can dispence with relays 733, 772 and 773, at which stage the wiring diagram is simplified to a coupl of conectors and a single relay (742).
This should leave enough room in the scuttle for relays for the headlights and the starter motor
Shrunk diagram is as follows;
I have all diagrams and pretty pictures on site;
BX Project
-
tom
- Citroen Sorceror
- Posts: 1283
- Joined: Fri May 20, 2005 8:51 pm
- Location: France
- My Cars: 2003- Passe-Partout 1.9 TGD estate
2005 Grolliffe Tizzydee turbo estate and sundry other BXs and Grace, a CX TRD.
2008 to 2023 - all sorts of stuff, some interesting
2024. TxD 1.9D estate. 'Wheelybin'. Much worse than expected. Scrapped.
2025 Grogan. 1.9 TD Evasion Image Break. LHD. - x 38
Good work, and now a public service announcement:
The unit marked 60, the control module, has as you will see, a relay within which switches the clutch current. It will be the first bit to fail and you won't get another one easily nor cheaply. Take the wire from the relay and route it to the coil of another relay, taking the other end of the coil to earth. Take the first contact of the relay to +12v and use the other to mirror the output of unit 60. This will protect the black box against burnt out relays.
Vanny is right about the wiring. Later models have the thermoswitch in the positive line to the fans.
-
DavidRutherford

- BX Digit man!
- Posts: 2706
- Joined: Wed May 18, 2005 5:07 pm
- Location: Placing comments on YouTube.
TX valve means "Thermal Expansion" valve.Vanny wrote:TX?
TX, meaning transmission, meaning the bit where the AC system puts out the cold air? And the TX valve is the bit that controls this output and is it's self controlled by the magic black box behind the 'doors open panel'
It's the point in the system where high pressure, ambient temperature liquid refridgerant enters the evaporator. The pressure drops (from high side to nearly low side pressure) and the liquid evaporates, causing cooling. It's not electronically controlled.
this might be a signature