Anyway, last week I decided to do the cambelt. My BX is a petrol and though there is an FAQ on changing the cambelt, it’s for diesels with a very convoluted set of stories. The Haynes manual for the petrol is not too inspiring, because all the pictures are taken with the engine out of the car !
So here is my description of doing a cambelt on a BX petrol engine, in the car, without an assistant (my son had gone on holiday).
0. Put the handbrake on and put the car into high suspension then jack up the car on the driver’s side (UK car) and place axle stands at front and back sill positions on driver’s side. Place some supports on the passenger side (UK car) in case the suspension goes down slowly (this is because you might be jacking up the engine later). Remove the front wheel on driver’s side, then remove the plastic panel on the inner wing so that you can see the engine pulley.
1. Remove the spark plugs, and place a socket with a “breaker bar” as in the picture below. Then use the ignition key to run the starter motor for one second, to “break” the torque of the pulley bolt. Check that you can undo the pulley bolt with a normal spanner, but do not fully remove the bolt yet. Remove the earth lead from the battery.

2. Remove the upper plastic cambelt inspection cover (10mm head one side, 13mm head other side). Remove the drive belt on the alternator and on the HP pump. While you’re at it, remove the alternator by pulling the large bolt back against the inner wing, so that the alternator can be lifted out with the bolt in place, see picture below.

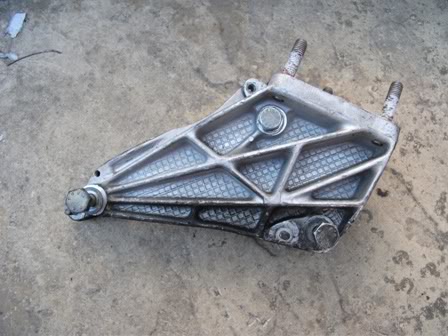
3. It is possible to do the cambelt without removing the engine support on the driver’s side, but IMO it makes life easier if you remove the engine support and also jack up the engine a bit higher, all described next. Put a jack under the sump (at the pulley end) and then remove the upper part of the engine support. Heads are 16mm. Use plug spanner on the recessed nut. When it is removed, things should look like the picture below.

4. Now raise the engine until the top of the lower part of the engine support is level with the top of the inner wing, as in the picture below.

5. Remove the central plastic cambelt cover which covers the cambelt below the engine support. This is held in place by two nuts (10mm head) on the engine support, a single nut (11mm head) in the middle of the cover, and a bolt (10mm head). Now remove the lower part of the engine support. The picture below shows it removed from the engine. The top bolt has a 16mm head, the other two have 17mm heads (trust Citroen to vary your enjoyment on any job).
6. The next 3 pictures show the spanners in use. You can get a socket on one of them (bonus !!)


7. Using the pulley bolt, rotate the engine clockwise until the cambelt sprocket is in position so that a 10mm dowel can be inserted as below (I used an M10 bolt). There should be a small centre-punch mark on the sprocket, at the location I have marked with Tippex.

8. Check that a 10mm dowel can also be inserted into the pulley as picture below. Now remove the pulley bolt, then the pulley using a puller. Make sure you remove and keep safe the Woodruff key. FYI the pulley is 5 inch diameter, so use a 6 inch puller. See picture. Now you can remove the lower plastic cambelt cover (two bolts 11mm heads, one bolt tucked away with 13mm head).


9. Slacken the two nuts holding the tensioner (11mm heads). On the left of the tensioner wheel there is a small cam, and if you reach round behind the cam you can feel a spindle with a square head for turning the cam. There is a locknut (16mm head) which locks the spindle. Slacken that locknut. Haynes says “Use a spanner on the square end of the cam spindle to turn the cam to the horizontal position”, why not try a triple somersault on a pogo stick too. Instead, compress the tensioner using a long screwdriver as picture below, and turn the spindle by hand. Tensioner cam should then be horizontal, which holds the tensioner wheel off the belt. See picture


10. Before removing the cambelt, I marked it with Tippex in two places. Place one mark on the belt, above the marked tooth on the camshaft sprocket, and the other mark adjacent to a mark you will see on the crankshaft sprocket, see picture below (Tippex also on the mark on crankshaft).

11. When the belt was removed, I then checked that the marks on the old belt line up with the marks on the new belt (your new belt should come pre-marked).
12. I also renewed the tensioner (not in Haynes anywhere but surprisingly easy to do). To do this, use the long screwdriver again to compress the spring, move the tensioner cam back to the vertical position and let the tensioner wheel come up against the metal barrel which holds the spring. Fully remove the tensioner cam and the two 11mm nuts, then the tensioner should come off complete with spring and barrel. Be careful not to let the barrel slip off the wheel or it might end up next door. Carefully remove the barrel and then spring, then put them onto the new tensioner, and carefully put it onto the engine and put the 11mm nuts back, and the tensioner cam. Then turn the tensioner cam to the horizontal position again.
13. Before fitting the new belt, put Tippex marks on the edges of the new belt next to the main marks on the surface of the belt. Fit the belt round the crankshaft sprocket first (align the Tippex marks as in previous picture), then round the camshaft sprocket (make sure the other Tippex marks are aligned as in picture below), then round the water pump and the tensioner wheel.

14. Turn the tensioner cam back to the vertical position and tighten the two 11mm locknuts. The diagram below shows the situation you should now have.

15. If you have followed the procedure above exactly, then everything is definitely aligned correctly. Replace the lower plastic cambelt cover. Then put the Woodruff key back, then the pulley, and the pulley bolt (do not tighten yet). As a final check, make sure that the 10mm dowel goes back into the pulley. Then remove both 10m dowels.
16. Turn the crankshaft clockwise two full turns using the pulley bolt. Slacken the two 11mm nuts on the tensioner, then retighten them. Tighten the 16mm locknut on the tensioner cam.
17. Replace the lower engine support. Then lower the engine and replace the upper engine support, then remove the jack from the sump. To tighten the bolt on the crankshaft pulley, I put the car into fifth gear, and took the pulley bolt up to 18 kgfm with the handbrake easily holding it (this must be why Citroen put the handbrake on the front wheels).
18. Replace the alternator, refit and tension both drivebelts, replace the sparkplugs, then put the earth lead back on the battery.
19. Haynes recommends running the engine up to temperature to recheck the tension. Run the engine until the cooling fan starts to operate, then “allow it to cool down for at least two hours”. I think this is worth doing. Haynes then says “Rotate the crankshaft to the TDC position No 1 cylinder firing”. Just as useful, I suggest you remove the spare wheel and stand it on the car roof with the valve at 3 o’clock position. Whatever you fancy, when done, slacken and retighten the tensioner nuts.
20. Finally refit the central and top plastic camshaft covers. Refit the plastic panel on the inner wing, refit the front wheel, remove the axle stands, and go for a drive.
Edit 3/4/12: picture re-org in photobucket