GT mediated Awesomeness
-
saintjamesy89

- Over 2k
- Posts: 2096
- Joined: Tue May 04, 2010 8:01 pm
- Location: Somerset
- My Cars: 1985 Citroen BX19 GT
1985 Citroen BX16 TRS 'SE' auto
1988 Volvo 740 2.0 GL Hearse
1990 Volvo 740 2.3 GLE Estate
2013 Nissan Leaf Acenta 24Kw - x 196
Re: GT mediated Awesomeness
Ok, do the followers just pop out with the use of a very delicate screwdriver - or is there a special way to remove them? I'll have a gander at Haynes tonight to see about shim and valve clearance checks.
I'm not a Saint, or a James, but a Tom Saint-James!
Mes voitures:
1985 Citroen BX19 GT
1988 Volvo 740 2.3 HPT GL Hearse
2007 Lexus RX 400h SE hybrid
2007 Citroen C6 Lignage 2.2HDI manual
2013 Lexus RX 450h Luxury
Mes voitures:
1985 Citroen BX19 GT
1988 Volvo 740 2.3 HPT GL Hearse
2007 Lexus RX 400h SE hybrid
2007 Citroen C6 Lignage 2.2HDI manual
2013 Lexus RX 450h Luxury
-
citsncycles

- Over 2k
- Posts: 3224
- Joined: Sun Aug 08, 2010 9:14 pm
- Location: Dursley, Gloucestershire
- x 1
Re: GT mediated Awesomeness
I pulled mine using a valve grinding tool (basically a sucker on a stick), although you should be able to pull them out with a large pair of pliers or similar, so long as you're careful not to mark any of the surfaces.
As with the cam followers, make sure you mark everything or at least keep it all in the same order as they will have all worn into their respective places by now.
As with the cam followers, make sure you mark everything or at least keep it all in the same order as they will have all worn into their respective places by now.
Mike Sims
BX 19RD Estate Mk1 - Timex!
BX 4X4 Estate - Oh god, I've done it again!
BX 17RD MK1 - it called to me!
BX14 TGE, - SOLD
XM Turbo SD,GS Club Estate,Visa 17D Leader,HY Pickup,Dyane Nomad,Dyane 6,2CV AZL,Falcon S,Trabant P50,3x Land Rovers (88" series 1,109" series 2a FFR,series 2a Marshall ambulance),DKW F7, Lambretta LD150 x 1.5,Mobylette SP93,Ural Cossack,Ural M63,CZ 250 Sport,Honda Varadero 125,lots of bicycles & tricycles including (but not only) Sunbeams,Higgins & Bates!
-
mat_fenwick

- Moderator
- Posts: 7330
- Joined: Tue Sep 20, 2005 4:08 pm
- Location: North Wales
- x 22
Re: GT mediated Awesomeness
I've previously used a magnet too.

1993 1.9 TZD Turbo Estate
1996 3.9 V8 Discovery
1993 VW LT35 campervan
1985 Hyundai Stellar V8
2016 Hyundai iLoad
-
BX Bandit

- Backslash Bandit
- Posts: 2588
- Joined: Thu Aug 31, 2006 7:46 am
- Location: Home
- My Cars: Cars
- x 3
Re: GT mediated Awesomeness
As fits and cycles said, small metal discs about the size of a 5penny piece, but you'll need other shims if they need adjusting and a Verneer calliper to measure the shim thickness. They vary by as little as 0.005mm !saintjamesy89 wrote:Thanks TimSure will.
Bandit, no shims have come off yet, just the bearing caps. Are the shims the big circular bits that the cam lobes contact (as seen in the last picture above)? Regarding the dash, the GT was the only MK1 to have a non lego dash, discounting the digit of course.
I guess Tims GT must have the same dash as yours then? I never knew about that dash.
1990 BX 16V Platinum Grey
1990 BX TGD White
1960 Morris Minor Clarondon Grey
1971 Triumph 2000 Auto Valencia Blue
1990 BX TGD White
1960 Morris Minor Clarondon Grey
1971 Triumph 2000 Auto Valencia Blue
-
MULLEY

- Over 2k
- Posts: 8406
- Joined: Thu Jun 22, 2006 11:10 pm
- Location: Derbyshire
- My Cars: 1999 Xsara LX 2.0HDI (90) Hatch - Fern
2002 C5 2.0 HDI (110) Estate - Jasmine - SORN
2011 Mini Cooper D Clubman - SOLD
2016 Mercedes A180D Sport - Auto refinement
1992 TZD Turbo - Bluebell - SORN
1992 TZD Turbo Estate - SORN
1991 Gti 16V - Blaze - crash damaged, will get repaired - SORN
1990 Gti 8Valve SOLD - looks like it's been scrapped
2002 Mini Cooper S - SOLD - i miss this car
1992 TXD - Scrapped in March 2014
1988 CX 25 GTI Turbo2 - SORN
1996 - AX Memphis 1.5D - Dream - SORN - x 8
Re: GT mediated Awesomeness
All the GT's had that Dash, it does look a bit odd in a MK1 when you're expecting the PRN version.
2002 C5 2.0 HDI Estate - Jasmine - Now SORN
2011 Mini Cooper D Clubman - SOLD
2016 Mercedes A180D Sport - Auto refinement
1992 TZD Turbo - Bluebell - My daily
1991 Gti 16V - Blaze - crash damaged, will get repaired.
1990 Gti 8Valve SOLD - looks like it's been scrapped
2002 Mini Cooper S - SOLD - i miss this car
1992 TXD - Scrapped in March 2014
1988 CX 25 GTI Turbo2 - SORN
1996 - AX Memphis 1.5D - Dream - SORN
I'm not just a username, i'm also called Matthew.
-
saintjamesy89
- Over 2k
- Posts: 2096
- Joined: Tue May 04, 2010 8:01 pm
- Location: Somerset
- My Cars: 1985 Citroen BX19 GT
1985 Citroen BX16 TRS 'SE' auto
1988 Volvo 740 2.0 GL Hearse
1990 Volvo 740 2.3 GLE Estate
2013 Nissan Leaf Acenta 24Kw - x 196
Re: GT mediated Awesomeness
I think, if it will involve vernier calipers and extra shims of correct thickness, then that may just be a little out of my depth. Unless anyone else disagrees and thinks I should look at the valves? From comments above, I should be checking valve clearances and to adjust if necessary you use a different size/depth shim?
I have been meaning to check Haynes on their valve check procedure, so I can understand what's there - I really don't know what goes on between the cam follower and valve end - except that it involves the valve, a guide, a spring and a shim. So I drew a little picture to how it works in my mind.
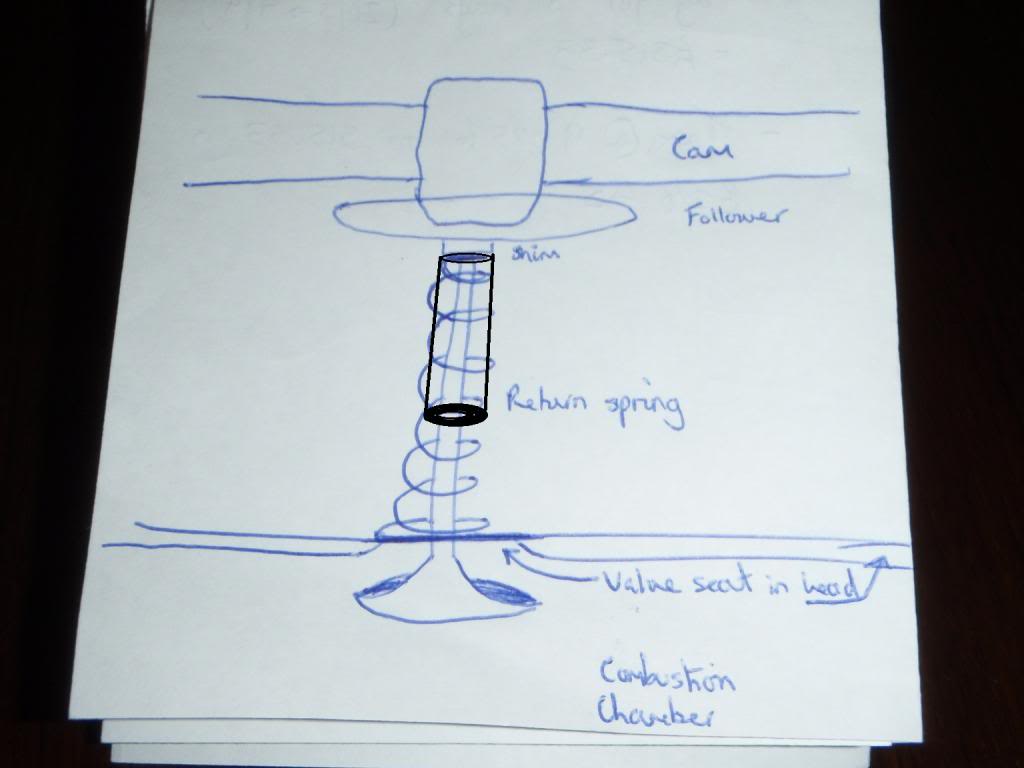
After drawing this, I changed my mind, it makes more sense for the guide to be inside the spring. The guide and spring resting on the head side (as spring is in picture), as the spring would need a static face for it to provide the up-force to return the valve to closed when the cam rotates and releases the pressure on the spring/follower .The top of the spring rests on the bottom of the cam follower and the shim to fit between the follower and valve. I guess the shim is the 'adjustable' bit between the valve and the follower that assures the valve is actually closed when at rest.
Do you have any photo's of the valvetrain when you had Timex in bits Mike? Assuming that they're similar in this respect, they are both XU's but yours is a diesel, so may be different. It'd be interesting to see what it looks like before/if I delve in there.
Last edited by saintjamesy89 on Fri Jun 21, 2013 10:55 pm, edited 2 times in total.
I'm not a Saint, or a James, but a Tom Saint-James!
Mes voitures:
1985 Citroen BX19 GT
1988 Volvo 740 2.3 HPT GL Hearse
2007 Lexus RX 400h SE hybrid
2007 Citroen C6 Lignage 2.2HDI manual
2013 Lexus RX 450h Luxury
Mes voitures:
1985 Citroen BX19 GT
1988 Volvo 740 2.3 HPT GL Hearse
2007 Lexus RX 400h SE hybrid
2007 Citroen C6 Lignage 2.2HDI manual
2013 Lexus RX 450h Luxury
-
mat_fenwick
- Moderator
- Posts: 7330
- Joined: Tue Sep 20, 2005 4:08 pm
- Location: North Wales
- x 22
Re: GT mediated Awesomeness
This is correct. If you have a feeler gauge it's very easy to check the clearances at least, and if they are in spec. then that's all you need to do. If they are out of spec. then a simple bit of maths and measuring will tell you what size you need. I've got a bag full of different sizes, so can post/bring a few down to you if needed.saintjamesy89 wrote:From comments above, I should be checking valve clearances and to adjust if necessary you use a different size/depth shim?
Your drawing is pretty much what goes on, yes. Just pull one of the followers out (even a fridge magnet may have enough pull) and it will become clearer. The shim may stick to the underside of the follower (which is like an upturned bucket in shape) so don't worry if the shim appears to be missing!
1993 1.9 TZD Turbo Estate
1996 3.9 V8 Discovery
1993 VW LT35 campervan
1985 Hyundai Stellar V8
2016 Hyundai iLoad
-
saintjamesy89
- Over 2k
- Posts: 2096
- Joined: Tue May 04, 2010 8:01 pm
- Location: Somerset
- My Cars: 1985 Citroen BX19 GT
1985 Citroen BX16 TRS 'SE' auto
1988 Volvo 740 2.0 GL Hearse
1990 Volvo 740 2.3 GLE Estate
2013 Nissan Leaf Acenta 24Kw - x 196
Re: GT mediated Awesomeness
What am I feeling with the feeler? I guess it'll be a gap somewhere (no prizes for me for that assumption), as the cam is out we know all valves are closed (or at least they all should be!), so we're measuring the gap between...?
I'm not a Saint, or a James, but a Tom Saint-James!
Mes voitures:
1985 Citroen BX19 GT
1988 Volvo 740 2.3 HPT GL Hearse
2007 Lexus RX 400h SE hybrid
2007 Citroen C6 Lignage 2.2HDI manual
2013 Lexus RX 450h Luxury
Mes voitures:
1985 Citroen BX19 GT
1988 Volvo 740 2.3 HPT GL Hearse
2007 Lexus RX 400h SE hybrid
2007 Citroen C6 Lignage 2.2HDI manual
2013 Lexus RX 450h Luxury
-
mat_fenwick
- Moderator
- Posts: 7330
- Joined: Tue Sep 20, 2005 4:08 pm
- Location: North Wales
- x 22
Re: GT mediated Awesomeness
You have to put the cam back in and you're measuring the gap between the 'back' of the cam lobe (i.e. it's pointing away from the valve in question) and the follower. Then rotate the camshaft for the next valve and so on. In your case, rotating the cam might not be possible depending on where your pistons are, so you may have to nudge the bottom end round too. If you get get no. 1 cylinder to TDC then you can just rotate the crank round 1/4 of a turn and then all cylinders will be half way down their bores and out of harm's way.
Basically when checking the valve clearances you are trying to ensure that the valves always close fully. No clearance means the valve is always riding on the cam and never shuts totally. Too tight a clearance (when cold) means that as the engine heats up, the clearance may shrink to zero. Too loose and it'll sound like a neglected Ford Ka...
Basically when checking the valve clearances you are trying to ensure that the valves always close fully. No clearance means the valve is always riding on the cam and never shuts totally. Too tight a clearance (when cold) means that as the engine heats up, the clearance may shrink to zero. Too loose and it'll sound like a neglected Ford Ka...
1993 1.9 TZD Turbo Estate
1996 3.9 V8 Discovery
1993 VW LT35 campervan
1985 Hyundai Stellar V8
2016 Hyundai iLoad
-
BX Bandit
- Backslash Bandit
- Posts: 2588
- Joined: Thu Aug 31, 2006 7:46 am
- Location: Home
- My Cars: Cars
- x 3
Re: GT mediated Awesomeness
Perfect description from Wino above! I have my scrapped xud head lying about, so I'll make up some pics, but if pull the bucket up, like what Wino said, nothing will suddenly spring apart, but watch out for the shim in case it doesn't stick the the cam follower (the inverted bucket Wino mentioned).
If you are going to check them, you need to measure each shim in turn, put the camshaft in, measure the gap with feeler gauge, do some maths, work out which new shim thicknesses you need, remove camshaft, fit new shims, fit camshaft and measure again to check. Sounds more laborious than it actually is, you can sort of get into a rhythm with it.
If you are going to check them, you need to measure each shim in turn, put the camshaft in, measure the gap with feeler gauge, do some maths, work out which new shim thicknesses you need, remove camshaft, fit new shims, fit camshaft and measure again to check. Sounds more laborious than it actually is, you can sort of get into a rhythm with it.
1990 BX 16V Platinum Grey
1990 BX TGD White
1960 Morris Minor Clarondon Grey
1971 Triumph 2000 Auto Valencia Blue
1990 BX TGD White
1960 Morris Minor Clarondon Grey
1971 Triumph 2000 Auto Valencia Blue
-
BX Bandit
- Backslash Bandit
- Posts: 2588
- Joined: Thu Aug 31, 2006 7:46 am
- Location: Home
- My Cars: Cars
- x 3
Re: GT mediated Awesomeness
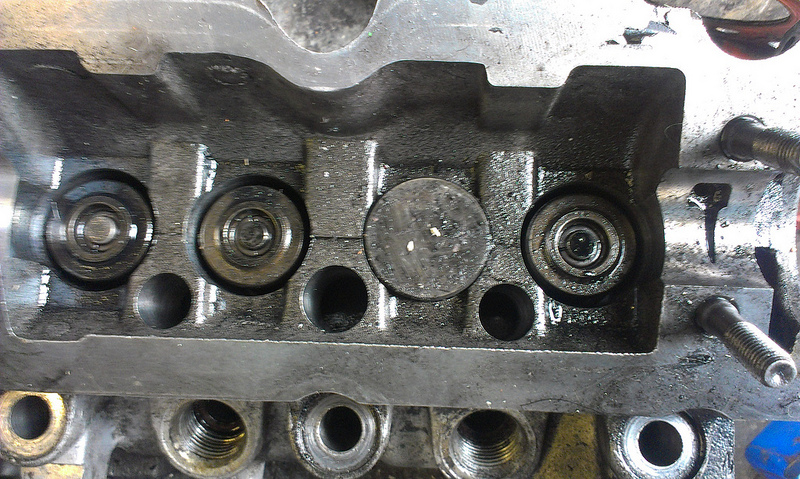
Here be three valves with the cam followers (buckets) removed.
Picture showing the inside of the cam follower and a shim in place on top of the valve:
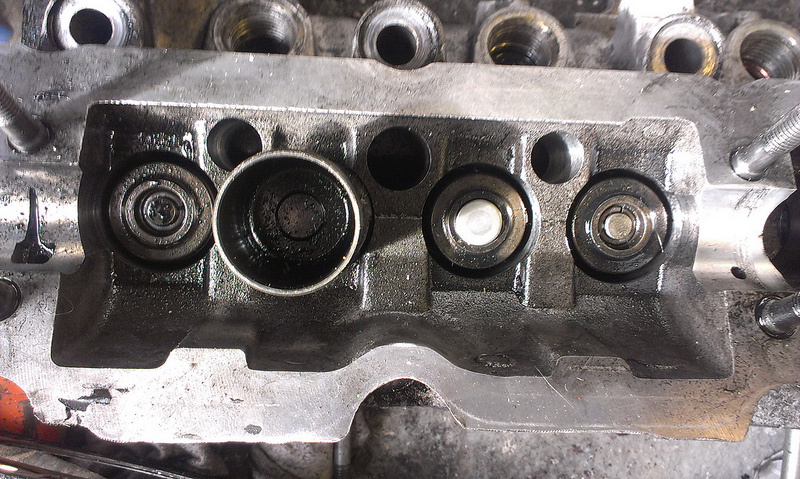
Picture showing the inside of the cam follower and a shim in place on top of the valve:
1990 BX 16V Platinum Grey
1990 BX TGD White
1960 Morris Minor Clarondon Grey
1971 Triumph 2000 Auto Valencia Blue
1990 BX TGD White
1960 Morris Minor Clarondon Grey
1971 Triumph 2000 Auto Valencia Blue
-
saintjamesy89
- Over 2k
- Posts: 2096
- Joined: Tue May 04, 2010 8:01 pm
- Location: Somerset
- My Cars: 1985 Citroen BX19 GT
1985 Citroen BX16 TRS 'SE' auto
1988 Volvo 740 2.0 GL Hearse
1990 Volvo 740 2.3 GLE Estate
2013 Nissan Leaf Acenta 24Kw - x 196
Re: GT mediated Awesomeness
Brilliant replies, thanks chaps great pictures too Niel. Doesn't sound too difficult - quite sure I can do that. Will have a go at it tomorrow, need to buy a feeler gauge though, last one I bought I left somewhere and it rusted solid. I'll assume Haynes book of lies will have the clearances etc that i'll need to refer to when measuring? Is there a clearance to aim for i.e. the best clearance for the engine, or is it just a range to be inside of?
Maybe because we're talking about such small distances, as long as the clearance falls inside the spec, then all is good. Let's hope it's in spec, as then I don't have to play with different sized shims and procure a vernier caliper! Then, also I can get on with putting a new belt on, it'd make sense to do a proper job now i'm this far onto the game and put a new water pump and belt tensioner on there - but money is so tight atm I don't know when i'll be able to do that.
In other news, I got my tax rebate - a measly 180 odd quid, which is about a third of what I had calculated to expect. It seems I had underpaid tax earlier in the year for the first few months after I left uni and the tax office though I was still at uni, at the time it was great as Domino's do not pay well, but I regret not informing them now. The money is already spoken for, so no spare to spend on this lovely GT.
I'm not a Saint, or a James, but a Tom Saint-James!
Mes voitures:
1985 Citroen BX19 GT
1988 Volvo 740 2.3 HPT GL Hearse
2007 Lexus RX 400h SE hybrid
2007 Citroen C6 Lignage 2.2HDI manual
2013 Lexus RX 450h Luxury
Mes voitures:
1985 Citroen BX19 GT
1988 Volvo 740 2.3 HPT GL Hearse
2007 Lexus RX 400h SE hybrid
2007 Citroen C6 Lignage 2.2HDI manual
2013 Lexus RX 450h Luxury
-
BX Bandit
- Backslash Bandit
- Posts: 2588
- Joined: Thu Aug 31, 2006 7:46 am
- Location: Home
- My Cars: Cars
- x 3
Re: GT mediated Awesomeness
Never checked the hbol for petrol clearances but they'll be in there. Just be sure to check whether engine should be hot or cold when measuring. There is a max and min for allowable gappage.
1990 BX 16V Platinum Grey
1990 BX TGD White
1960 Morris Minor Clarondon Grey
1971 Triumph 2000 Auto Valencia Blue
1990 BX TGD White
1960 Morris Minor Clarondon Grey
1971 Triumph 2000 Auto Valencia Blue
-
mat_fenwick
- Moderator
- Posts: 7330
- Joined: Tue Sep 20, 2005 4:08 pm
- Location: North Wales
- x 22
Re: GT mediated Awesomeness
Wino? WINO? I'll have you know that after 2 weeks I still have all this left after the trip to France...


1993 1.9 TZD Turbo Estate
1996 3.9 V8 Discovery
1993 VW LT35 campervan
1985 Hyundai Stellar V8
2016 Hyundai iLoad
-
saintjamesy89
- Over 2k
- Posts: 2096
- Joined: Tue May 04, 2010 8:01 pm
- Location: Somerset
- My Cars: 1985 Citroen BX19 GT
1985 Citroen BX16 TRS 'SE' auto
1988 Volvo 740 2.0 GL Hearse
1990 Volvo 740 2.3 GLE Estate
2013 Nissan Leaf Acenta 24Kw - x 196
Re: GT mediated Awesomeness
Didn't have much planned for today, and achieved less! Most of this morning I spent trying to undo the lower engine mount bolts, three whopping 17mm jobbies. The very bottom one you can get a socket on, and no amount of brute force worked, so I cast around for a leverage-extending device and found that my sphere tool fits very nicely over the end of the socket wrench - more leverage had the bolt shifting in no time. The other two are more of a problem, the are recessed under the top lip of the mount, I could get a 17mm spanner on the front one but it hurt my hands too much as the spanner cut into them, so I used an old aux belt looped inside the other end of the spanner, using two hands and pulling up on the belt moved the bolt! The spanner did fly off when it shifted though, and it took me 20 mins of struggling to undo this bolt. The third bolt I could not shift, I will need a recess spanner to get this one undone, nothing I had would stay on the bolt head, it's just fly off and me end up cutting myself on something.
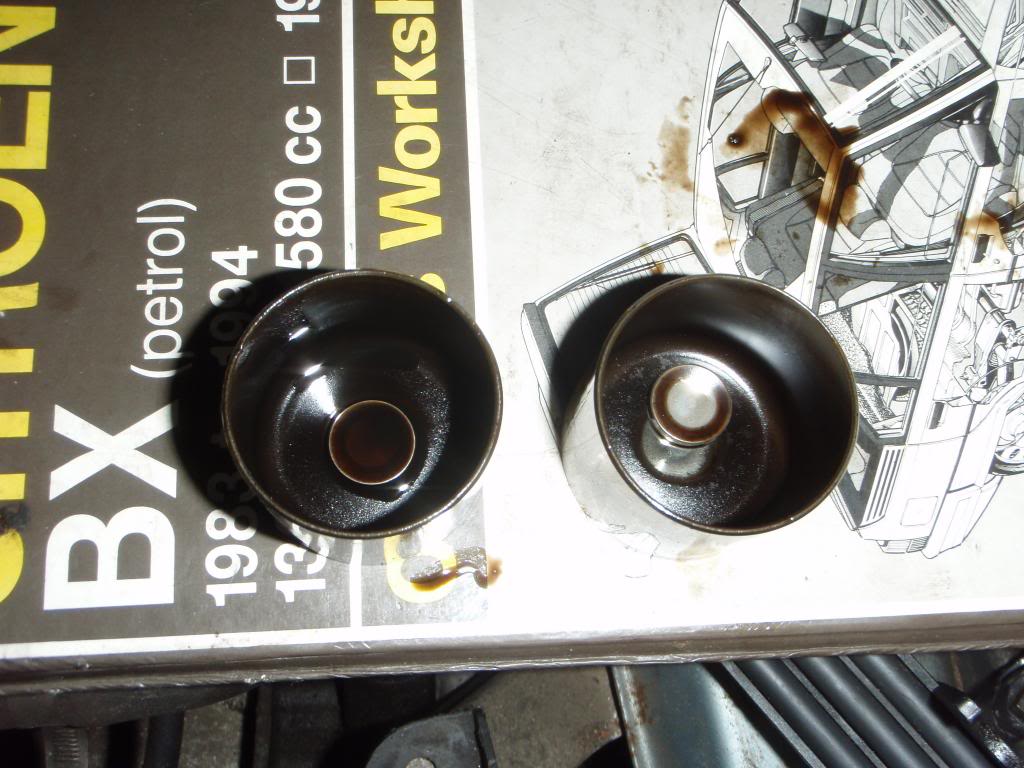
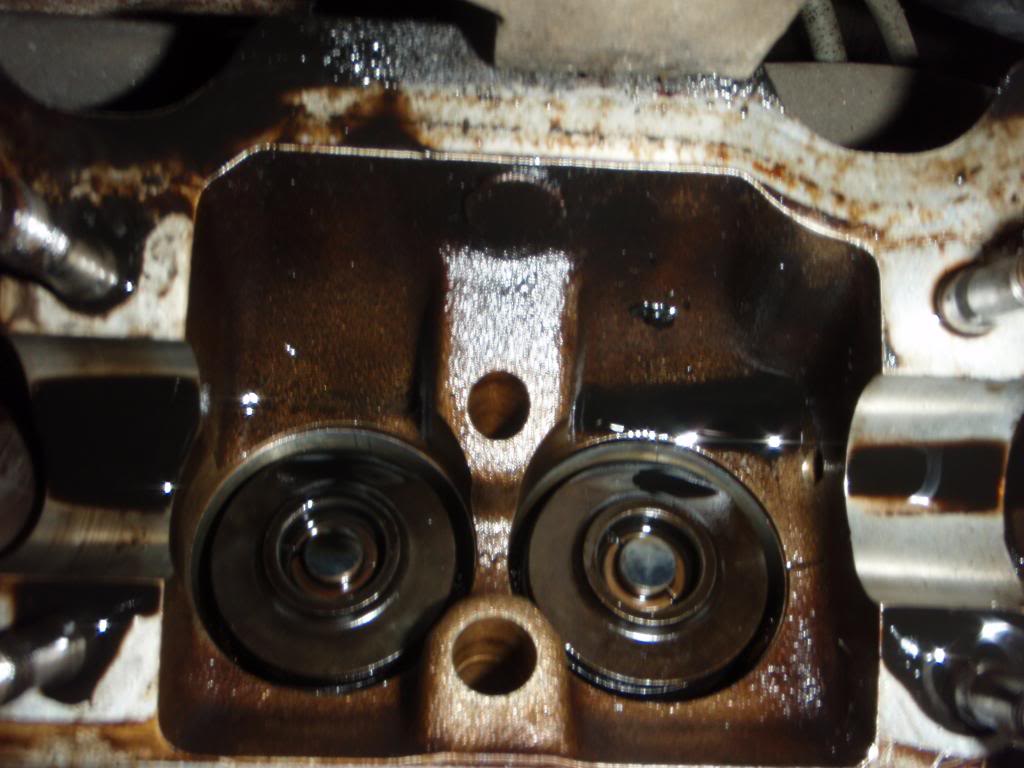
Had a look under the followers, all looks well in cyl no.4, didn't check the others. Looked exactly like Niels picture above, but a darn sight cleaner!
Cyl 4's two followers and shims.
Valve ends/guides/spring housing. Which side is which btw, hbol didn't say which one is exhaust/inlet and as the clearances are different it's quite important!
I also bought a feeler blade set and a valve grinding tool cos it was well cheap. With my breakfast this morning I had a nice cup of coffee and a bit of research, Steve is working today so I have a whole day to myself! A rare thing, so after researching stuff I made a list of what I need to be doing, I like lists - it's easier to do stuff if you've worked out a sensible way of doing it.
Need to do;
Water pump
Valve clearances
New cambelt
Coil
Ignition module
Ignition timing
1. Look at valve guides and stuff to see if bent
2. Remove the rest of the engine mounts
3. Mark old belt as per crank and cam sprocket indents (compare to new belt)
4. Remove crank pulley to get old belt off
5. Put new water pump on
6. Refit cam
7. Check valve clearances
8. If necessary put different shims in
9. Slacken tensioner cam and tighten locknut so it remains slack, use screwdriver to compress roller/spring then turn cam and locknut by hand.
10. Put new belt on then crank pulley, tighten bolt with flywheel jammed/in 5th with handbrake on
11. Insert timing dowels
12. Fit belt over cam sprocket, then tensioner and water pump
13. Align marks on cam pulley and belt
14. Loosen tensioner locknut, turn cam downwards to release spring then tighten tensioner locknuts and two front nuts.
15. Remove dowels, turn crankshaft through 2 full rotations in correct direction
16. Turn further to bring No.1 piston to TDC
17. Slacken tensioner front nuts and cam locking nut then retighten to correct torque
18. Check tension by turning crank to insert both dowels (if won't insert then take belt off and start again)
New Belt requires:
1. Tighten crank pulley bolt to correct torque
2. Refit engine mounts
3. Refit alternator and HP belts
4. Run engine until fan kicks in, then cool for at least two hours
5. Rotate engine to No.1 TDC position
6. Slacken and tension the tensioner nuts (as in16 above)
7. Remove HP + alternator belts, remove crank pulley
8. Refit crank pulley and tension to correct torque
9. Refit everything else.
10. Check ignition timing.
Had a look under the followers, all looks well in cyl no.4, didn't check the others. Looked exactly like Niels picture above, but a darn sight cleaner!
Cyl 4's two followers and shims.

Valve ends/guides/spring housing. Which side is which btw, hbol didn't say which one is exhaust/inlet and as the clearances are different it's quite important!

I also bought a feeler blade set and a valve grinding tool cos it was well cheap. With my breakfast this morning I had a nice cup of coffee and a bit of research, Steve is working today so I have a whole day to myself! A rare thing, so after researching stuff I made a list of what I need to be doing, I like lists - it's easier to do stuff if you've worked out a sensible way of doing it.
Need to do;
Water pump
Valve clearances
New cambelt
Coil
Ignition module
Ignition timing
1. Look at valve guides and stuff to see if bent
2. Remove the rest of the engine mounts
3. Mark old belt as per crank and cam sprocket indents (compare to new belt)
4. Remove crank pulley to get old belt off
5. Put new water pump on
6. Refit cam
7. Check valve clearances
8. If necessary put different shims in
9. Slacken tensioner cam and tighten locknut so it remains slack, use screwdriver to compress roller/spring then turn cam and locknut by hand.
10. Put new belt on then crank pulley, tighten bolt with flywheel jammed/in 5th with handbrake on
11. Insert timing dowels
12. Fit belt over cam sprocket, then tensioner and water pump
13. Align marks on cam pulley and belt
14. Loosen tensioner locknut, turn cam downwards to release spring then tighten tensioner locknuts and two front nuts.
15. Remove dowels, turn crankshaft through 2 full rotations in correct direction
16. Turn further to bring No.1 piston to TDC
17. Slacken tensioner front nuts and cam locking nut then retighten to correct torque
18. Check tension by turning crank to insert both dowels (if won't insert then take belt off and start again)
New Belt requires:
1. Tighten crank pulley bolt to correct torque
2. Refit engine mounts
3. Refit alternator and HP belts
4. Run engine until fan kicks in, then cool for at least two hours
5. Rotate engine to No.1 TDC position
6. Slacken and tension the tensioner nuts (as in16 above)
7. Remove HP + alternator belts, remove crank pulley
8. Refit crank pulley and tension to correct torque
9. Refit everything else.
10. Check ignition timing.
I'm not a Saint, or a James, but a Tom Saint-James!
Mes voitures:
1985 Citroen BX19 GT
1988 Volvo 740 2.3 HPT GL Hearse
2007 Lexus RX 400h SE hybrid
2007 Citroen C6 Lignage 2.2HDI manual
2013 Lexus RX 450h Luxury
Mes voitures:
1985 Citroen BX19 GT
1988 Volvo 740 2.3 HPT GL Hearse
2007 Lexus RX 400h SE hybrid
2007 Citroen C6 Lignage 2.2HDI manual
2013 Lexus RX 450h Luxury