Octopus Replacement

Frequently asked technical questions and common modifications/improvements
User avatar
frog
BXpert
Posts: 268
Joined: Thu Feb 12, 2009 8:01 pm
Location: Australia
x 12

Octopus Replacement

Post by frog »

I'm just adding my write up as it's already all typed and for the aussiefrogs forum:

All done! It took around 2 or 3 hours of actual work and probably another 3 hours of procrastinating/reading/thinking.
It is not that hard once you actually start.

I would recommend taking out the drive shaft on the drivers side as it does provide a lot more access; it can be done with out doing this, though I needed to replace the boot on the driveshaft anyway so it made sense.

Also remove the small plastic wheel arch shroud that covers the crank pulley/aircon compressor.

I started by removing the old octopus and cleaning up the area, taking note of the different routes, plastic sleeves, diameters of hard plastic pipes etc. Take your time with this, and ideally refit the new octopus the same day so that it is fresh in your mind.

I fitted the new octopus through the following steps:
  1. Using closed needle nosed pliers dipped in LHM, gently stretch and lubricate the internal openings of the new Octopus
  2. Feed the longest pipe on the passenger side of the octopus that goes off to the passenger strut return into the sleeve along the subframe and place the Octopus pod in position under the height corrector
  3. Using long handled needle nose pliers push the hard plastic passenger strut return pipe (Black 5mm) into the forward passenger side of the octopus (as per diagram).
  4. Using pliers push the hard plastic priority valve return (White 4mm) into the other passenger opening on the octopus (as per diagram)
  5. Feed the passenger strut return pipe through the sleeve and onto its corresponding metal pipe.
  6. Feed the three tank returns up and around the engine/under the brake valve/through the sleeve on the chassis rail and onto the reservoir as per the diagram below. I marked each with different coloured tape so I knew where they fitted onto the reservoir.
  7. Push the Hard plastic (Black 5mm curved) drivers strut return pipe into the hole on top of the octopus.
  8. Working from the drivers side of the car, sitting in the wheel arch with the view of the photo below: Connect the two hard plastic pipes (Rear height corrector 4mm and suspension return 5mm) to the corresponding points on the octopus. This I found the be the most difficult part of the process as access is limited. Use those long handled needle nose pliers!
  9. Connect the front height corrector return (small pipe that usually fails) to the height corrector.
  10. Cut the drivers strut return pipe to length and fit to corresponding metal pipe on chassis.
Image
Octopus by tyro.chris, on Flickr
If you follow the link to the flickr page I have added notes on the photo.

Image
Octopus by Y. Narabayashi

Image
Reservoir by Y. Narabayashi
1989 Citroën BX 16v
1993 Citroën BX 16v project
FireBladeSteve
Confirmed BX'er
Posts: 27
Joined: Tue Jun 28, 2016 8:49 pm
Location: Burscough
My Cars: Citroen BX 16 TGS

Saab 900 S

Porsche 911 Carrera 2

BX 16 TRS in 1996 (F343 HDS)

Re: Octopus Replacement

Post by FireBladeSteve »

What an excellent and invaluable guide! Where did you source the pipework?
User avatar
frog
BXpert
Posts: 268
Joined: Thu Feb 12, 2009 8:01 pm
Location: Australia
x 12

Re: Octopus Replacement

Post by frog »

Through a Local (Australia) independent workshop specialising in Cit's
1989 Citroën BX 16v
1993 Citroën BX 16v project
Defender110
Over 2k
Posts: 5918
Joined: Wed Dec 16, 2009 8:02 pm
Location: Harwood, Bolton
My Cars: Land Rover Discovery Series 1 200tdi 3 door
Land Rover Discovery Series 2 Facelift TD5
2020 Fiat Panda cross 4x4 twin air.
x 27

Re: Octopus Replacement

Post by Defender110 »

=D> ^^ ^^
Kevan
1997 Mercedes C230 W202
2003 Land Rover Discovery Series 2 Facelift TD5 - Daily driver / hobby days and camping.
1993 Land Rover Discovery 200tdi Series 1 3 door - in need of TLC
2020 Fiat Panda 4x4 Cross Twin Air.
KevR
1K Away
Posts: 1767
Joined: Mon Apr 12, 2010 8:46 pm
Location: Normandy
My Cars: It's all in my signature
x 4

Re: Octopus Replacement

Post by KevR »

Well done that man! Got to do one of mine imminently - fortunately driveshafts and all front suspension is removed at the moment, so access is good, which should make it a bit easier.
1990 BX TZD Estate ('the grey one', 1991 BX TZD Estate ('the white one'), 1982 2CV6 Charleston (in bits), 1972 AZU Serie B (2CV van), 1974 HY72 Camper, 1990 Land Rover 110 diesel LWB, 1957 Mobylette AV76, 1992 Ducati 400SS, 1966 VW Beetle, 1990 Mazda MX-5, 1996 Peugeot 106D, 1974 JCB 2D MkII, 1997 BMW R1100RS, 1987 Suzuki GSX-R1100, 1978 Honda CX500A, 1965 Motobecane Cady, 1988 Honda Bros/Africa Twin, 1963 Massey Ferguson 825, and a lot of bicycles!
rutter123
Over 2k
Posts: 2695
Joined: Sun Sep 02, 2012 9:54 pm
Location: South Lincs
My Cars: 90 Bx Tzd turbo ven red 295k
74 D Super 5 black
05 Volvo V50 2.0d 180k
65 Peugeot Boxer work van 280k
x 138

Re: Octopus Replacement

Post by rutter123 »

I found just removing the o/s driveshaft and rear engine mount bracket will save a lot of hassle for the sake of 20mins work, and first a good steam clean to the engine bay and underside is an absolute must esp around the subframe.
90 BX Tzd turbo 294k SORN undergoing major surgery
90 BX Tzd turbo estate 46k awaiting surgery
65 Peugeot Boxer Van the new workhorse
52 Toyota Rav4 180k Bulletproof Jap reliability
User avatar
Dragon Man
BXpert
Posts: 187
Joined: Sat Aug 22, 2015 3:45 am
Location: The East Midlands, Derby
My Cars: Citroen Dispatch 2.0L HDi 2005
Fiat Panda 4x4 Sisley 1991
x 6

Re: Octopus Replacement

Post by Dragon Man »

i am actually going to have a go at making my own out of nylon piping and T connectors.

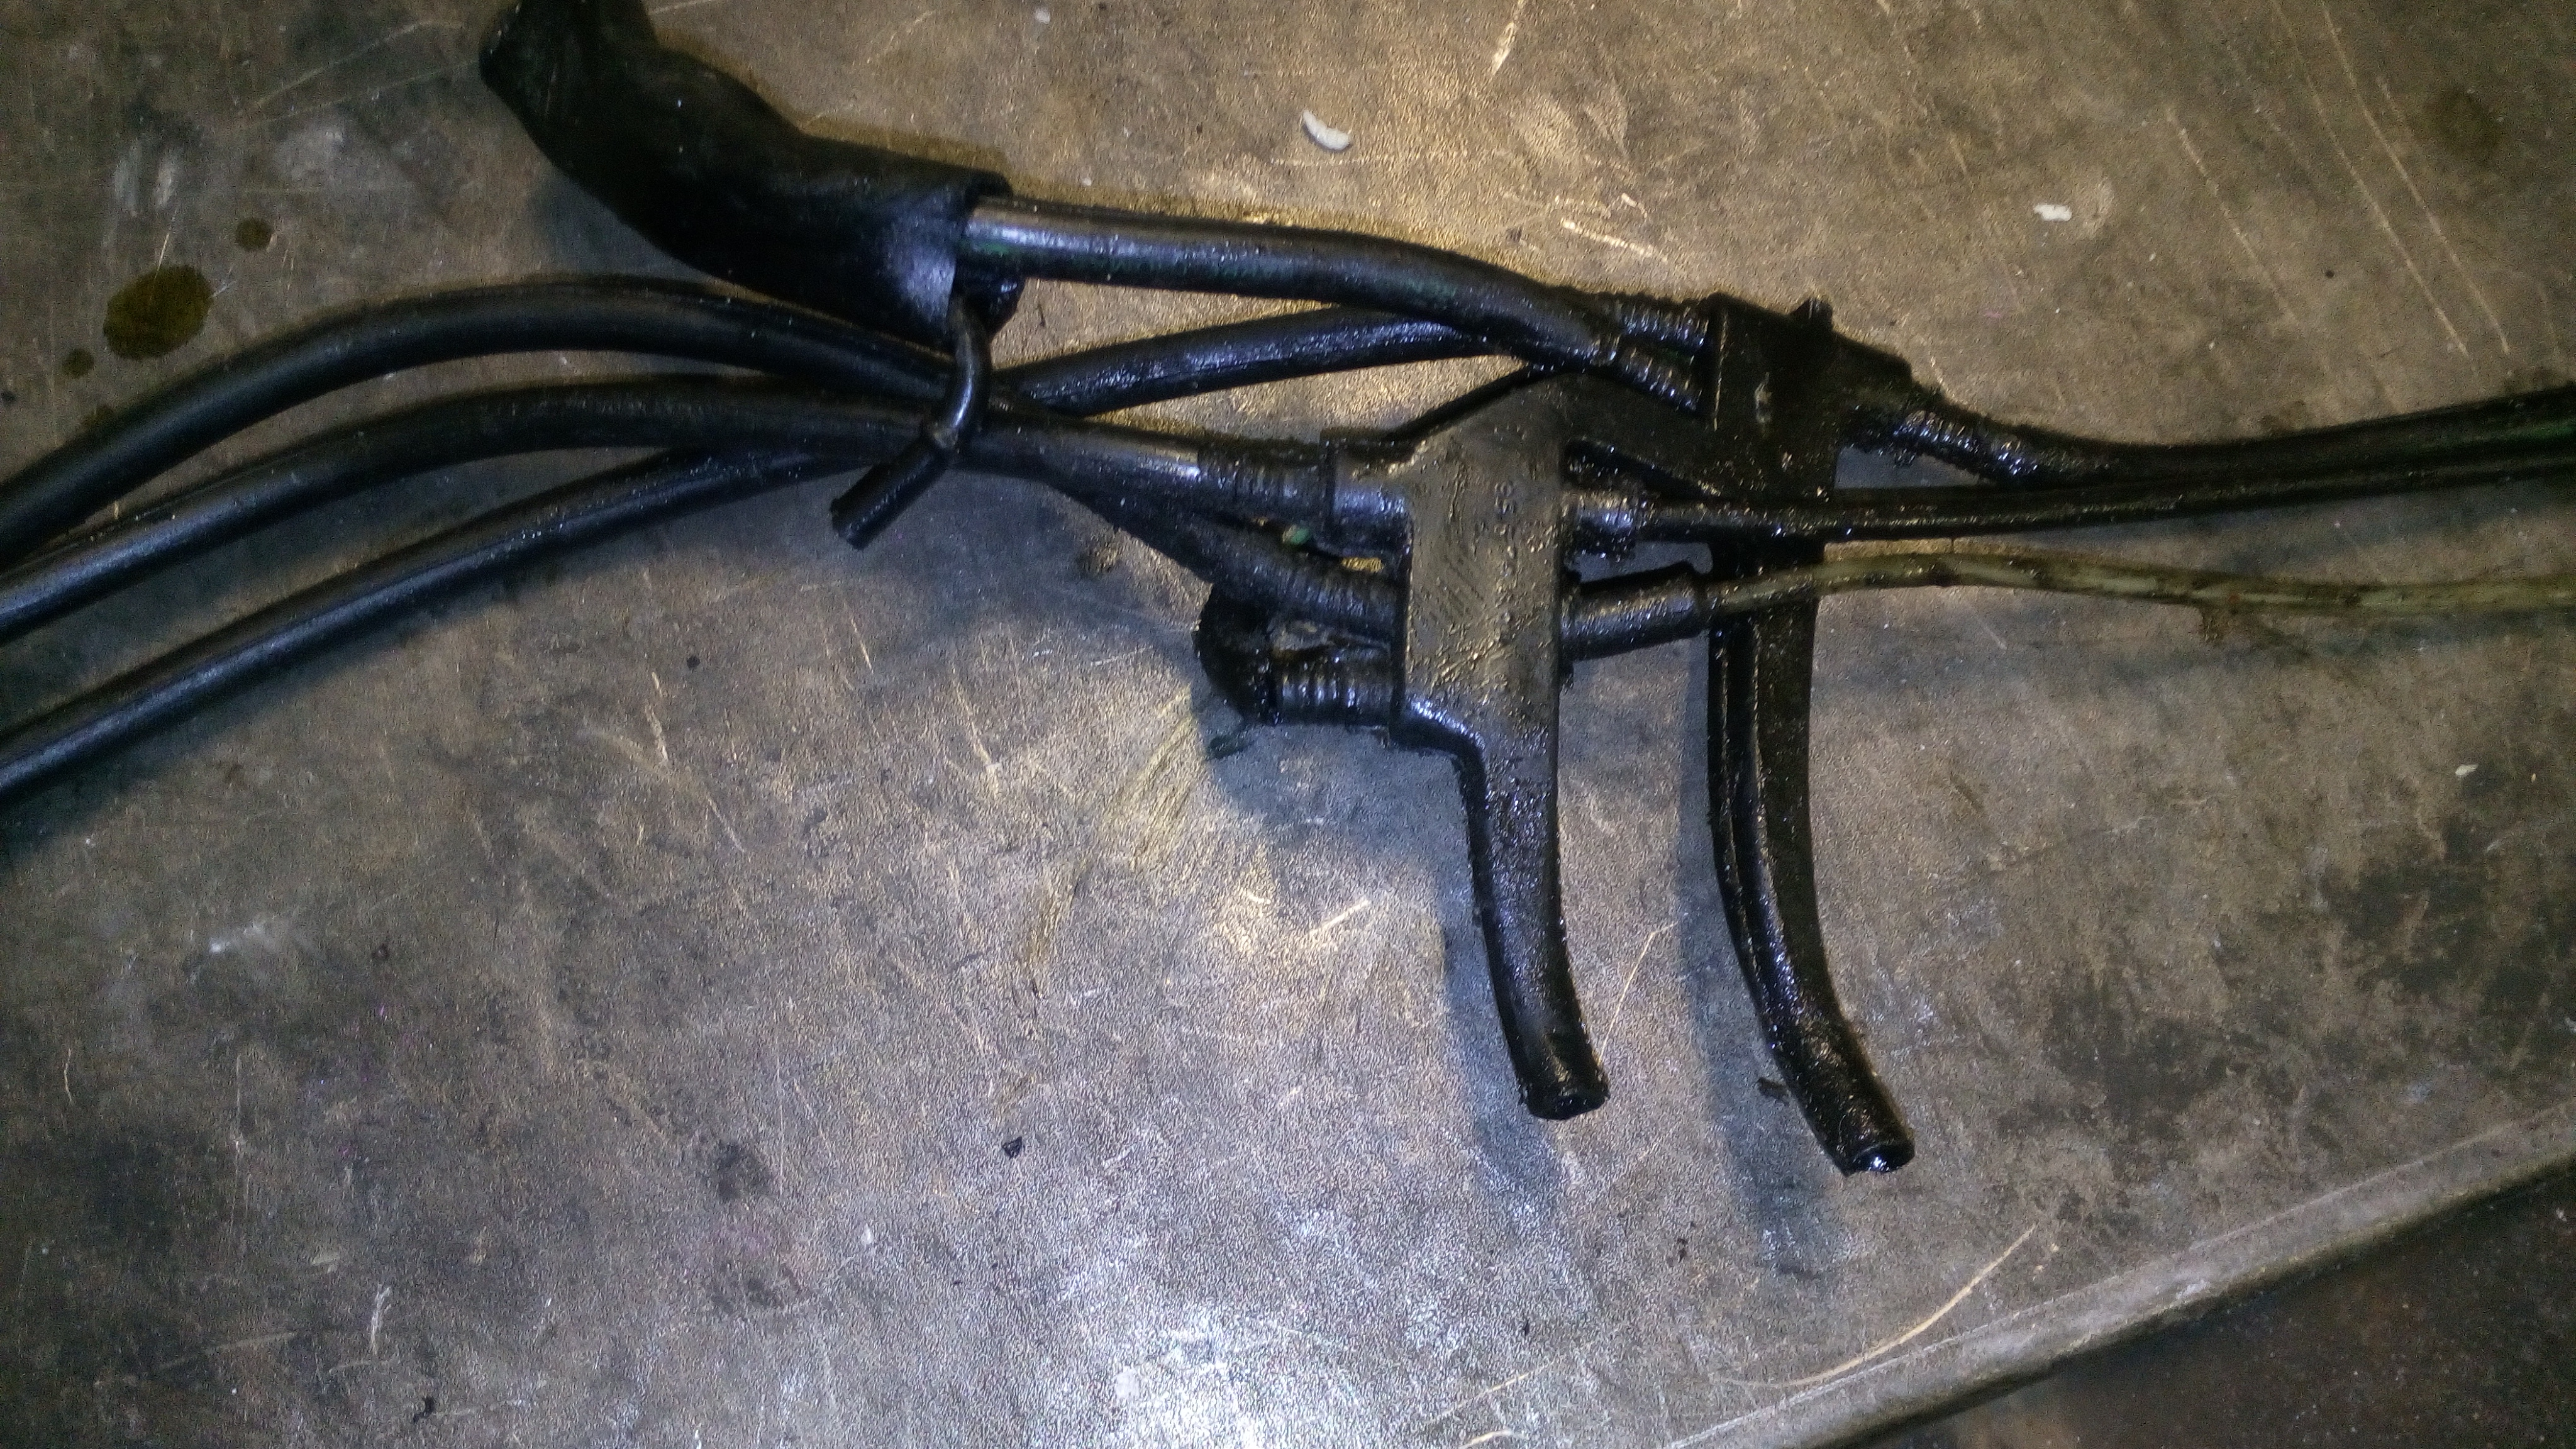
ill add the picture of my one:

Image
- JohnDragonMan

Drives: Citroen Dispatch with retrofitted air conditioning 8)
Classic Fiat Panda 4x4 Sisley named Talon (long term storage)

always buy base spec. that way you have the fun of putting all the cool bit on your vehicle :mrgreen:
Defender110
Over 2k
Posts: 5918
Joined: Wed Dec 16, 2009 8:02 pm
Location: Harwood, Bolton
My Cars: Land Rover Discovery Series 1 200tdi 3 door
Land Rover Discovery Series 2 Facelift TD5
2020 Fiat Panda cross 4x4 twin air.
x 27

Re: Octopus Replacement

Post by Defender110 »

Dragon Man wrote:i am actually going to have a go at making my own out of nylon piping and T connectors.
Here we go again :roll:
Kevan
1997 Mercedes C230 W202
2003 Land Rover Discovery Series 2 Facelift TD5 - Daily driver / hobby days and camping.
1993 Land Rover Discovery 200tdi Series 1 3 door - in need of TLC
2020 Fiat Panda 4x4 Cross Twin Air.
User avatar
Dragon Man
BXpert
Posts: 187
Joined: Sat Aug 22, 2015 3:45 am
Location: The East Midlands, Derby
My Cars: Citroen Dispatch 2.0L HDi 2005
Fiat Panda 4x4 Sisley 1991
x 6

Re: Octopus Replacement

Post by Dragon Man »

heh yeah i thought it would have already been covered.
i can understand why they made multiple leak off returning pipes.. but they really did go overkill on them. still whatever works i guess. kinda a shame that they did not make all of the returns out of nylon though, would have stopped the need of replacing anything. as far as i remember, rubber costs more to make than nylon!

we will see how my little project goes :D
- JohnDragonMan

Drives: Citroen Dispatch with retrofitted air conditioning 8)
Classic Fiat Panda 4x4 Sisley named Talon (long term storage)

always buy base spec. that way you have the fun of putting all the cool bit on your vehicle :mrgreen:
KevR
1K Away
Posts: 1767
Joined: Mon Apr 12, 2010 8:46 pm
Location: Normandy
My Cars: It's all in my signature
x 4

Re: Octopus Replacement

Post by KevR »

If you think about it, when they build new cars they're not anticipating problems 25 or 30 years down the road, because the car probably has a life expectancy of ten years tops as far as they're concerned. In 16 years and about 200,000 miles in BXs, I've replaced one Octopus, and that was on the first car I had, because it had been damaged by a careless mechanic. For the rest, I've had a couple of minor leaks, easily fixed by splicing in a new section. I'll be replacing the Octpous on the white one when it goes back on the road, but only because it's been sat for ten years so the rubber's gone a bit hard, and I've got the whole thing in bits anyway. Otherwise, I'd rather spend the same amount of time fixing/modifying things that actually matter!
1990 BX TZD Estate ('the grey one', 1991 BX TZD Estate ('the white one'), 1982 2CV6 Charleston (in bits), 1972 AZU Serie B (2CV van), 1974 HY72 Camper, 1990 Land Rover 110 diesel LWB, 1957 Mobylette AV76, 1992 Ducati 400SS, 1966 VW Beetle, 1990 Mazda MX-5, 1996 Peugeot 106D, 1974 JCB 2D MkII, 1997 BMW R1100RS, 1987 Suzuki GSX-R1100, 1978 Honda CX500A, 1965 Motobecane Cady, 1988 Honda Bros/Africa Twin, 1963 Massey Ferguson 825, and a lot of bicycles!
rutter123
Over 2k
Posts: 2695
Joined: Sun Sep 02, 2012 9:54 pm
Location: South Lincs
My Cars: 90 Bx Tzd turbo ven red 295k
74 D Super 5 black
05 Volvo V50 2.0d 180k
65 Peugeot Boxer work van 280k
x 138

Re: Octopus Replacement

Post by rutter123 »

Personally i couldn't be assed with trying to make one up from scratch, for the sake of £60 for a new one that WILL fit and do the job perfectly, at the end of the day its still gonna be a few hours work to fit, i'm sure the o/e octopus is designed like it is for a reason.
90 BX Tzd turbo 294k SORN undergoing major surgery
90 BX Tzd turbo estate 46k awaiting surgery
65 Peugeot Boxer Van the new workhorse
52 Toyota Rav4 180k Bulletproof Jap reliability
User avatar
Dragon Man
BXpert
Posts: 187
Joined: Sat Aug 22, 2015 3:45 am
Location: The East Midlands, Derby
My Cars: Citroen Dispatch 2.0L HDi 2005
Fiat Panda 4x4 Sisley 1991
x 6

Re: Octopus Replacement

Post by Dragon Man »

damn £60 for a bit of rubber.. if you ask me that is really expensive. i bought 50 6mm T connectors and 30 meters of 6mm nylon pipe for just under £20! and nylon will last a lot longer than rubber ;)
like i say, this pipe is as easy as cut and connect. it may not look as neat as the original, but it would have a better flow rate and would never have any issues of pipes blowing off.

really wish our fork truck at work had a return built into the main lifting ram.. the seals on that are so bad.
- JohnDragonMan

Drives: Citroen Dispatch with retrofitted air conditioning 8)
Classic Fiat Panda 4x4 Sisley named Talon (long term storage)

always buy base spec. that way you have the fun of putting all the cool bit on your vehicle :mrgreen:
Kaapelimies
BXpert
Posts: 289
Joined: Wed Feb 10, 2010 9:01 am
Location: Hollola, Finland
x 16

Re: Octopus Replacement

Post by Kaapelimies »

Are you going to keep the original one-way-valves on top of the reservoir (the steel balls in the 90deg curved pieces)?
BX 4x4 estate, several BX Van's and some more normal estates in Finland.
rutter123
Over 2k
Posts: 2695
Joined: Sun Sep 02, 2012 9:54 pm
Location: South Lincs
My Cars: 90 Bx Tzd turbo ven red 295k
74 D Super 5 black
05 Volvo V50 2.0d 180k
65 Peugeot Boxer work van 280k
x 138

Re: Octopus Replacement

Post by rutter123 »

Mine has had no one way valves for many years and it dosen't cause a problem.
90 BX Tzd turbo 294k SORN undergoing major surgery
90 BX Tzd turbo estate 46k awaiting surgery
65 Peugeot Boxer Van the new workhorse
52 Toyota Rav4 180k Bulletproof Jap reliability
User avatar
Dragon Man
BXpert
Posts: 187
Joined: Sat Aug 22, 2015 3:45 am
Location: The East Midlands, Derby
My Cars: Citroen Dispatch 2.0L HDi 2005
Fiat Panda 4x4 Sisley 1991
x 6

Re: Octopus Replacement

Post by Dragon Man »

if its all built into the top of the LHM tank then it will stay as it is. if its built into the pipes then it will all be changed for the new pipe. fluid can only go one way in the system anyway and with the new connectors there's no way it would blow a hose off unless the pressure reaches over 10 bar. that would only happen if complete failure of a strut or other seal happened.. even then the struts are fed using 3.5mm pipe, theres a possibility that with the 6mm being larger (and say on the front struts the return pipes are doubled) it would survive the full force of a seal failure as the 3.5mm pipe can only deliver so much LHM.

one way push fit valves are only pence so if i needed to add them at a later date it would not be hard to do.
- JohnDragonMan

Drives: Citroen Dispatch with retrofitted air conditioning 8)
Classic Fiat Panda 4x4 Sisley named Talon (long term storage)

always buy base spec. that way you have the fun of putting all the cool bit on your vehicle :mrgreen: