Well unfortunately there's a bad rust area on the corner of the front passenger door and a dent on the rear passenger door (you couldn't see it in the ebay pictures!)
Anyway the one main reason I wanted a 16 petrol (and that onbody else wants one!) was to fit an LPG system to it to see if I could get massively better consumption than on the LPG CX..
Cyril's progress
-
Aerodynamica

- BXpert
- Posts: 793
- Joined: Sat Jun 07, 2008 11:43 pm
- Location: Glasgow
-
Aerodynamica
- BXpert
- Posts: 793
- Joined: Sat Jun 07, 2008 11:43 pm
- Location: Glasgow
Ello.
next bit.
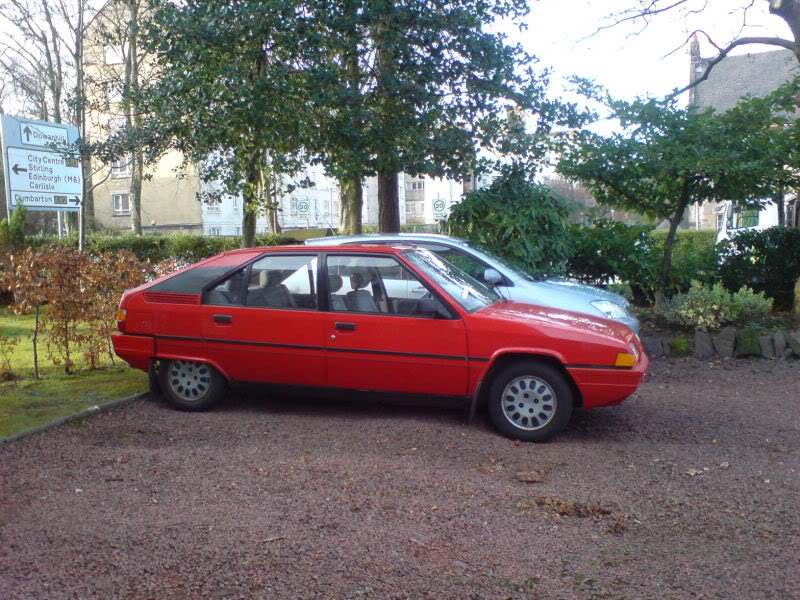 this is a photo of the 'good' side and it does look quite good. The other side has a crusty corner on the front passenger door and a parking dent at the bottom of the rear door. I am after 2 replacement doors.
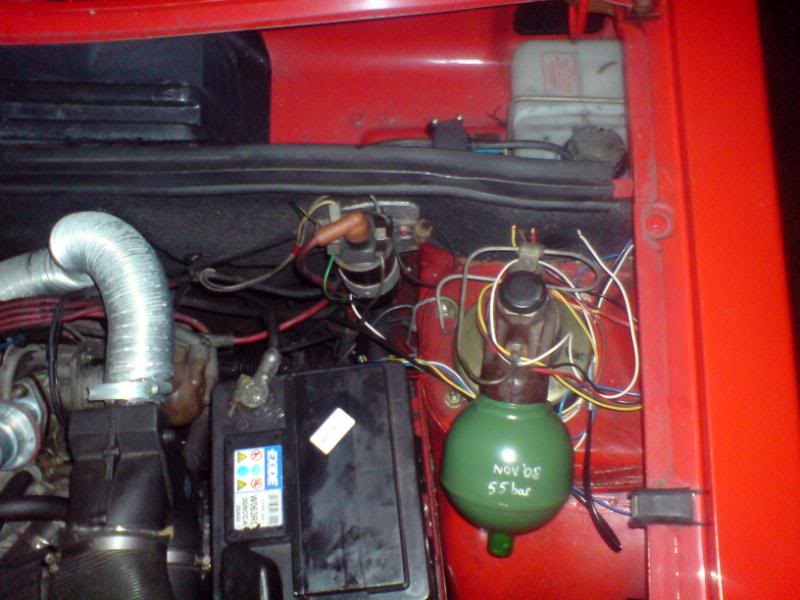
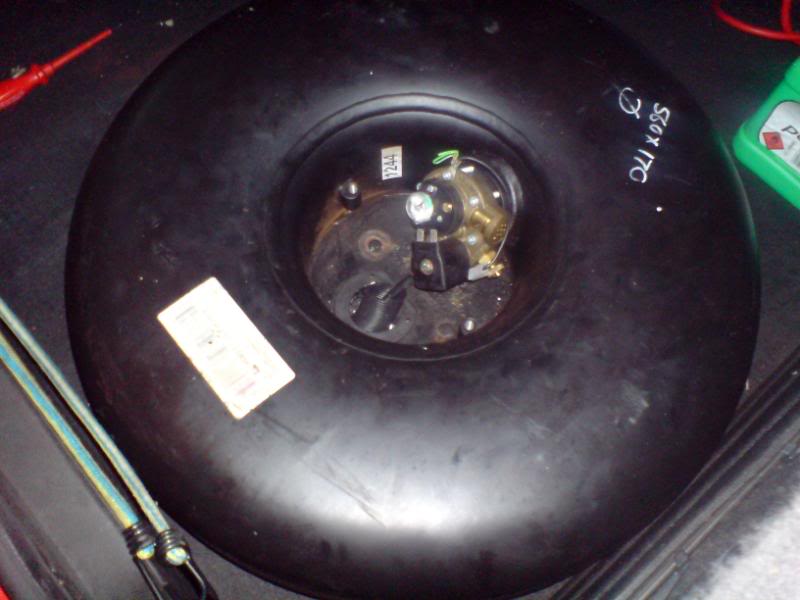
Right, I had this very small LPG gas tank left over from the first version of the CX's LPG fitting. On the CX's thirsty engine it was rubbish as it just couldn't give it the range. This tank is 30L and holds 24L of LPG. It came out of a VX Astra but never asked what engine size it had been (maybe 1.4?) anyway with absolutely zero money and some keen DIY spirit I intended to fit this tank to the BX initially planning to fit it into the spare wheel carrier. But since the multi valve and level gauge can only be accessed from the top on this tank I changed that and reckoned if I fitted it in a choice location in the boot it wouldn't intrude so much on the load space.
Here's a first look at the possible location of the tank:
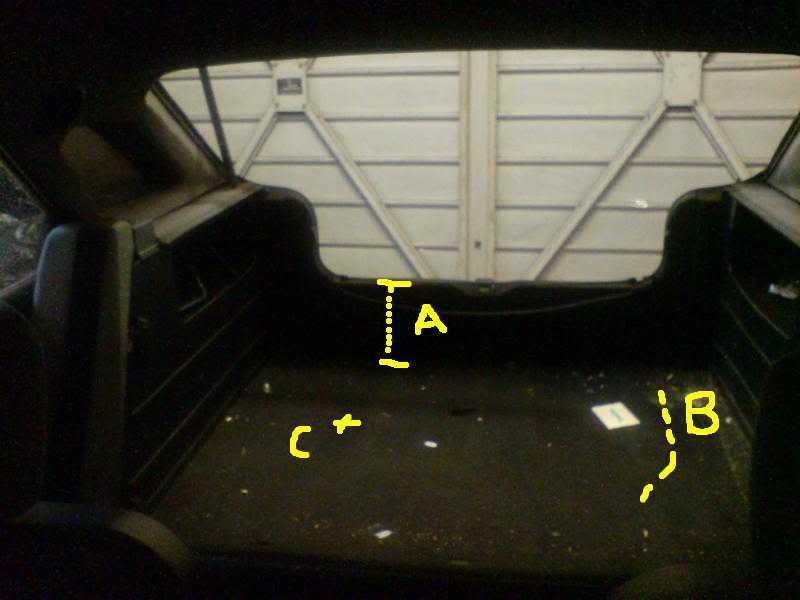
A. is the sill height and it was found to be greater than the tank's height
B. is the route of the exhaust so although I wanted to fit the tank on the opposite side to driver it was not going to be doable as the gas pipes join the tank in the center and they'd be routed right next to the rear box.
C. marks the approximate center of the circular toroid tank and would be where a floor vent would be located so I needed to check that this was ok under the boot too - no obstacles in the way and the like..
The fairly heavy tank was placed in the boot in that location to check fit.
And once happy that this spot was ok for the vent hole in the boot floor to conduit the gas pipes shrouded by the vent pipe, a hole was cut and the plastic vent fitted (seem to have lost this batch of photos so the similar CX pic instead!)
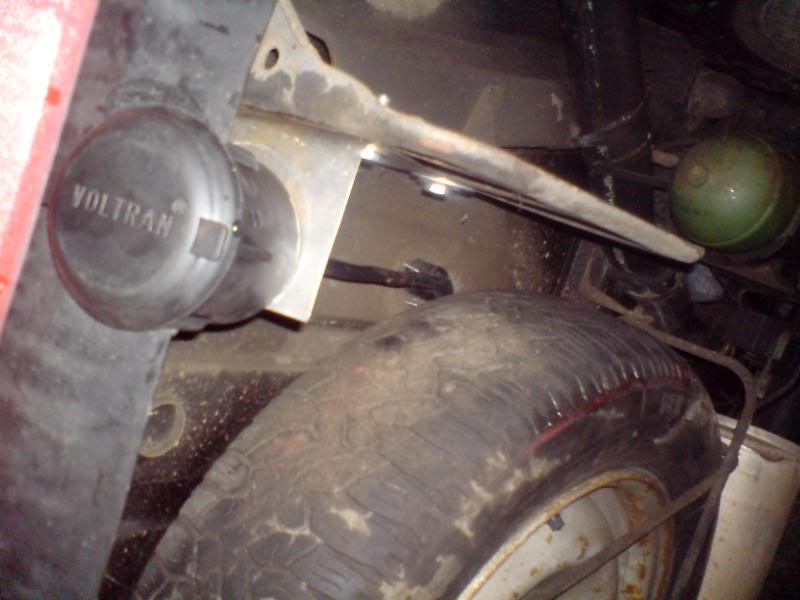
Next thing was a brand new part: an LPG filler piont - there's no point in getting a second hand one as they're not too expensive and it's risky if you don't know it's good. It has to carry high pressure -200? liquid through its one way valve.
I decided after some thought that the place I wanted it fitted was going to be the same as on the CX - under the back bumper but off center in case I even get a towbar. It has to be well away from the exhaust. The CX has smaller bumpers but does have a steel undertray through which its filler was located. On the BX the bumper extends below this level and I was not keen on cutting a hole in the bumper. However, there's a black coloured 'spoiler' with a semi flat face that was in an ideal position to cut through and fit the filler if the rear towing eye structure was used as a mounting point for the filler by making up a bracket.
So it was all measured up and the inclination of the bumper matched to the towing eye panel and a circular hole cut in the black plastic panel. Here's the filler being adapted with a steel plate to mount it securely and in the right orientation that the filler's plastic cup will be a press fit in the hole cut for it.
The filler was adjusted and secured and finished with its cap.
 - floor is still red from doing the bumpers a month before!
So the first bit was in place and it was probably the least technical but there were many bits to fit /adapt to come.
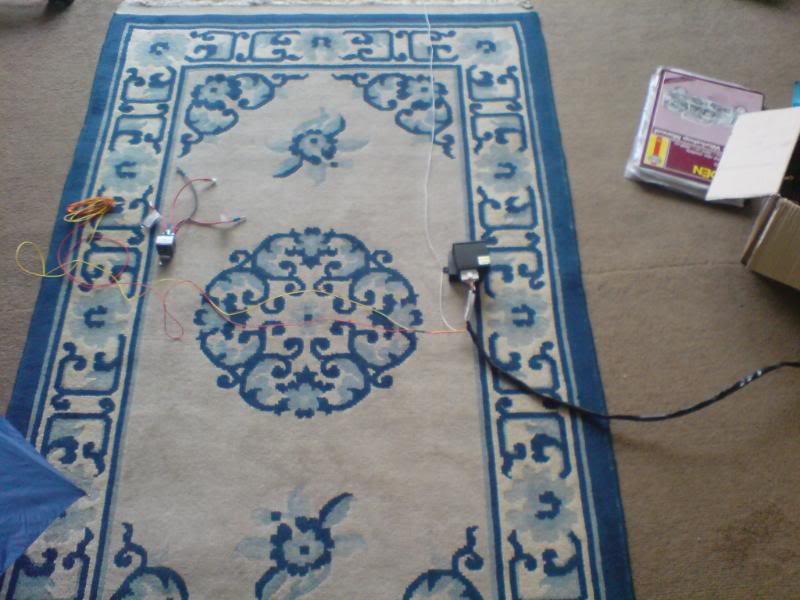
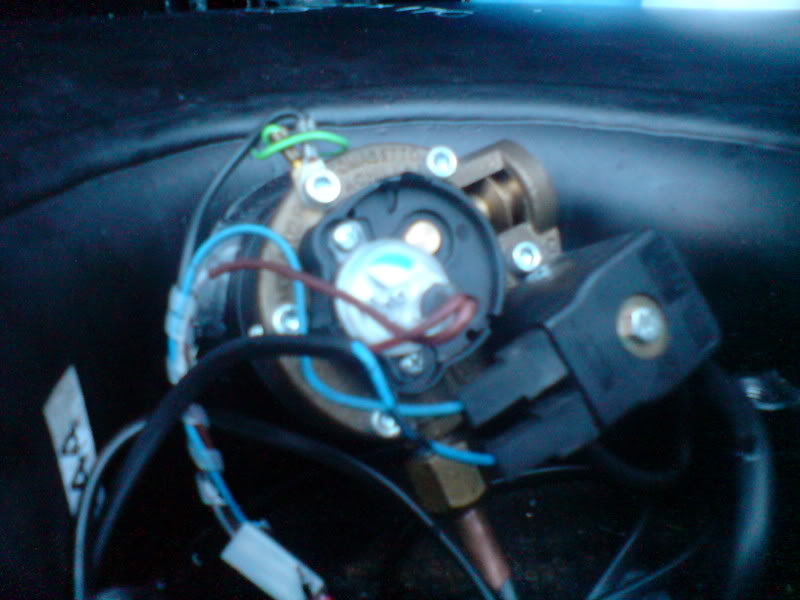
I got a new electronic changeover switch/LPG level gauge which comes with its own wiring loom. It has wires for: the tank and vapouriser solenoids, the petrol shut off solenoid valve, 12v supply, pulse connection to the coil -ve, a connection to the level sender in the tank and an earth wire. All of these can go through the bulk head to the engine bay. Wires from the tank i.e. solenoid, earth and sender wires travel from the tank at the rear, through the car to be connected/ loomed with the others.
No photo of the wiring but here's a snap of the similar one fitted on the CX:
 on the floor. The relays were not used on the BX wiring.
next bit.
this is a photo of the 'good' side and it does look quite good. The other side has a crusty corner on the front passenger door and a parking dent at the bottom of the rear door. I am after 2 replacement doors.Right, I had this very small LPG gas tank left over from the first version of the CX's LPG fitting. On the CX's thirsty engine it was rubbish as it just couldn't give it the range. This tank is 30L and holds 24L of LPG. It came out of a VX Astra but never asked what engine size it had been (maybe 1.4?) anyway with absolutely zero money and some keen DIY spirit I intended to fit this tank to the BX initially planning to fit it into the spare wheel carrier. But since the multi valve and level gauge can only be accessed from the top on this tank I changed that and reckoned if I fitted it in a choice location in the boot it wouldn't intrude so much on the load space.
Here's a first look at the possible location of the tank:
A. is the sill height and it was found to be greater than the tank's height
B. is the route of the exhaust so although I wanted to fit the tank on the opposite side to driver it was not going to be doable as the gas pipes join the tank in the center and they'd be routed right next to the rear box.
C. marks the approximate center of the circular toroid tank and would be where a floor vent would be located so I needed to check that this was ok under the boot too - no obstacles in the way and the like..
The fairly heavy tank was placed in the boot in that location to check fit.
And once happy that this spot was ok for the vent hole in the boot floor to conduit the gas pipes shrouded by the vent pipe, a hole was cut and the plastic vent fitted (seem to have lost this batch of photos so the similar CX pic instead!)
Next thing was a brand new part: an LPG filler piont - there's no point in getting a second hand one as they're not too expensive and it's risky if you don't know it's good. It has to carry high pressure -200? liquid through its one way valve.
I decided after some thought that the place I wanted it fitted was going to be the same as on the CX - under the back bumper but off center in case I even get a towbar. It has to be well away from the exhaust. The CX has smaller bumpers but does have a steel undertray through which its filler was located. On the BX the bumper extends below this level and I was not keen on cutting a hole in the bumper. However, there's a black coloured 'spoiler' with a semi flat face that was in an ideal position to cut through and fit the filler if the rear towing eye structure was used as a mounting point for the filler by making up a bracket.
So it was all measured up and the inclination of the bumper matched to the towing eye panel and a circular hole cut in the black plastic panel. Here's the filler being adapted with a steel plate to mount it securely and in the right orientation that the filler's plastic cup will be a press fit in the hole cut for it.
The filler was adjusted and secured and finished with its cap.
- floor is still red from doing the bumpers a month before!So the first bit was in place and it was probably the least technical but there were many bits to fit /adapt to come.
I got a new electronic changeover switch/LPG level gauge which comes with its own wiring loom. It has wires for: the tank and vapouriser solenoids, the petrol shut off solenoid valve, 12v supply, pulse connection to the coil -ve, a connection to the level sender in the tank and an earth wire. All of these can go through the bulk head to the engine bay. Wires from the tank i.e. solenoid, earth and sender wires travel from the tank at the rear, through the car to be connected/ loomed with the others.
No photo of the wiring but here's a snap of the similar one fitted on the CX:
on the floor. The relays were not used on the BX wiring.Graeme M
CX 2400 Pallas LPG
2CV6 dolly (SORNed)
Mk1 Xantia 1.9TD SX
'c'est hydropneumatique'
CX 2400 Pallas LPG
2CV6 dolly (SORNed)
Mk1 Xantia 1.9TD SX
'c'est hydropneumatique'
-
Aerodynamica
- BXpert
- Posts: 793
- Joined: Sat Jun 07, 2008 11:43 pm
- Location: Glasgow
More
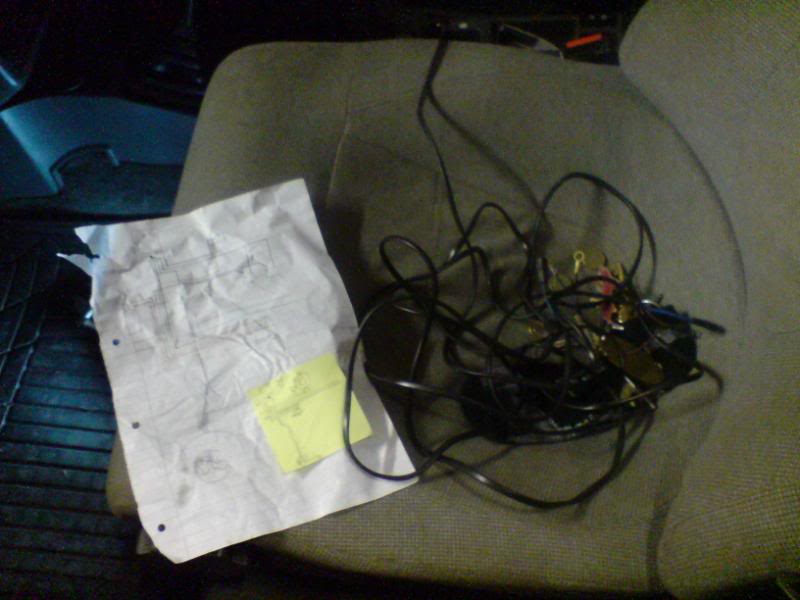
Here is the switch and loom on the passenger seat
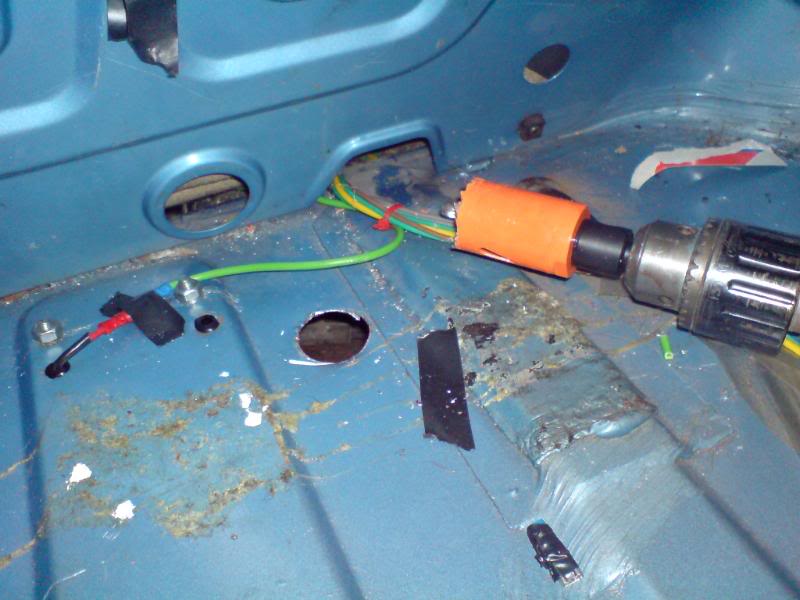
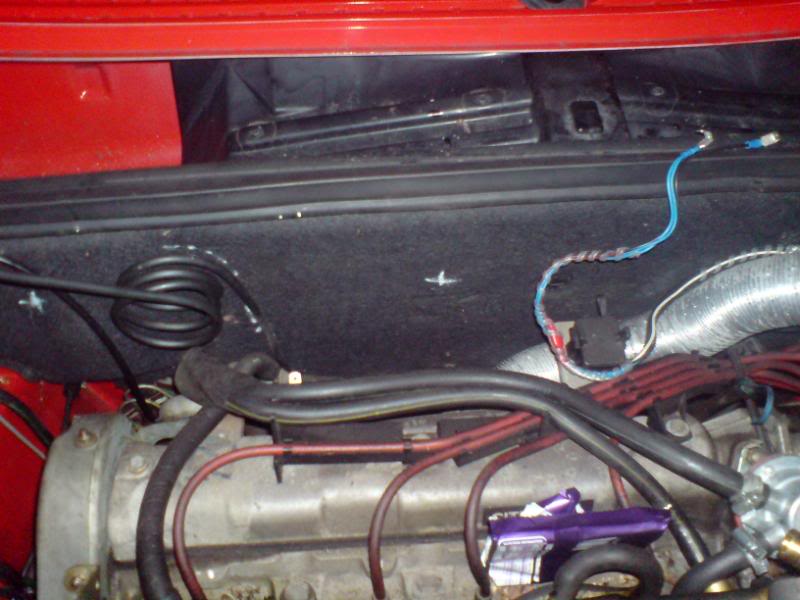
The aim was to feed the wiring all through the bulkhead grommet
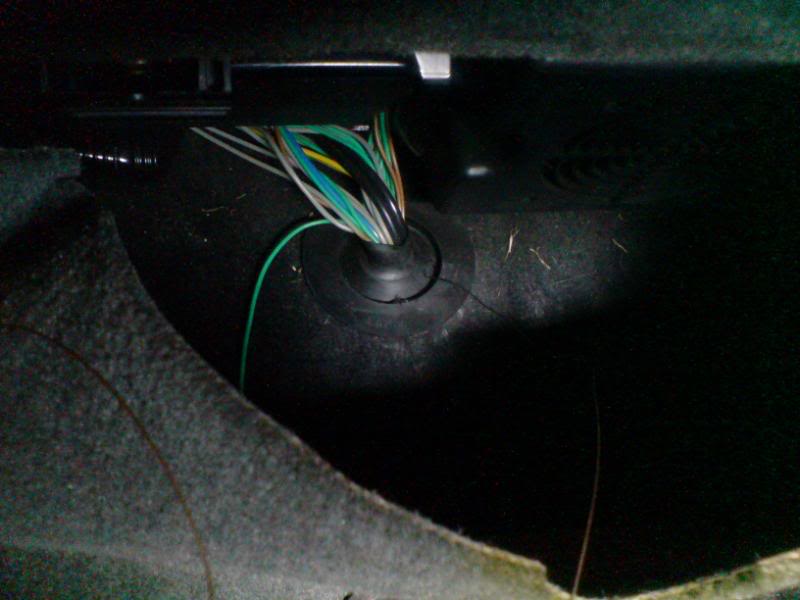
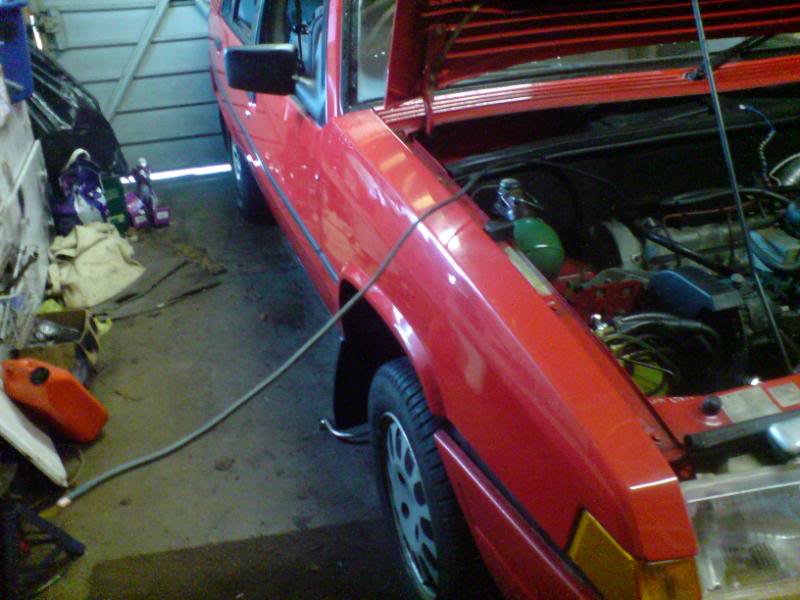
But this turned out to be unfathomably tight! It was hard to feed even one wire through without some sort of 'threader' and in the end I decided to get a 10mm drill bit and drill the shit out of it (while cunningly not drilling any wires) it worked well to create a small tight extra path through the grommet but still I had to engage the brain to feed through the wires. Ideally I wanted to be pulling them through from the engine side so I wound a length of welding wire through through the wires and doubles them back, then taped them down and wound duct tape around the fold and wound to a point where the welding wire came out. I greased up the smoothed shape and fed the thin wire through and eventually found it on theother side. It was just a case of pulling the lot through with pliers.
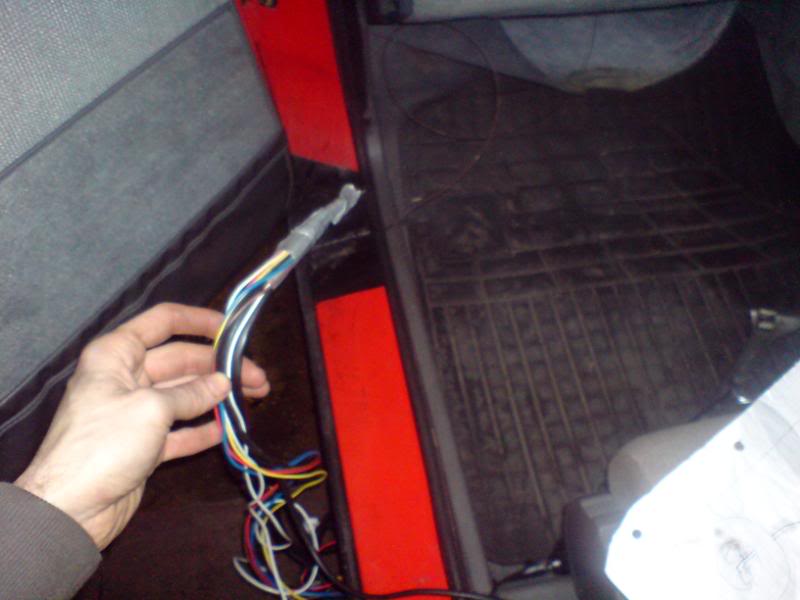
Pulling through on the engine side:
Beginning to emerge:
Through!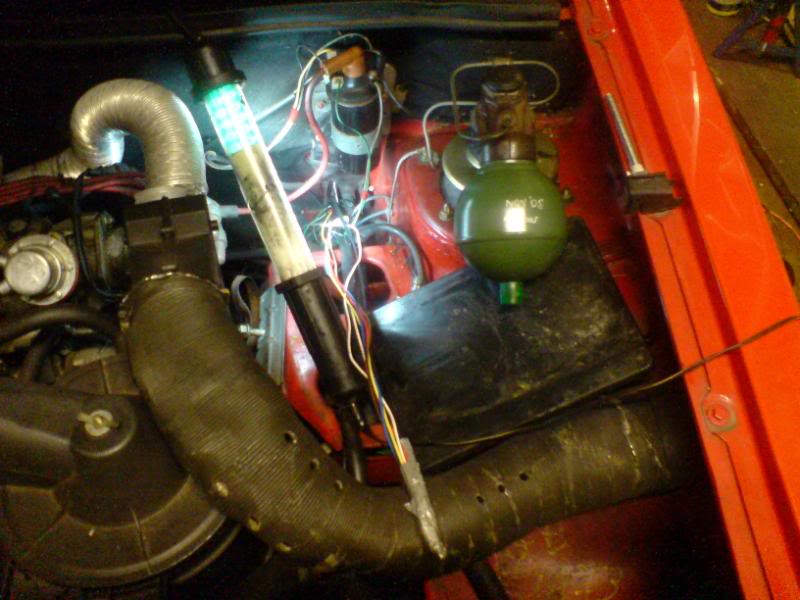
With it all through and the tape and welding wire off, it was just tied round the strut top to keep it out of the way while running the car until the various new bits were added and connected.
I drove around for a couple of weeks until the next batch of bits was ordered: lengths of the 6mm gas pipe from the tank to the evapourator to be fitted at the engine, the evapourator itself and some new 13mm cooling pipes and Ts to connect the evapourator to the hot water pipes somewhere.
Until these arrived an with Xmas about 2 weeks away I quickly fitted the 8mm gas pipe from the filler to the tank through the vent hole in the boot floor. This gas pipe was left over from the CX project back in May. I also had spare vent pipe to join the floor vent to the tank's gas tight multi valve housing. It needs to be this way because the tank has an overpressure releif valve that vents vapour off. This rarely needs to happen (and in our cold climate never does!) but if it does release it needs to be prevented from getting out into the boot and inside the car for obvious reasons! So the vent pipe was added to carry the gas pipes and join the vent of the tank to the floor vent. You can just see it part installed here
The black plastic flexi vent hose is only about 2" long for this installation and it was much narrower than the vent in the bottom plate of the tank so later I plan to fill the gap with Tiger sealant.
The 8mm pipe going through it and the floor to emerge here
and to connect to the already mounted filler point. The type of pipe connections is olive compression fittings.
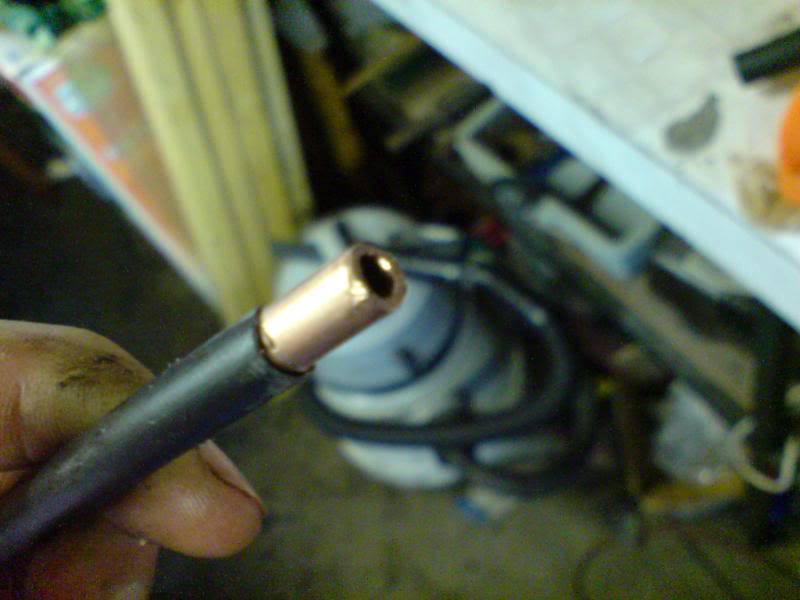
The ends of the copper gas pipes must be cut straight and filed to ensure a gas tight fit.
In the following days the parcel arrived:
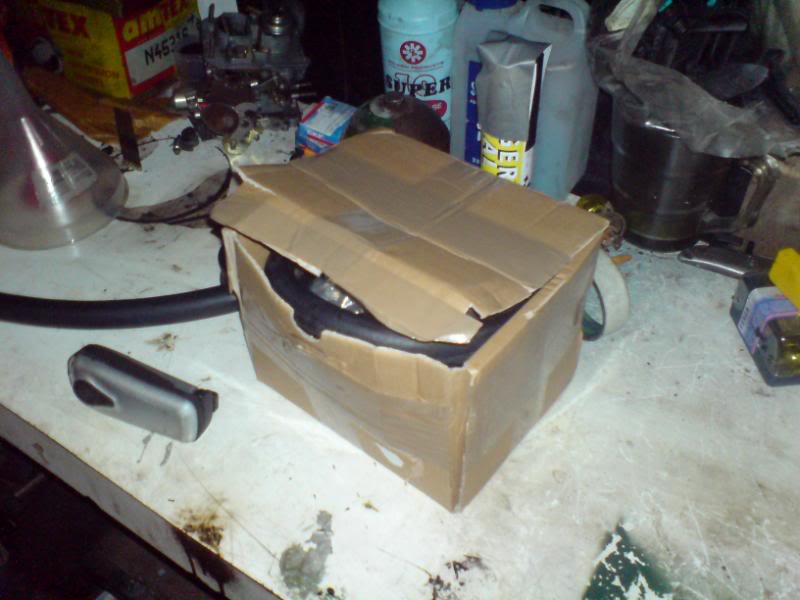
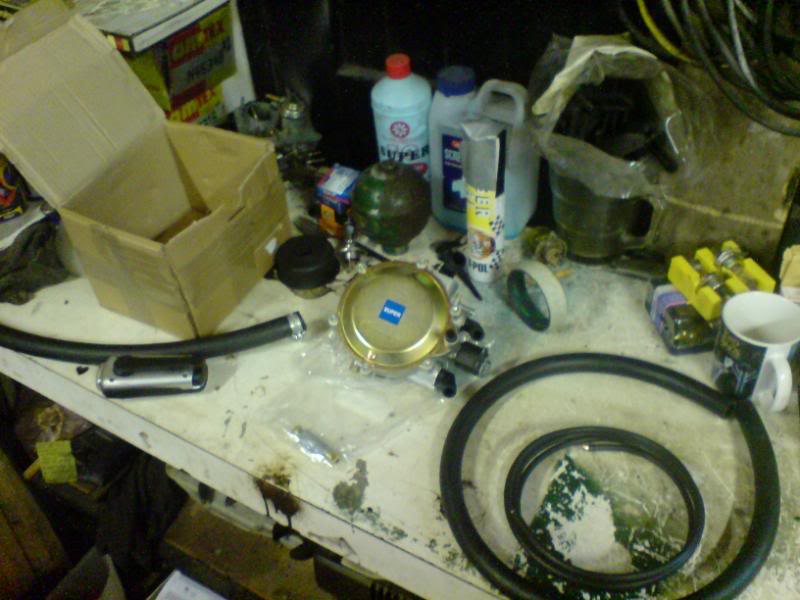
What's in there?
This stuff: the metallic thing in the center is the vapouriser - the main part of the system- all LPG systems have one of these in some form or other. And the other bits are the pipes.
I had already decided that the best place to fit the evapourator was going to be centrally above the rocker cover and fixed to the second bulkhead the BX has. The idea was that the best hot water pipe to connect the thing to was the hottest one emerging from the thermostat housing and going round the back of the engine to then turn and go into the bulkhead for the heater. It was ideal because it was coming straight out the cylinder head and was therefor hot, it exits without going through the thermostat and so will be heating up right from the start. It is also nicely straight travelling the length of the engine from the left to the right and had a long enough straight section below the convenient space above for the evapourator. It would have to be fitted with great care though as I learned doing the same part on the CX - the heater when it's set to cold stops the hot water flow and so the evapourator can freeze! I tested this on the BX by starting the engine from cold and setting the heater to cold - felt the pipe in question as it heated up and observed to see if the other pipe exiting the heater stayed cold (as on the CX) and found that it also heated up which meant that the BX heater matrix either disconnects its water flow from the hot water when set to cold but allows the flow to continue - ideal situation! The CX return water from the heater would remain cold in this test (on my early school CX with the pre-BEHR branded heater)
So it was also a good place for the evapourator because it's a pretty hot part of the engine room being at the top and back of the room.
So I checked there was enough room for the evapourator with the bonnet closed and that there was clearance for the rocker cover too.
In the meantime I pinched a bit off the sleeping CX.. it's gas mixer. The LPG system needs a thing called a mixer, it's usually an alloy ring that fits in the air intake just above or before the carburetor or with injection cars, between the air flow meter housing and the manifold. The mixer has a relatively wide venturi with a coaxial slit in it, the mixer has a hose connection just as the evapourator has a hose connector for the gas vapour outlet. When connected by a rubber LPG vapour hose the airflow through the manifold draws the vapour in through the mixer and through the carburetor using the carb's throttle valves as before. It means the connection between the mixer and the carb intake must be free of leaks.
Most mixers are the 'ring' type but the one I had got for the CX is a variable orifice mixer with a larger venturi but with a piston that varier it's position according to the airflow - just like the wonderful SU carburetors.
The variable mixer is better than the ring type by allowing greater airflow and also by not restricting the carburetor when running on petrol.
This type of mixer is designed by BRC an Italian company and named the 'BLOS' mixer. It is 80mm diameter and I had to make a pair of reducers to fit on the CX's surprisingly narrow air intake of 50mm. These needed to come off for the BX's 70mm intake.
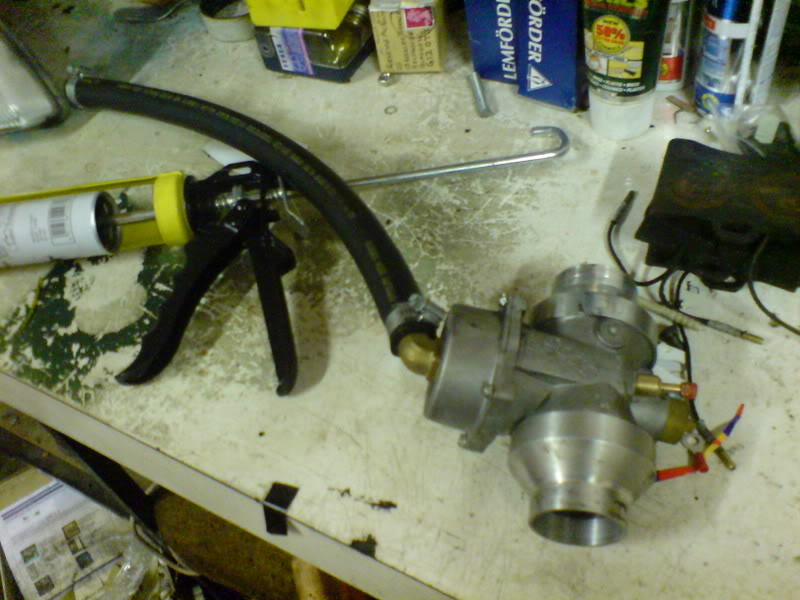
Here's the Blos mixer on the bench before fitting:
 - unlike a ring mixer, the Blos one has adjustments for mixture and idle in addition to the ones on the vapouriser unit.
And fitted:
- it has a direction of flow, and must be fitted with the cylinder top part inclined up from the horizontal ideally 45? but 10-20? is OK as it can be hard to get the angle and bonnet clearance together..
-I must have got the order of pix a bit mixed up because in that photo shows that the petrol shut off solenoid (blue thing) is already fitted! more of that soon.
The Mixer: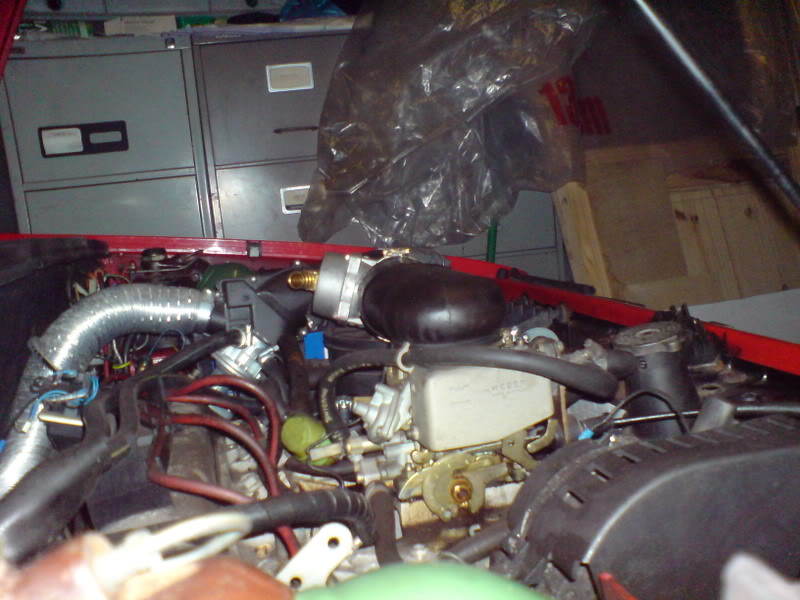
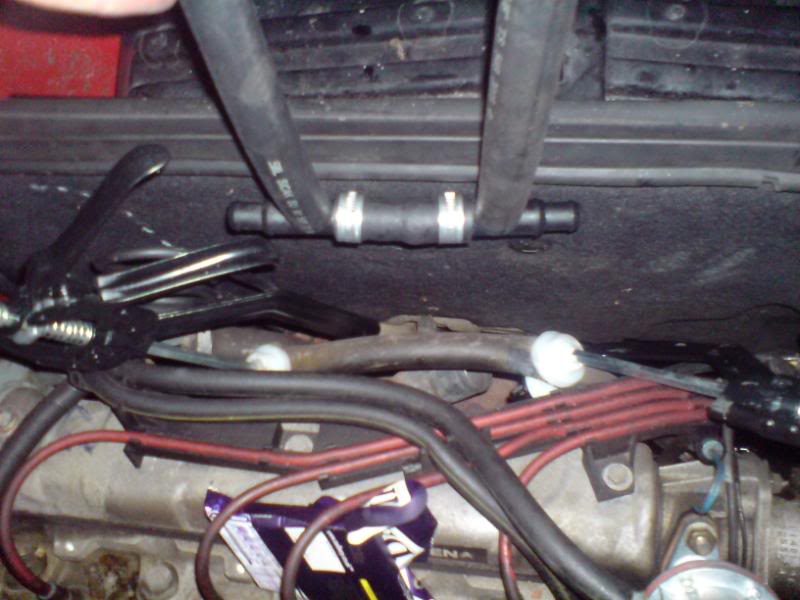
Next the 6mm gas pipe from the tank multi valve was routed under the car. It's always a job to decide the best route for it. It has to be away from the exhaust, should take as direct a route as possible and has to be securely fixed at 100mm intervals using the correct clips. I decided before even starting that the best route was from the boot floor vent, over to and along with the petrol filler pipe and then up and over the anti roll bar - routing well away from it and then straight under the petrol tank at the same route as the suspension manual height control rod (but closer to the tank) and then it was a straight route along the floor on the driver's side following the reinforced shape of the floor and not ruted with the petrol pipes towards the inner sill, this was because I wanted the pipe to be slightly higher than the other pipes to lower the risk of grounding and busting the pipe. It was then routed forward and up the front bulkhead, still as far from the exhaust as possible but closer to it than before. it was routed to the right of the steering column coupling and initially appeared to be fowling the coupling - that wouldn't do so it was pulled more to the right and then out the top to emerge like an antenna out from behind the engine.
Here it is and routed out of the way over the offside wing:
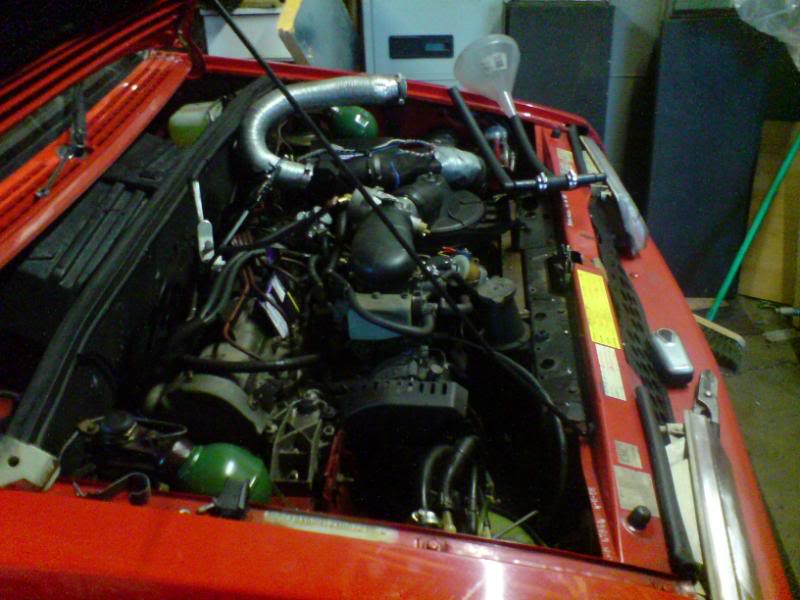
And here the evapourator is sitting unattached to anything while I verify if it's to be fitted in the absolute center above the engine or towards the outside a bit. Also note the choccy bar I was trying to warm up on the engine as it was like minus 2 that Sunday..

Once the location of the evapourator was finalised and the gas connection point of the pipe to the evapourator, I then coiled it a few times and cut and finished the end ready for fitting it to the evapourator at a later stage.
Coiled pipe ready to be attached once the evapourator was plumbed in:
Fitting the evapourator! this is a tricky bit because you need to cut existing water pipes that you've supposedly done your homework on! also you need to have checked the unit will fit and that the thing is not too far away from the mixer so the vapour only has to travel a short route. Also it has to be fitted very securely (I drilled a big hole in the second bulkhead but well above the 'water level') and you should still be able to reach the mixture and idle adjusters (on opposite sides!) but I thought I'd cracked it so went on to fitting the water pipes first.
Checked the measurements again:
I'd made up the new pipes and Ts on the bench (the T's are not actually connected straight as I blanked off the middle connection in case I had to modify it later) and with 2 clamps sealed off the water from major leakage when cut - it was like heart surgery! I set the heater to cold just in case.
Here I'm checking that my funnel actually fits the pipes before I cut the one on the car! I'll need to prime the pipes after fitting.
The heart bypass in place and the hose clips tightened (tricky and a fair bit of anti freeze soaking the exhaust downpipe!)
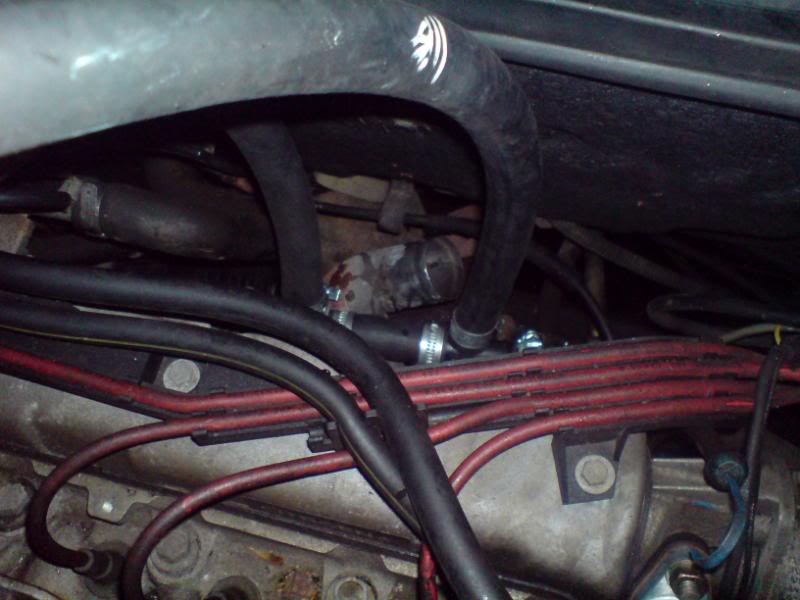
Here the 2 pipes connected - these will be filled with water - they're too long but previously marked for cutting. The bit of insulation cut out for mounting the evapourator to the bulkhead you can just see behind the pipes. Evapourator sitting waiting for its moment..
It's moment has come:
The pipes primed and the evapourator itself filled with water then connected to check pipes for kinks. Hose clips next.
Here is the switch and loom on the passenger seat
The aim was to feed the wiring all through the bulkhead grommet
But this turned out to be unfathomably tight! It was hard to feed even one wire through without some sort of 'threader' and in the end I decided to get a 10mm drill bit and drill the shit out of it (while cunningly not drilling any wires) it worked well to create a small tight extra path through the grommet but still I had to engage the brain to feed through the wires. Ideally I wanted to be pulling them through from the engine side so I wound a length of welding wire through through the wires and doubles them back, then taped them down and wound duct tape around the fold and wound to a point where the welding wire came out. I greased up the smoothed shape and fed the thin wire through and eventually found it on theother side. It was just a case of pulling the lot through with pliers.
Pulling through on the engine side:
Beginning to emerge:
Through!
With it all through and the tape and welding wire off, it was just tied round the strut top to keep it out of the way while running the car until the various new bits were added and connected.
I drove around for a couple of weeks until the next batch of bits was ordered: lengths of the 6mm gas pipe from the tank to the evapourator to be fitted at the engine, the evapourator itself and some new 13mm cooling pipes and Ts to connect the evapourator to the hot water pipes somewhere.
Until these arrived an with Xmas about 2 weeks away I quickly fitted the 8mm gas pipe from the filler to the tank through the vent hole in the boot floor. This gas pipe was left over from the CX project back in May. I also had spare vent pipe to join the floor vent to the tank's gas tight multi valve housing. It needs to be this way because the tank has an overpressure releif valve that vents vapour off. This rarely needs to happen (and in our cold climate never does!) but if it does release it needs to be prevented from getting out into the boot and inside the car for obvious reasons! So the vent pipe was added to carry the gas pipes and join the vent of the tank to the floor vent. You can just see it part installed here
The black plastic flexi vent hose is only about 2" long for this installation and it was much narrower than the vent in the bottom plate of the tank so later I plan to fill the gap with Tiger sealant.
The 8mm pipe going through it and the floor to emerge here
and to connect to the already mounted filler point. The type of pipe connections is olive compression fittings.
The ends of the copper gas pipes must be cut straight and filed to ensure a gas tight fit.
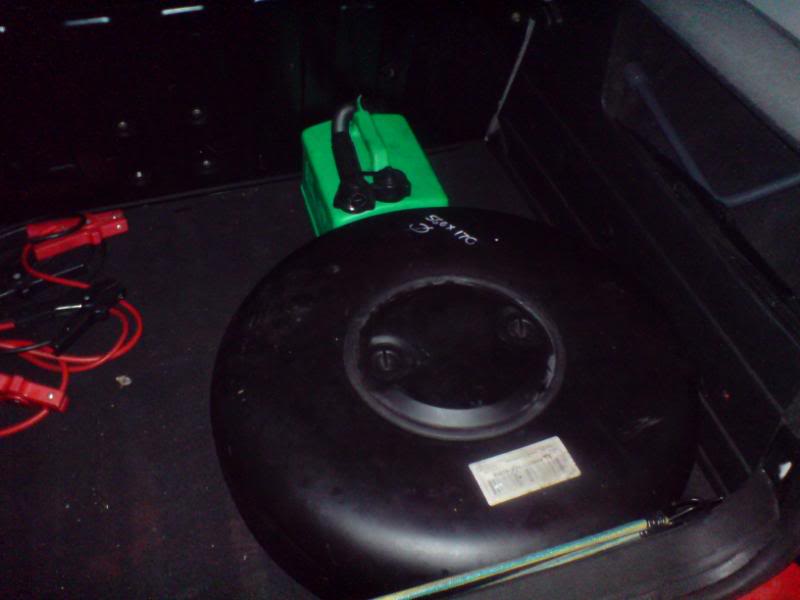
In the following days the parcel arrived:
What's in there?
This stuff: the metallic thing in the center is the vapouriser - the main part of the system- all LPG systems have one of these in some form or other. And the other bits are the pipes.
I had already decided that the best place to fit the evapourator was going to be centrally above the rocker cover and fixed to the second bulkhead the BX has. The idea was that the best hot water pipe to connect the thing to was the hottest one emerging from the thermostat housing and going round the back of the engine to then turn and go into the bulkhead for the heater. It was ideal because it was coming straight out the cylinder head and was therefor hot, it exits without going through the thermostat and so will be heating up right from the start. It is also nicely straight travelling the length of the engine from the left to the right and had a long enough straight section below the convenient space above for the evapourator. It would have to be fitted with great care though as I learned doing the same part on the CX - the heater when it's set to cold stops the hot water flow and so the evapourator can freeze! I tested this on the BX by starting the engine from cold and setting the heater to cold - felt the pipe in question as it heated up and observed to see if the other pipe exiting the heater stayed cold (as on the CX) and found that it also heated up which meant that the BX heater matrix either disconnects its water flow from the hot water when set to cold but allows the flow to continue - ideal situation! The CX return water from the heater would remain cold in this test (on my early school CX with the pre-BEHR branded heater)
So it was also a good place for the evapourator because it's a pretty hot part of the engine room being at the top and back of the room.
So I checked there was enough room for the evapourator with the bonnet closed and that there was clearance for the rocker cover too.
In the meantime I pinched a bit off the sleeping CX.. it's gas mixer. The LPG system needs a thing called a mixer, it's usually an alloy ring that fits in the air intake just above or before the carburetor or with injection cars, between the air flow meter housing and the manifold. The mixer has a relatively wide venturi with a coaxial slit in it, the mixer has a hose connection just as the evapourator has a hose connector for the gas vapour outlet. When connected by a rubber LPG vapour hose the airflow through the manifold draws the vapour in through the mixer and through the carburetor using the carb's throttle valves as before. It means the connection between the mixer and the carb intake must be free of leaks.
Most mixers are the 'ring' type but the one I had got for the CX is a variable orifice mixer with a larger venturi but with a piston that varier it's position according to the airflow - just like the wonderful SU carburetors.
The variable mixer is better than the ring type by allowing greater airflow and also by not restricting the carburetor when running on petrol.
This type of mixer is designed by BRC an Italian company and named the 'BLOS' mixer. It is 80mm diameter and I had to make a pair of reducers to fit on the CX's surprisingly narrow air intake of 50mm. These needed to come off for the BX's 70mm intake.
Here's the Blos mixer on the bench before fitting:
- unlike a ring mixer, the Blos one has adjustments for mixture and idle in addition to the ones on the vapouriser unit.And fitted:
- it has a direction of flow, and must be fitted with the cylinder top part inclined up from the horizontal ideally 45? but 10-20? is OK as it can be hard to get the angle and bonnet clearance together..
-I must have got the order of pix a bit mixed up because in that photo shows that the petrol shut off solenoid (blue thing) is already fitted! more of that soon.
The Mixer:
Next the 6mm gas pipe from the tank multi valve was routed under the car. It's always a job to decide the best route for it. It has to be away from the exhaust, should take as direct a route as possible and has to be securely fixed at 100mm intervals using the correct clips. I decided before even starting that the best route was from the boot floor vent, over to and along with the petrol filler pipe and then up and over the anti roll bar - routing well away from it and then straight under the petrol tank at the same route as the suspension manual height control rod (but closer to the tank) and then it was a straight route along the floor on the driver's side following the reinforced shape of the floor and not ruted with the petrol pipes towards the inner sill, this was because I wanted the pipe to be slightly higher than the other pipes to lower the risk of grounding and busting the pipe. It was then routed forward and up the front bulkhead, still as far from the exhaust as possible but closer to it than before. it was routed to the right of the steering column coupling and initially appeared to be fowling the coupling - that wouldn't do so it was pulled more to the right and then out the top to emerge like an antenna out from behind the engine.
Here it is and routed out of the way over the offside wing:
And here the evapourator is sitting unattached to anything while I verify if it's to be fitted in the absolute center above the engine or towards the outside a bit. Also note the choccy bar I was trying to warm up on the engine as it was like minus 2 that Sunday..
Once the location of the evapourator was finalised and the gas connection point of the pipe to the evapourator, I then coiled it a few times and cut and finished the end ready for fitting it to the evapourator at a later stage.
Coiled pipe ready to be attached once the evapourator was plumbed in:
Fitting the evapourator! this is a tricky bit because you need to cut existing water pipes that you've supposedly done your homework on! also you need to have checked the unit will fit and that the thing is not too far away from the mixer so the vapour only has to travel a short route. Also it has to be fitted very securely (I drilled a big hole in the second bulkhead but well above the 'water level') and you should still be able to reach the mixture and idle adjusters (on opposite sides!) but I thought I'd cracked it so went on to fitting the water pipes first.
Checked the measurements again:
I'd made up the new pipes and Ts on the bench (the T's are not actually connected straight as I blanked off the middle connection in case I had to modify it later) and with 2 clamps sealed off the water from major leakage when cut - it was like heart surgery! I set the heater to cold just in case.
Here I'm checking that my funnel actually fits the pipes before I cut the one on the car! I'll need to prime the pipes after fitting.
The heart bypass in place and the hose clips tightened (tricky and a fair bit of anti freeze soaking the exhaust downpipe!)
Here the 2 pipes connected - these will be filled with water - they're too long but previously marked for cutting. The bit of insulation cut out for mounting the evapourator to the bulkhead you can just see behind the pipes. Evapourator sitting waiting for its moment..
It's moment has come:
The pipes primed and the evapourator itself filled with water then connected to check pipes for kinks. Hose clips next.
Graeme M
CX 2400 Pallas LPG
2CV6 dolly (SORNed)
Mk1 Xantia 1.9TD SX
'c'est hydropneumatique'
CX 2400 Pallas LPG
2CV6 dolly (SORNed)
Mk1 Xantia 1.9TD SX
'c'est hydropneumatique'
-
jonathan_dyane

- BXpert
- Posts: 975
- Joined: Sat Feb 09, 2008 7:15 pm
- Location: Liverpool
-
Aerodynamica
- BXpert
- Posts: 793
- Joined: Sat Jun 07, 2008 11:43 pm
- Location: Glasgow
-
Aerodynamica
- BXpert
- Posts: 793
- Joined: Sat Jun 07, 2008 11:43 pm
- Location: Glasgow
Righty,
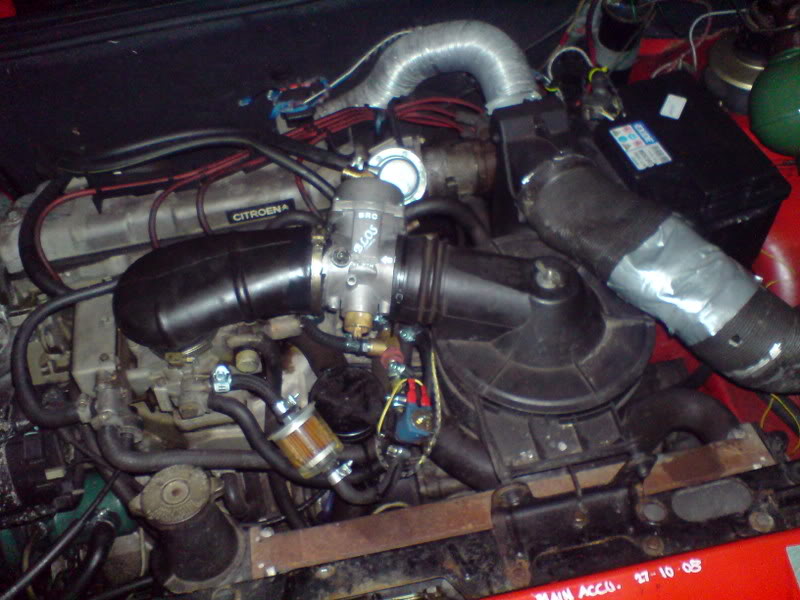
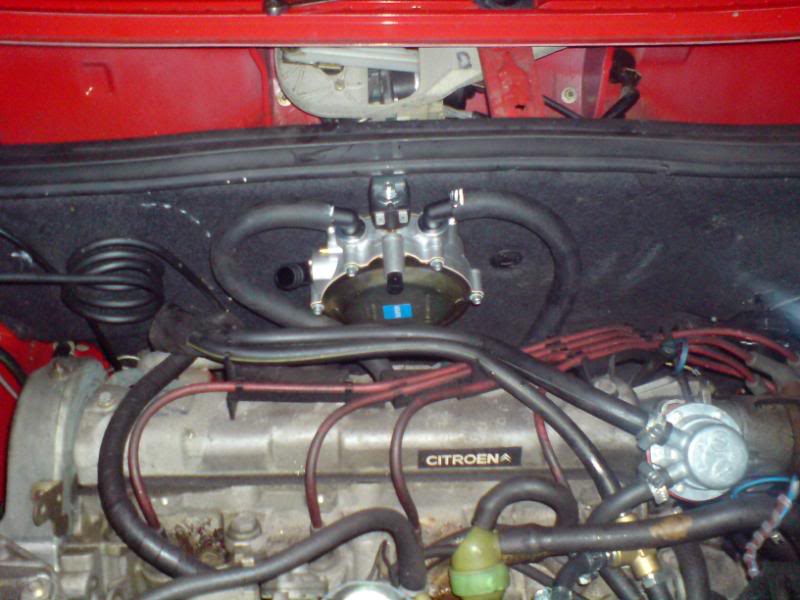
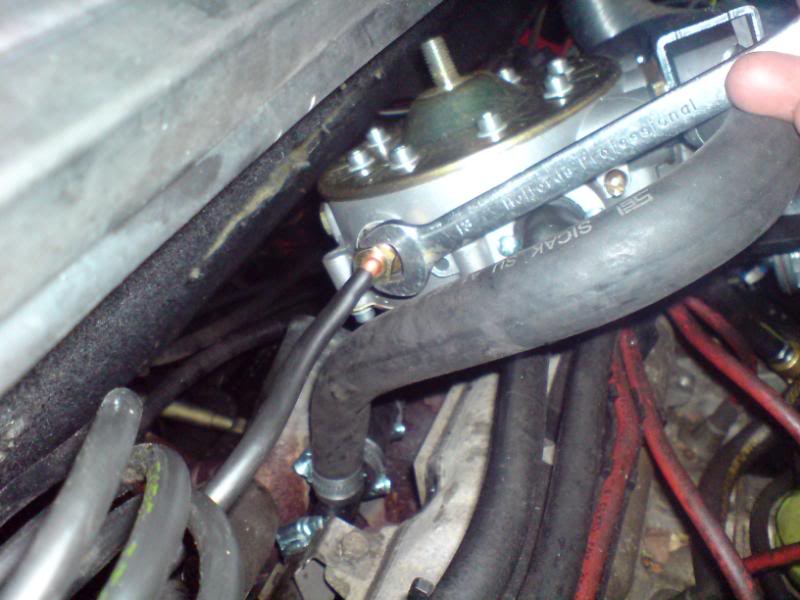
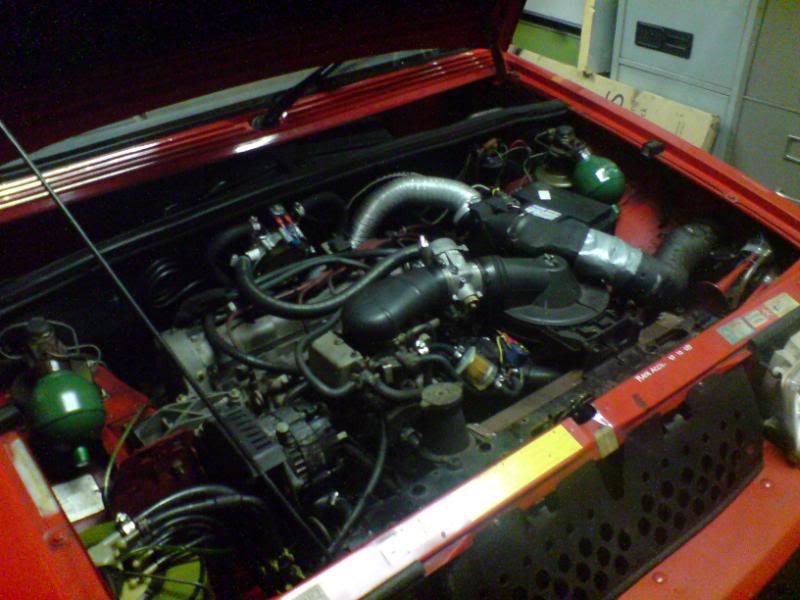
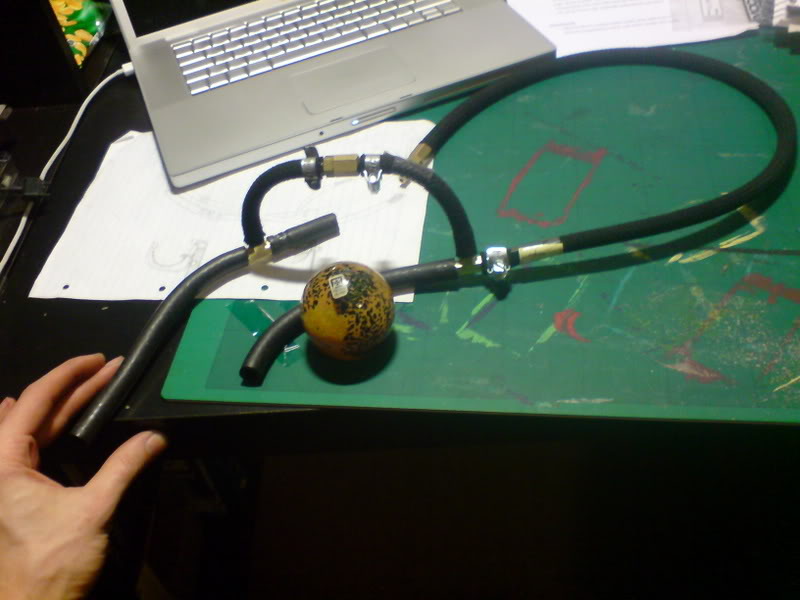
well now that the tank, pipes, filler, wiring and evapourator were in place and the tank was now securely anchored to the boot floor with 2 M10 screws and a series of BIG washers the next thing was to connect the 6mm copper gas pipe to the evapourator now fitted in the engine bay.
The coiled bit allows for movement and adjustment but stops near the pipe connection on the evapourator anyway so was fairly easy to line up after cutting and finishing the pipe end and fitting the union nut and olive.
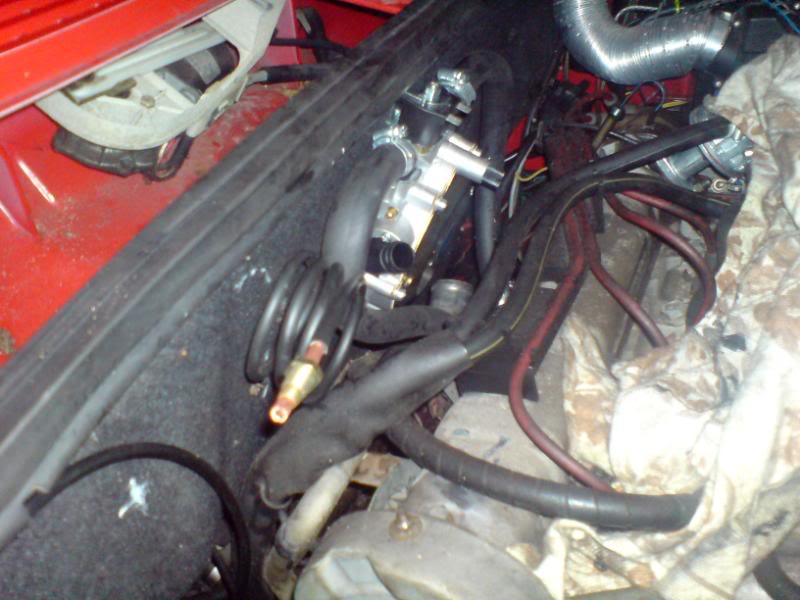
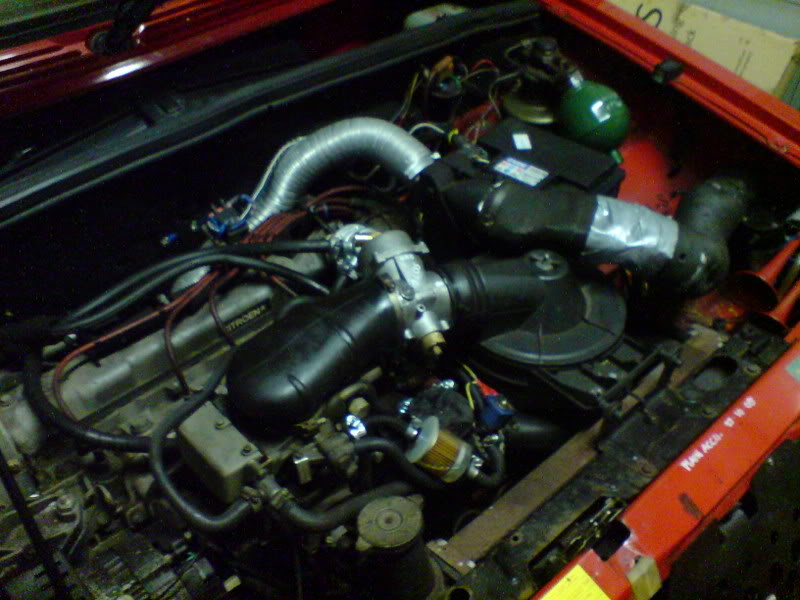
You can see that the evapourator does have fairly good clearance around it
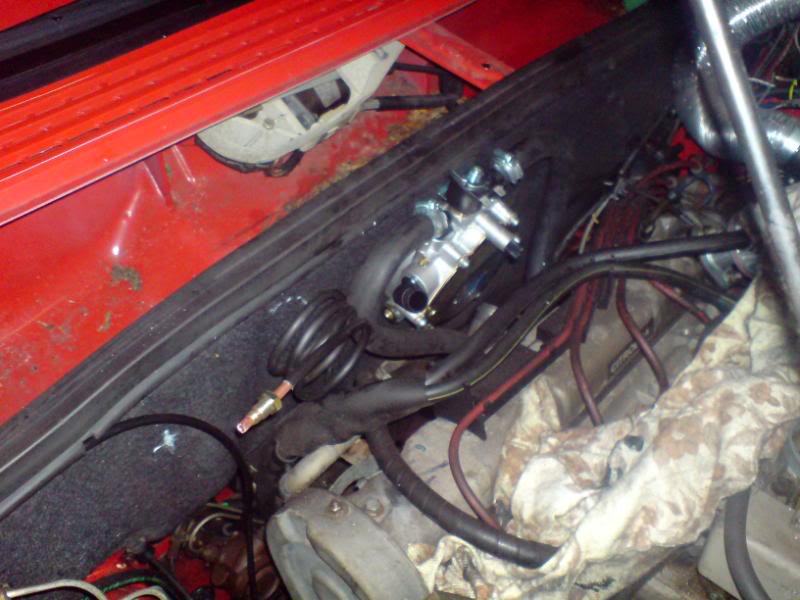
Took the evapourator off again to manoeuver it to help get the pipe in place and the union nut threads straight - these connections suffer from the same problems as the hydraulic pipe connections on the car!! -get the pipe angle wrong or a bend and you can't get it to thread easily.
Then all that's left is to fit the gas vapour pipe between the evapo and the mixer on the intake and connect the insulated spade connections.
Most LPG vapour pipes have a 'power valve' restrictor fitted in them but I still don't really know why it's needed so left it out for now though I have got one available.
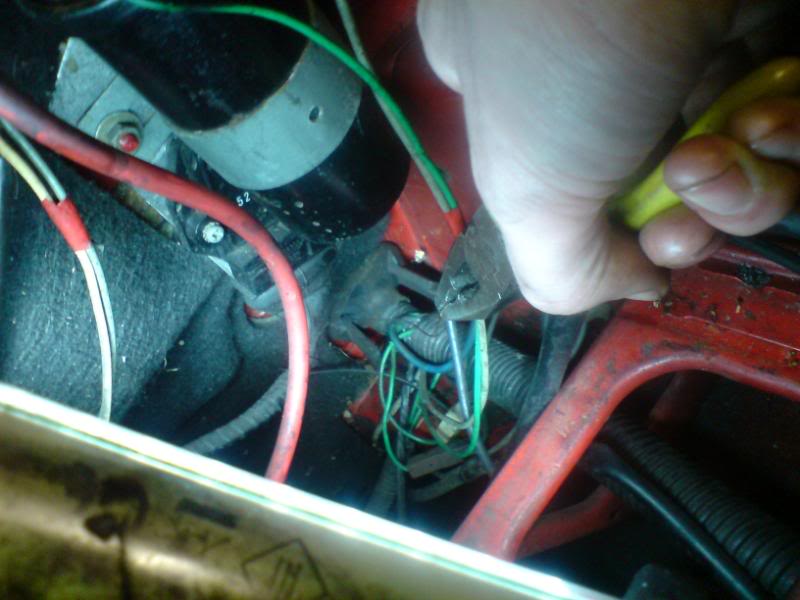
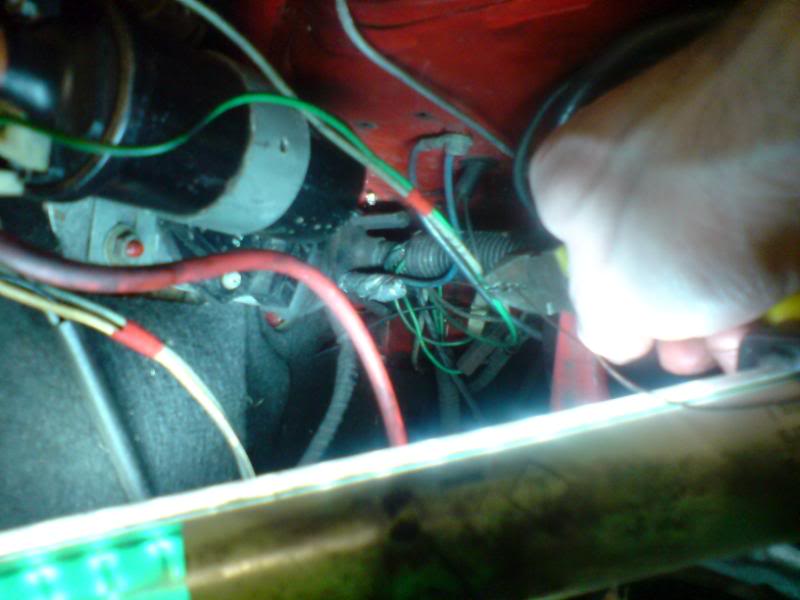
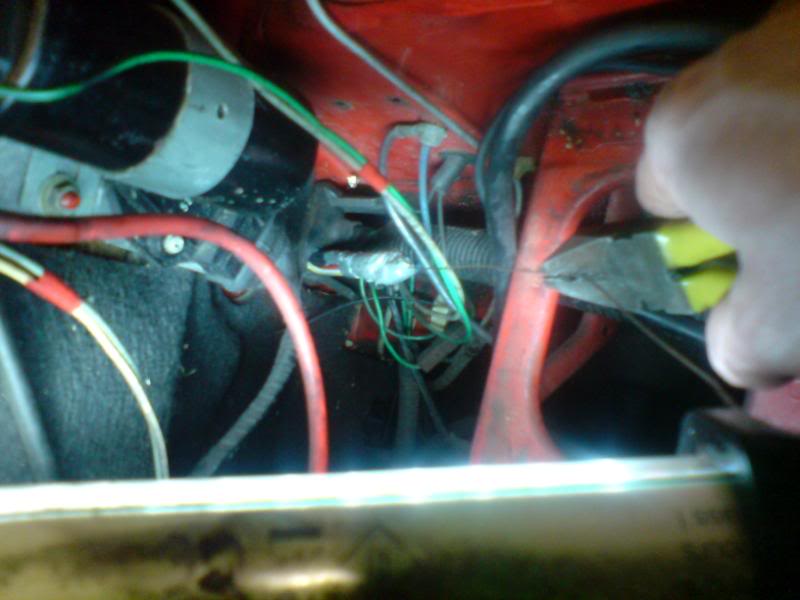
All the basic bits fitted and after going around all the gas connections once more to check their tightness it was just a case of connecting the wiring up at the tank multi valve:
These wires are additional to the loom that came with the electronic switch. I just got wire from Maplin along the road here. The 3 wires are 12v from the +ve connection on the evapourator solenoid running all the way back from the engine bay to the tank solenoid so that they both activate/deactivate together, one earth wire taking the same route but connected with all the other earths at the battery -ve and finally the signal wire from the gauge on the tank. The 3 wires are loomed together and travel under the central console under the rear carpet and rear seat and then round the side of the rear seat back hinge with the tail lights wiring to emerge in the corner of the boot. Then the wires go through a grommet in a hole in the boot floor and back to the floor vent of the tank pipes to travel up to the multi valve connectors. It was pretty labour intensive to get the wires under the rear carpet!
Finally, the petrol shut off.
well now that the tank, pipes, filler, wiring and evapourator were in place and the tank was now securely anchored to the boot floor with 2 M10 screws and a series of BIG washers the next thing was to connect the 6mm copper gas pipe to the evapourator now fitted in the engine bay.
The coiled bit allows for movement and adjustment but stops near the pipe connection on the evapourator anyway so was fairly easy to line up after cutting and finishing the pipe end and fitting the union nut and olive.
You can see that the evapourator does have fairly good clearance around it
Took the evapourator off again to manoeuver it to help get the pipe in place and the union nut threads straight - these connections suffer from the same problems as the hydraulic pipe connections on the car!! -get the pipe angle wrong or a bend and you can't get it to thread easily.
Then all that's left is to fit the gas vapour pipe between the evapo and the mixer on the intake and connect the insulated spade connections.
Most LPG vapour pipes have a 'power valve' restrictor fitted in them but I still don't really know why it's needed so left it out for now though I have got one available.
All the basic bits fitted and after going around all the gas connections once more to check their tightness it was just a case of connecting the wiring up at the tank multi valve:
These wires are additional to the loom that came with the electronic switch. I just got wire from Maplin along the road here. The 3 wires are 12v from the +ve connection on the evapourator solenoid running all the way back from the engine bay to the tank solenoid so that they both activate/deactivate together, one earth wire taking the same route but connected with all the other earths at the battery -ve and finally the signal wire from the gauge on the tank. The 3 wires are loomed together and travel under the central console under the rear carpet and rear seat and then round the side of the rear seat back hinge with the tail lights wiring to emerge in the corner of the boot. Then the wires go through a grommet in a hole in the boot floor and back to the floor vent of the tank pipes to travel up to the multi valve connectors. It was pretty labour intensive to get the wires under the rear carpet!
Finally, the petrol shut off.
Graeme M
CX 2400 Pallas LPG
2CV6 dolly (SORNed)
Mk1 Xantia 1.9TD SX
'c'est hydropneumatique'
CX 2400 Pallas LPG
2CV6 dolly (SORNed)
Mk1 Xantia 1.9TD SX
'c'est hydropneumatique'
-
frugg
- BXpert
- Posts: 229
- Joined: Mon May 26, 2008 8:44 pm
-
Aerodynamica
- BXpert
- Posts: 793
- Joined: Sat Jun 07, 2008 11:43 pm
- Location: Glasgow
- you seem to know me well now!2cv's turn next
- seriously though, Citroens are ideal for this mod because they have proper alloy cylinder head and proper hard valve seats so they're OK on UL petrol and ok for LPG gas!
The 2CV poses the challenge of finding an effective way of heating the evapourator but the 2cv would be really good economy wise on it.
The BX returned about 33mpg on a blast last Sunday to test it out on gas but if LPG costs about half of petrol that's the equivalent cost of 66mpg ftw! I dunno what a 2CV will do but if it can do 48 mpg on gas then it would be equivalent 96mpg! but I don't know what it'll do.
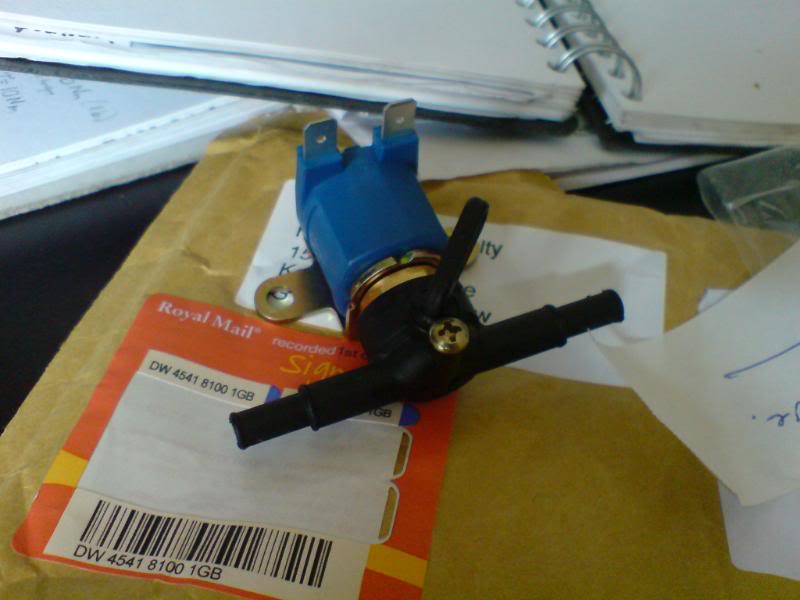
Anyway the next bit was the Petrol shut off: Simply, there's a shut off valve fitted in the petrol pipe after the petrol pump and before the carburetor. When this closes via the electronic switch, the engine is still turning and hence, the petrol pump is delivering petrol against the closed valve - it has nowhere to go so what do ya do? well a T piece is fitted just before the shut off valve and it joins the petrol return pipe next to the supply pipe. You simply fit a one way valve in this joining pipe to stop cross over when on petrol and a second one way valve on the return pipe near the carburetor to stop petrol being pumped into the return of the carb but to allow the return to flow out when on petrol.
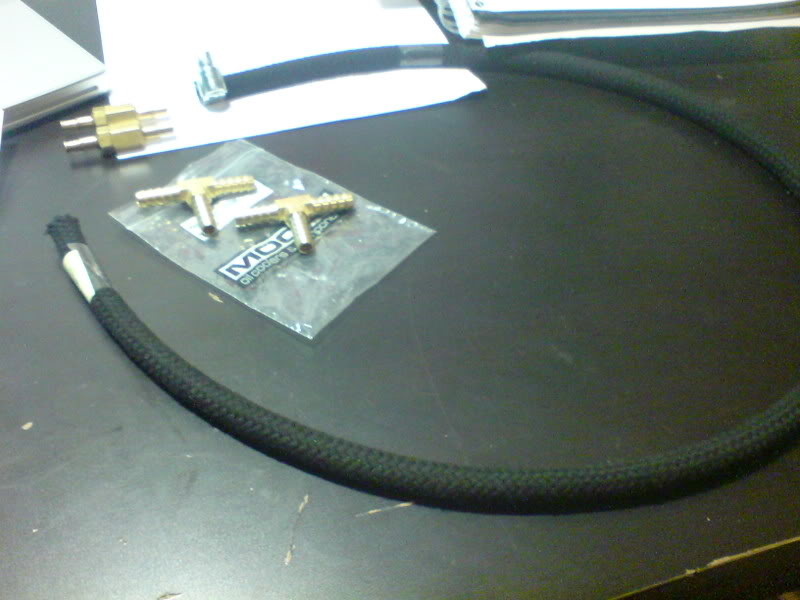
Here are the bits to add:
The shut off valve:
The Ts, one-way valves and extra petrol pipe
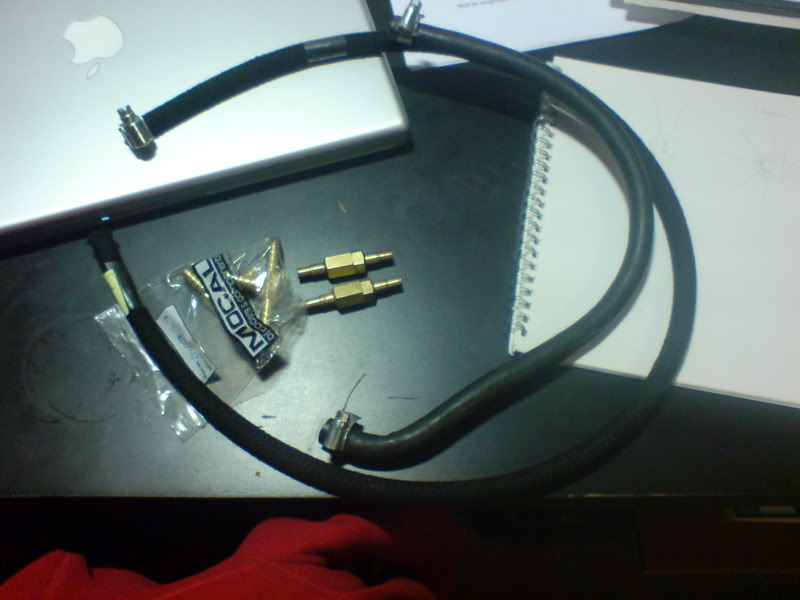
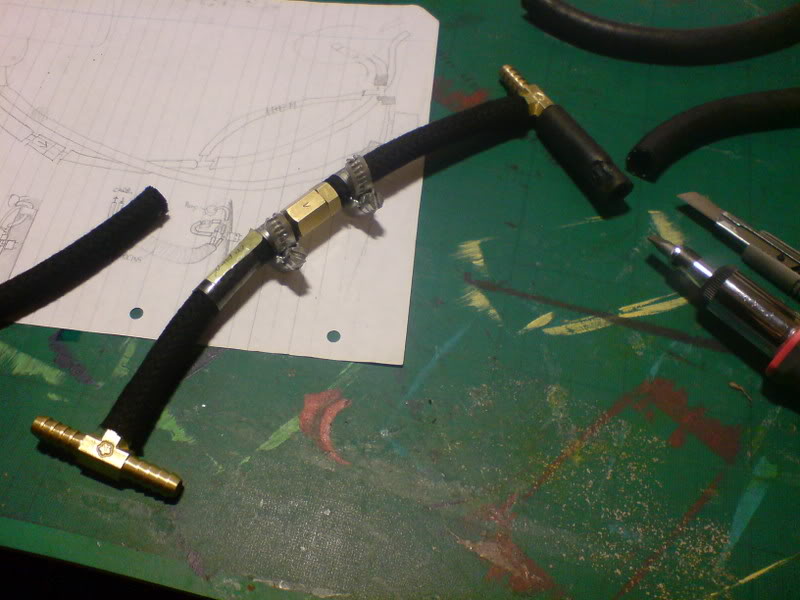
Here's the main parts together - the round thing is a paperweight!
This lot fits in pretty snugly between the petrol pump and the carb under the air intake.
Graeme M
CX 2400 Pallas LPG
2CV6 dolly (SORNed)
Mk1 Xantia 1.9TD SX
'c'est hydropneumatique'
CX 2400 Pallas LPG
2CV6 dolly (SORNed)
Mk1 Xantia 1.9TD SX
'c'est hydropneumatique'
-
mat_fenwick
- Moderator
- Posts: 7330
- Joined: Tue Sep 20, 2005 4:08 pm
- Location: North Wales
- x 22
Very interesting blog and photos Graeme...I have a variable venturi mixer like the one you have, but the LPG 'specialist' who checked over the Disco to give it a safety cert said they couldn't get it to run right with it on, and replaced it with a plain mixer ring. 
Oooh, and one other thing - I was told that the vapouriser should be mounted at 90 degrees to the angle yours is, so that acceleration/decceleration does not affect the diaphragm. Having said that, if you have experience to show that it doesn't affect it in real life, then feel free to ignore the advice!
Oooh, and one other thing - I was told that the vapouriser should be mounted at 90 degrees to the angle yours is, so that acceleration/decceleration does not affect the diaphragm. Having said that, if you have experience to show that it doesn't affect it in real life, then feel free to ignore the advice!

1993 1.9 TZD Turbo Estate
1996 3.9 V8 Discovery
1993 VW LT35 campervan
1985 Hyundai Stellar V8
2016 Hyundai iLoad
-
Aerodynamica
- BXpert
- Posts: 793
- Joined: Sat Jun 07, 2008 11:43 pm
- Location: Glasgow
Hi Mat, that's interesting - I didn't know that ( it's hard to find comprehensive info on fitting) I didn't realise the diaphragm was so sensitive to momentum/inertia! I'll watch out for that! - though i must say it seems to run perfectly, the CX however has at times displayed an occasional loss of power having braked then accelerated again and it has a vapouriser mounted in a similar orientation - I wonder... funnily enough the guy at the garage I got the safety inspection for the CX didn't say anything about it. O well I'll see how it goes and if it has to be done then it'll be moved (would be a shame as it's so neat in that position and heats up very quickly!)and one other thing - I was told that the vapouriser should be mounted at 90 degrees to the angle yours is, so that acceleration/decceleration does not affect the diaphragm. Having said that, if you have experience to show that it doesn't affect it in real life, then feel free to ignore the advice!
What did you do with the variable mixer you couldn't get to work? is it an Item you'd be wanting to move on? I should say though that it doesn't seem to work on the BX properly either - the vacuum appears too low (?) but it works very well on the CX.
What sort of performance and economy are you getting on the Land Rover?
Anyway thanks for the info!
Graeme M
CX 2400 Pallas LPG
2CV6 dolly (SORNed)
Mk1 Xantia 1.9TD SX
'c'est hydropneumatique'
CX 2400 Pallas LPG
2CV6 dolly (SORNed)
Mk1 Xantia 1.9TD SX
'c'est hydropneumatique'
-
velosolex50
- Confirmed BX'er
- Posts: 80
- Joined: Sat May 06, 2006 10:10 pm
- Location: Isle of Man
aircooled lpg
I gassed a vw camper a couple of years ago, and after endless faffing about with screenwasher pumps & coils of pipe round/in the exhaust, several episodes of frozen evaporator (they can take a lot of thawing out!) I finally fitted an exhaust probe on the silencer, which was then totally trouble free. I got it from a company ( FES autogas) in snowdonia that has done a few VWs. Expensive, but well made, and no problem with freezing up afterwards. Highly recommended solution, but not sure what the LPG inspectors would say----I had mine certified earlier with the heath robinson water heating arrangements. Good luck!
-
Aerodynamica
- BXpert
- Posts: 793
- Joined: Sat Jun 07, 2008 11:43 pm
- Location: Glasgow
Cheers M!,
velosolex, that's interesting too! what is an exhaust probe? I've heard the term before but not certain as to what it actually is!
I wonder why the coils of pipe round the hot exhaust doesn't move enough heat to stop the freezing - maybe too much loss or too low a rate of heat transfer?
An idea that Jonathan had was to fit a water- oil heat exchanger in place of the 2CV or GSA oil cooler but he ran into some trouble with this.
Anyway, I took the BX to work today due to sleeping in /laziness and noticed how crap the near side doors look with their dents. I hadn't seen the BX in daylight for many weeks. I really need a replacement pair of doors - I have ear marked the ones of the poor 16V that's getting broken but that's white and needs painting red and the paint matched - more horrible expense if I want it done properly and one thing I don't DIY is spray painting due to lack of facilities and confidence.
Graeme M
CX 2400 Pallas LPG
2CV6 dolly (SORNed)
Mk1 Xantia 1.9TD SX
'c'est hydropneumatique'
CX 2400 Pallas LPG
2CV6 dolly (SORNed)
Mk1 Xantia 1.9TD SX
'c'est hydropneumatique'
-
MULLEY

- Over 2k
- Posts: 8406
- Joined: Thu Jun 22, 2006 11:10 pm
- Location: Derbyshire
- My Cars: 1999 Xsara LX 2.0HDI (90) Hatch - Fern
2002 C5 2.0 HDI (110) Estate - Jasmine - SORN
2011 Mini Cooper D Clubman - SOLD
2016 Mercedes A180D Sport - Auto refinement
1992 TZD Turbo - Bluebell - SORN
1992 TZD Turbo Estate - SORN
1991 Gti 16V - Blaze - crash damaged, will get repaired - SORN
1990 Gti 8Valve SOLD - looks like it's been scrapped
2002 Mini Cooper S - SOLD - i miss this car
1992 TXD - Scrapped in March 2014
1988 CX 25 GTI Turbo2 - SORN
1996 - AX Memphis 1.5D - Dream - SORN - x 8
Isn't most of the expense of painting, the labour for taking the door trim off, & then sanding everything down & then cleaning them, if you could do all that surely painting cant be that expensive?
But then again i dont have a clue about these sorts of costs, except my TZD was resprayed & that cost £500 to do the whole car, a couple of doors cant be that much....
But then again i dont have a clue about these sorts of costs, except my TZD was resprayed & that cost £500 to do the whole car, a couple of doors cant be that much....
2002 C5 2.0 HDI Estate - Jasmine - Now SORN
2011 Mini Cooper D Clubman - SOLD
2016 Mercedes A180D Sport - Auto refinement
1992 TZD Turbo - Bluebell - My daily
1991 Gti 16V - Blaze - crash damaged, will get repaired.
1990 Gti 8Valve SOLD - looks like it's been scrapped
2002 Mini Cooper S - SOLD - i miss this car
1992 TXD - Scrapped in March 2014
1988 CX 25 GTI Turbo2 - SORN
1996 - AX Memphis 1.5D - Dream - SORN
I'm not just a username, i'm also called Matthew.
-
Aerodynamica
- BXpert
- Posts: 793
- Joined: Sat Jun 07, 2008 11:43 pm
- Location: Glasgow
I'd say you're right Mulley, when I had Aphrodite the CX repainted back in 2007 I supplied the paint, hardener, clear coat and car and the guy painted it in a booth for £250 - it took him a day so he did well! But I felt it was a bargain compared to the prices 'professional' places charge for a CX sized car. The paint cost about £100 and the hardener and topcoat (can't recall but I'll say:) another £50-70 so all in all it was not the kind of prices the 'restorers' charge. If I get the paint mixed myself and the doors prepped then the same guy should do it for a fair charge.
The guy who painted the CX, Ally, he teaches vehicle spray painting at one of the colleges here in Glasgow and I was put in touch with him via my artist mate Steve (fellow Citroen fanatic) after Ally had done his CX a year before.
I don't mean to come across as a cheap skate but i am pretty much devoid of the green stuff.
Anyway, await a future episode of Cyril's progress for this paint project..
Graeme M
CX 2400 Pallas LPG
2CV6 dolly (SORNed)
Mk1 Xantia 1.9TD SX
'c'est hydropneumatique'
CX 2400 Pallas LPG
2CV6 dolly (SORNed)
Mk1 Xantia 1.9TD SX
'c'est hydropneumatique'